661
Endodontic treatment of a tooth involves invading its internal cavities - the pulp chamber and root canals for treatment (vitalization) or removal of the pulp.
The location of the opening may be the bottom of the carious cavity or the undamaged, intact surface of the tooth.
The essence and purpose of manipulation
Tooth trephination (Greek Trypanon - trephine, drill) is the initial stage of endodontic treatment, which involves opening the top of the pulpous chamber, removing the pulp located in the coronal part, and creating access to the mouths of the tooth root canals.
This procedure is also called “crown expansion” or “endodontic coronal preparation.”
It should be noted that trephination does not involve expanding or changing the shape of the dental cavity and penetrating the tooth canals. Its more modest task is to open the crown cavity and provide access to the mouth of the root canals. The operation can be performed on both natural and artificial crowns.
According to the general medical classification, trephination is indicated by code A 16. 07. 092, where “A” means medical, indicating that this is a surgical intervention, “07” - that it is carried out in the oral cavity, and “092” indicates that this the procedure, in fact, is trepanation.
Trepanation of teeth in a child - trepanation of baby teeth
In temporary teeth, when the pulp is exposed by caries, trephination is performed along with amputation of the ventricular pulp, leaving living pulp in the canals. On the other hand, removal of the pulp of primary teeth is rarely carried out - as in the case of a missing root of a permanent tooth.
In the case of dead primary teeth with a fistula, they are opened and washed with hydrogen peroxide. You can conditionally leave a baby tooth open as a “space limiter” for a permanent analogue. The parent is then instructed on how to care for it - it becomes necessary to thoroughly clean it every day with rinsing with hydrogen peroxide and the ability to insert cotton wool every day - so as not to clog the chamber with food. However, in case of exacerbation of symptoms (for example, pain or activation of the fistula) or contraindications (for example, in children with immunodeficiency or heart defects), such a tooth must be removed.
About
Indications
Trephination is the first stage of endodontic treatment; it is indicated in all cases where it is necessary to penetrate inside the tooth for its treatment (vitalization or pulp removal, obturation of dental canals, installation of a pin or other operations).
Most often, trepanation is performed in the following cases.
- The presence of a deep carious cavity in the area of the clinical crown of the tooth with a thin or completely absent septum between it and the pulpous chamber.
Even if the thin wall is preserved, it is capable of allowing pathogenic microorganisms to pass through, resulting in possible infection of the pulp. Therefore, if appropriate symptoms are present, the doctor may consider trepanation of the tooth necessary. - Chronic or acute pulpitis.
- Any form of periodontitis.
A contraindication to trepanation is the impossibility of restoring the functionality of the tooth and the need for its removal:
- impassable, curved root canals;
- severe periodontal damage;
- tooth root fracture.
In all these cases, the tooth is simply removed.
Why does a tooth hurt when you press it, and what to do in such a situation.
Visit here to learn more about the signs of dental pulp necrosis.
At this address we will tell you whether garlic works against toothache.
Trephination of a vital tooth – how does it work?
To open the chamber of a living tooth, local anesthesia is required. The next step is pulp extirpation (removing it from the root canals of the tooth), as well as preparing and filling the canals.
In emergency situations, trephination of the pulp chamber and placement of a devitalization insert for 10–14 days until the next visit is still common. Then the tooth may hurt on the first day. However, it is now recommended to avoid pulp devitalization (commonly known as "tooth poisoning") and remove it through the vital portion (under anesthesia).
Preparatory stage
Trepanation should be preceded by a diagnosis, a complete assessment of the condition of the crown of the tooth, its roots, and periodontal tissues.
To achieve this, the following activities are carried out:
- Questioning the patient regarding complaints. Inspection and probing of the tooth to determine the presence and depth of carious cavities in the clinical crown. Assessing the condition of the gums in the area of the problem tooth. If there are fillings, their condition is assessed.
- Electroodontometry. Determination of the condition of the pulp by its reaction to electric current.
- X-ray of the tooth. This is a mandatory and very important stage in endodontic treatment.
Using fluoroscopy, the number and condition of root canals, their length, and anatomical shape are determined. The shape and dimensions of the pulp chamber, the thickness of its walls and lid are established. The presence of lateral canals, pathological changes in the tooth ligament.
By applying the bur to the radiograph, the required size of the instrument and its correct direction when opening the tooth are determined.
Before treatment, professional cleaning of the entire dental cavity or just a segment of the jaw arch with the element being prepared may be necessary.
The procedure for gaining access to dental canals
To ensure convenience and high quality of root orifice treatment, the dentist needs to ensure a wide opening of the tooth cavity. To do this, he needs to perform the following list of operations:
- Formation of an intradental cavity in full accordance with its anatomical dimensions and shape, as well as the number, location and curvature of the canals.
- Adaptation of the shape of the prepared cavity to make subsequent manipulations as convenient as possible by: creating free access to the root orifices;
- providing a direct approach to the apical foramen;
- preparation for a specific filling technique;
- creating conditions for complete control over the movement of the tool.
Sequence of doctor's actions
Trepanation involves three main stages:
- local anesthesia;
- tooth isolation by applying a rubber dam;
- directly opening the crown.
After anesthesia and the application of a rubber dam, the doctor proceeds directly to trepanation. The preparation is performed using a turbine drill with a diamond or carbide bur with a supply of coolant.
First, the crown is opened - installed by drilling a point connection between the bottom of the carious cavity or the intact surface of the tooth with its internal cavity.
Then the coronal cavity is opened - the edges of the enamel-dentin cap overhanging it are removed. Dentin sawdust and necrotic tissue are washed off with liquid.
The coronal part of the pulp is removed with a sharp excavator and EDTA (sodium salt dihydrate, which softens surface dentin) and disinfectant sodium hypochlorite are supplied into the cavity.
The walls of the cavity and the mouth of the dental canals are not additionally prepared. The main thing is that they are clearly visible and access to the dental canals is provided.
At this point, the trephination of the tooth ends and the next stage of endodontic treatment begins according to indications.
In the video, watch the process of tooth trephination.
Contraindications for tooth root resection
The operation of resection of the apex of the tooth root is not performed:
- If the patient has a disease such as periodontal disease, which has led to exposure of the neck or root of the tooth;
- If severe tooth mobility is detected;
- For acute periodontitis;
- In case of severe destruction of a diseased tooth;
- In case of an inflammatory process that has damaged most of the root system of the tooth.
The operation of tooth root resection is not prescribed for patients suffering from severe pathologies of the cardiovascular system; other surgical techniques are chosen to remove cysts and granulomas larger than 10 millimeters in size.
Before such a serious and complex operation as resection of the apex of a tooth root, a thorough and high-quality diagnosis is essential, helping to eliminate all possible contraindications to the technique. In our dentistry "Firadent", the highest attention is always paid to the quality of patient diagnostics; all activities are carried out using modern and ultra-precise equipment.
Resection of the apex of the tooth root is an operation carried out in four successive stages, and below we will tell you in detail about all stages of the treatment process.
Some nuances
The starting point for opening the pulpous chamber should be located at the bottom of the caries lesion or on the intact surface of the tooth closest to the pulp, that is, at the site of the pulp horn. The moment the drill enters the cavity manifests itself as a feeling of “sinking” of the instrument.
When is a rubber dam applied?
There is no consensus. Some experts recommend doing this before opening the cavity, others - after opening. The latter explain their choice by the fact that the absence of a rubber dam at the stage of opening the cavity helps to more accurately guide the tool.
Trepanation technique
Trephination methods vary somewhat depending on the group of teeth and their location (upper or lower jaw).
Technique for preparing incisors and canines
The carious cavity on the cutting surfaces of the incisors and canines is transferred to the lingual/palatal surface, and only then the pulpous chamber is opened.
Preparation of intact incisors and canines begins from their lingual/palatal surface - from its central point. Preparation from the cutting edge can lead to destruction (breakage) of the lateral surface of the incisor or canine. The intact incisors are exposed in the area of the blind fossa.
During trephination, the instrument is first directed perpendicular to the palatal or lingual surface of the canine or incisor. After the hole is formed, the drilling direction is changed to parallel to the longitudinal axis of the tooth.
Trepanation of premolars
In premolars, carious cavities begin to be opened from their bottom in the place closest to the pulp. In this case, they try to transfer the preparation to the chewing surface.
The opening point for intact premolars should be located on the occlusal surface in the middle of the fissures. When drilling, the bur is directed towards the most pronounced tubercle.
The dental cavity should be opened in the palatal-buccal direction. Doing this in a mesial or distal direction is not recommended, since this quite often leads to perforation of the walls of the coronal cavity.
The opened cavity should have a round or oval shape.
Molar preparation
Carious cavities in the molars of the upper jaw are trepanned in the same way as premolars. During opening, the bur is directed in the palatal-buccal direction.
Lower intact molars have their own opening characteristics. The bur entry point should be located in the middle of the longitudinal fissure. The instrument is directed towards the anterior buccal cusp. Unlike maxillary painters, the cavities open in the mesial-distal direction. Buccolingual opening is considered faulty.
The second and third maxillary molars are the most difficult for trephination due to the different structures of their crowns.
Difficulty identifying canal mouths
If the orifices of the root canals are poorly identified, their location is established using a dye that colors the entrances to the canal dark blue.
What is the danger of chronic caries and its treatment tactics.
In this publication you will find instructions for using a caries marker.
Here is all the most important information about fissure caries.
Nuances and features of the procedure on different teeth
You now know what trepanation of a tooth crown is. However, when preparing different teeth, there are some nuances:
- incisors and canines: drilling and opening of the pulp chamber is carried out through the lingual or palatal surface. Opening from the outside is not carried out due to the risk of breaking off or destroying the cutting edge, which will lead to disruption of the functionality of the tooth and loss of its aesthetics. For work, the doctor selects burs of small or medium diameter (No. 2 or No. 4), their rotation speed during the process should be minimal,
- molars and premolars: they are opened on the chewing surface in the fissure area. The doctor gives the emerging cavity a rounded shape for subsequent high-quality filling. Manipulations are performed using burs larger than those used for incisors and canines.
If a patient is aged (over 60 years) undergoing treatment, then the degree of tissue preparation should be less than in younger people. This is due to the smaller size of the tooth cavity.
Large burs are not suitable for trepanation, because their vibrations can lead to tissue destruction and root fracture.
Possible complications
Coronal preparation is less risky in terms of complications than root preparation. However, they still happen:
- Perforation of the wall of the pulpous chamber. The reason is the carelessness of the dentist, the wrong choice of instrument, the lack of an x-ray, which determines the shape of the cavity.
If the hole is small and the perforation site is located above the periodontal groove, the defect can be easily eliminated - with the help of cement.If the hole is larger than 1.5 mm, and the perforation is located below the periodontal groove, there is a risk of filling material leaking into the periodontium, which can lead to inflammation.
- Broken tool. Occurs due to excessive application of force, the use of low-quality instruments, poor condition of the crown, and the doctor ignoring the shape of the cavity.
- Change in color (darkening) of the crown . The reasons are a violation of the operating mode of the tool (high speed, lack of cooling), improper processing of the cavity walls.
- Pain. They may appear after the instrument enters the periodontium, when working without cooling, or due to poor-quality antiseptic treatment (re-infection).
In general, complications are caused by preparation errors, lack of cooling, incorrect choice of instrument, and lack of high-quality x-rays. To avoid them, you need to strictly follow the operation protocol.
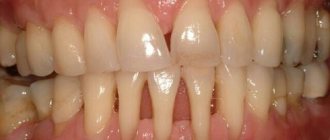
Causes of toothache under a crown
The list of factors that can provoke an inflammatory process even under a recently installed crown is:
- Hypothermia of the body.
- Decreased immunity; previously suffered acute respiratory diseases; viral infections.
- Failure of the crown (i.e. the crown has expired its service life) each orthopedic design has its own service life, therefore, in order to avoid pain in the tooth under the crown, it is necessary to undergo a professional examination. dental examination every 6 months.
- Chronic dental injuries. (if the filling on the antagonist tooth is too high)
- Acute injury (fall and bruise or damage in a fight).
Reviews
The vast majority of visitors to dental offices are familiar with tooth trephination, which everyone simply calls “drilling.”
If you are one of them, and some special incident happened to you during tooth trephination, share your experience with other visitors to our site. You can do this by filling out the form at the bottom of this page.
If you find an error, please select a piece of text and press Ctrl+Enter.
Tags toothache
Did you like the article? stay tuned
Previous article
In what cases are braces + springs used and how effective?
Next article
What you need to know about supraocclusion
Opening and formation of the access cavity and localization of root canals
Author: American Association of Endodontists
The endodontic triad, including biomechanical preparation, disinfection and complete obturation of the root canal space (RC), remains the basis of endodontic treatment (ET). However, even if access to the ostia of the CC and apical foramina is ensured correctly, achieving the goals of this triad will still be labor-intensive. The main goal of EL is to create conditions in which the body can heal on its own. Adequate access is the key to achieving this goal and, accordingly, the success of EL. The purpose of this article is to assist the practitioner in understanding the technique of providing access to the dental cavity and orifices of the oral cavity. A systematic approach to addressing this issue is described below.
Basic principles
The pulp complex is a continuum (continuous structure) starting from the pulp horns and ending at the apical foramen. In order to completely remove the pulp, access to the coronal part must be ensured in such a way that the localization and cleaning of the CC can be carried out fully and without weakening the coronal dentin and enamel.
The process of cleaning and forming the access cavity and CC can be divided into 4 stages: analysis of access, removal of the roof of the tooth cavity, identification of the tooth cavity and the mouths of the CC, instrumentation of the CC.
Access Analysis
Removal of pulp tissue begins with an analysis of the anatomy of the tooth being treated and the anatomy of the surrounding tissue. To completely remove all pulp tissue, it is necessary to identify the coronal and root parts of the pulp complex. According to Krasner and Rankow, the cavity of each tooth is centrally located at the cemento-enamel junction, a feature called the “law of centrality.” Confirmation of this law can be seen in Fig. 1A and 1B.
Rice. 1. Sample slices demonstrating the law of centrality.
The law of centrality can be used to guide the initial formation of access. However, the operator must understand that this law is valid only at the level of the CEJ and is not related to the anatomy of the chewing surface.
Therefore, the initial penetration into the tooth cavity must be made in the center of the central epithelium. Therefore, the doctor must make an approach, mentally imagining the localization of the central epithelium, while ignoring the anatomy of the clinical or artificial crown. As can be seen in Fig. 2, artificial crowns disorientate clinicians, since their anatomy is not centered relative to the CEJ.
Rice. 2. Localization of the central epithelium, which does not correspond to the anatomy of the artificial crown.
Step 1
The first step in gaining access to the dental cavity is physical identification of the shape and location of the CEJ. This is done with the help of a periodontal probe, which is used to examine the circumference of the CEJ to get a mental picture of its size and boundaries, as shown in Fig. 3 A-D.
Rice. 3.AD. Periodontal probing to localize the central epithelium.
After visualizing the CEJ on the occlusal surface, a penetration point is selected. On the surface of the restoration, this point may not be related to the anatomy of the occlusal surface. This can be seen in Fig. 3E, where the correct penetration point on the chewing surface is marked with a blue circle. This point was determined using radiographic examination, periodontal probing, and a mental representation of the CEJ perimeter.
Rice. 3. E. Localization of the primary penetration point, based on determining the perimeter of the central epithelium.
Visualization of the final contour of the tooth cavity can be supplemented by the use of another law related to its anatomy - the law of concentricity. This law states: “the walls of the tooth cavity at the level of the CEJ are concentric with respect to the external contour of the tooth.” The law of concentricity is shown in Fig. 4.
Sample slices demonstrating the law of concentricity.
This law helps clinicians to correctly open the tooth cavity. If there is a convexity of the CEJ, the tooth cavity will also have a corresponding convexity. For example, if a tooth is narrowed mesiodistally, the tooth cavity will also be narrowed in that direction, as shown in Fig. 5a and 5b.
Step 2
The second step is to determine the angulation of the tooth (mesio-distal inclination). This is done using radiography (Fig. 6) and clinical examination. CBCT can provide information about the vestibulo-oral inclination of the tooth.
Rice. 6. Determination of angulation using radiography. You should pay attention to the inclination of the second molar of the HF. Step 3
The third step, as shown in Fig. 7, is the measurement of the distance from the top of the tubercle to the furcation using a radiogram. Once this distance is determined, a shorter length bur is placed in the handpiece to avoid perforation of the furcation. If a shorter bur is directed directly along the center of the central joint, parallel to the long axis of the tooth, then perforation is practically eliminated.
Rice. 7. Measuring the distance from the occlusal surface to the furcation. Step 4
After all parameters are determined, the primary access point is selected. Its location may vary relative to the occlusal surface of the tooth and will depend on all of the above factors. All recommendations regarding starting access from holes or depressions are erroneous. In some extraordinary cases, the primary access point may even be on the tubercle. The principle follows from this: the internal anatomy of the pulp chamber determines the external contours of the crown. The shape of the crown can be triangular, trapezoidal or irregular.
Access technology
Step 1
Before starting the mechanical component of access formation, all defective restorations and carious tissues must be removed to avoid bacterial contamination during the treatment process.
Step 2
The type and shape of the working surface of the bur is selected individually by the clinician. The most commonly used are spherical carbide (carbide) or diamond and fissure burs. For orthopedic structures, special burs are used to cut metal. After selecting the bur, penetration of the occlusal surface is carried out at the point determined by the above characteristics. The bur must move towards the center of the mentally imagined CEJ until the moment of “falling through” or until the head of the tip touches the tubercle of the tooth. However, “sinking” is felt only when the depth of the tooth cavity is at least 2 mm.
When a doctor evaluates the possibility of treatment on his own or referral to another specialist, it is necessary to take into account the distance from the roof of the tooth cavity to the bottom. Patients with a calcified dental cavity, as shown in Fig. 8, it is better to refer to more experienced specialists with appropriate equipment.
Rice. 8. X-ray of a molar with calcified CC. Step 3
The goal of proper access is to completely remove the roof of the tooth cavity. During the process of removing the roof, there is no need to search for the mouths of the roof, since after its complete removal and, accordingly, completion of the formation of the access, the mouths can be found without much difficulty.
The roof of the tooth cavity can be removed in two ways: place the bur parallel to the long axis of the tooth and open the tooth cavity with lateral movements, or place a spherical bur in the access cavity and, grasping the lateral overhanging edges of the roof, move the bur towards the chewing surface (Fig. 9).
Using various burs to remove the roof of the tooth cavity. The roof of the tooth cavity is sequentially removed, after which the formation of the access can be considered complete. One of the most important steps during this process is when it is determined that access has been completed. In order to accurately determine this point, the doctor needs to know the “law of color change.” The law states that the color of a tooth cavity is always darker than that of the surrounding walls. As long as the walls are light, there is a place where they transition into the darker bottom of the tooth cavity. This connection between the wall and the bottom is shown in Fig. 10, passing through the entire bottom of the tooth cavity.
Rice. 10. Sample section showing the connection between the walls and the bottom of the tooth cavity. Fig. 11. Sample slice demonstrating full access.
The operator knows that the access formation is completed in case of a complete view (360 degrees) of the connection of the bottom and walls of the tooth cavity (Fig. 11). If this connection is not fully visible, the operator will need to remove additional overhanging structures (restorative material, reparative dentin, or overhanging edges of the roof of the dental cavity). This intervention to provide a complete view can be seen in Fig. 12.
Clear visualization of the wall-floor junction is one of the main aspects of providing access for endodontic treatment.
If the doctor cannot carry out this manipulation for any reason, then he must refer the patient to another specialist. In Fig. Figure 12 shows a defective approach where a full view of the wall-to-bottom connection is not visible.
Rice. 13 illustrates full access, where the transition of the walls to the bottom is visualized along the entire perimeter of the tooth cavity.
Rice. 12. Sample of defective access.Fig. 13. Sample of full access.
Estuary localization
The number of CC orifices in each specific tooth should be known in advance before treatment. Although radiographs help in some cases to determine the number of roots, and the average values of the number of roots and CC for each tooth are also known, most often the number and location of the orifices of the CC remain unidentified.
So how does a clinician determine the exact number of CB orifices without causing iatrogenic destruction to the tooth? The only effective and safe way to visualize all formations of the floor of the dental cavity is to use a variety of anatomical landmarks.
There are several laws for identifying the localization of the mouths of the CC:
- I law of symmetry: with the exception of the molars of the HF, the mouths of the CC are equidistant from a line drawn in the mesio-distal direction through the center of the bottom of the cavity (Fig. 14);
- II law of symmetry: with the exception of the HF molars, the mouths of the CC lie on a line perpendicular to the line passing in the mesio-distal direction through the center of the bottom of the tooth cavity (Fig. 15);
Rice. 14.Fig. 15.
- law of color change: the color of the bottom of the tooth cavity is always darker than the color of the walls (Fig. 16, A and B);
Rice. 16. A-B.
- I law of localization of the mouths: the mouths of the CC are always located at the point of transition of the walls into the bottom of the tooth cavity (Fig. 17);
- II law of localization of mouths: the mouths of the CC are located at the tops of the wall-bottom connection (Fig. 18).
Once the wall-bottom connection is clearly visualized, all laws of symmetry and location of orifices can be used to determine their exact position and number.
If you look at the localization of the mouths at the bottom of the tooth cavity in Fig. 19, then knowledge of the l and ll laws of symmetry indicates not only the presence of the 4th mouth, but also its exact location.
The laws of localization of mouths l and ll can be used to determine their number and location. Since all orifices may be located along the wall-bottom junction, any black spots, indentations or white spots that are observed elsewhere (on the walls or dark bottom) should be ignored to avoid perforation. ll law of localization of mouths helps to focus on their exact location. The vertices or corners of the geometric shape of the dark bottom of the tooth cavity will indicate the exact location of the orifices. If the CC is calcified, then this apical position will determine the need for the bur to penetrate the reparative dentin of the upper part of the CC (Fig. 20).
Rice. 19. Localization of mouths using symmetry laws. Fig. 20. Sample sections showing the vertices of the floor of the tooth cavity. l and ll laws of localization of orifices in combination with the law of color change are often the only possible indicators of the presence and localization of the second CC in the bucco-medial root of the first molar of the HF (Fig. 16). In Fig. 16A shows the bottom of a tooth cavity; along the wall-floor junction there is an angle between the orifices of the bucco-medial and palatal CC. l and ll laws of localization of orifices indicate the presence of a second CC in the buccal-medial root, as can be seen in Fig. 16B. This orifice is present in the vast majority of HF molars; it can be located at different distances from the orifice of the first CC, but is always located along the line of connection between the wall and the bottom of the tooth cavity.
All of the above laws apply to all teeth with the exception of high-frequency molars. They are especially valuable in cases of unusual anatomy. Pay attention to the schematic representation of the bottom of the tooth cavity of the second premolar tooth in Fig. 21(A). Knowledge of the laws of the anatomy of the bottom of the tooth cavity will immediately indicate the presence of three CCs in this tooth (Fig. 21 (B)).
Localization of the mouth of the third CC using the laws of the anatomy of the bottom of the tooth cavity. Another example of the value of knowing the anatomy of the bottom of the tooth cavity can be seen in Fig. 22(A), which shows a LM molar sectioned along the CEJ. In accordance with the laws of the anatomy of the bottom of the tooth cavity, it can be argued that there are only two CCs in this tooth. Their location is shown in Fig. 22(B). However, the physician should be aware that the number of orifices does not always correlate with the number of CCs. Sometimes there may be several CCs at one mouth.
Anatomy of the dental cavity, demonstrating the presence of two CCs in the molar of the lower jaw. Despite all our attempts to ensure high-quality access, problems may still arise during the treatment process. Listed below are the most common problems faced by practitioners and how to resolve them.
Schematic representation of problems and options for eliminating them
Problem: inability to localize the bottom of the tooth cavity due to excessive bleeding. Cause: pulp tissue of the tooth cavity or CC. Methods of elimination: 1. Expand access by removing the roof of the tooth cavity without touching the bottom (you cannot touch the bottom of the tooth cavity without completely visualizing the wall-bottom connection). 2. Place a hemostatic agent into the tooth cavity. 3. Use a pulp extractor to remove pulp tissue.
Problem: inability to determine the location of the bottom of the tooth cavity due to inadequate removal of the roof of the tooth cavity. Reasons: 1. Wrong choice of primary access point. 2. Inability to visualize the wall-bottom connection at 360 degrees. Elimination methods: return to the previous bur (spherical or fissure) and continue opening the tooth cavity until the wall-bottom connection is completely visualized.
Problem: inability to determine the location of the bottom of the tooth cavity due to inadequate lighting. Reasons: 1. Too little access. 2. Presence of crowns or restorations. 3. Lack of smooth surfaces on the walls and bottom of the tooth cavity (usually due to the use of too small spherical burs). Methods of elimination: 1. Enlarge the access cavity until the wall-bottom connection is completely visualized. 2. Remove the restoration material. 3. Use additional lighting devices (LED headlamps or operating microscope) if you have a crown. 4. Smooth out all irregularities on the walls and bottom of the tooth cavity using spherical burs.
Problem: calcifications, denticles. Cause: degenerative processes in the pulp Methods of elimination: after completely removing the roof of the tooth cavity and stopping the bleeding, use a non-aggressive spherical bur to smooth the bottom of the tooth cavity to remove calcification and clearly visualize the wall-bottom connection.
Problem: inability to determine the location of the bottom of the tooth cavity due to the overhang of the restoration material over the tooth cavity. Reason: inadequate removal of all restoration material before the start of access formation (in particular, with carious cavities of class 5, the restoration material can be introduced into the tooth cavity). Remedy: remove all restoration material before starting access.
Problem: inability to localize the bottom of the tooth cavity due to loss of landmarks. Reasons: 1. Using the occlusal surface as the starting point for access formation. 2. Problem with determining the inclination and rotation of the tooth. 3. Loss of landmark in the form of a circle along the central nervous system. 4. Wrong choice of angulation for primary access. Methods of elimination: 1. Correctly determine the orientation of the tooth before starting access formation. 2. Correctly mentally imagine the CES. 3. Remove the rubber dam to avoid loss of landmarks. 4. Select the appropriate penetration angle for the bur during initial access.
Problem: perforation of the bottom of the tooth cavity. Reasons: 1. Premature attempt to identify the mouths of the CC. 2. Incorrect measurement of the distance from the occlusal surface to the furcation. 3. Incorrect identification of the wall-to-bottom connection. 4. Inadequate access. Elimination methods: 1. Remove the roof of the tooth cavity before determining the location of the mouths of the CC. 2. Obtain a 360 degree view of the wall-bottom connection. 3. Use a bur of shorter length than the distance from the occlusal surface to the furcation. 4. Direct the bur along the center of the CES perimeter.
Problem: perforation of the lateral wall of the tooth cavity. Reasons: 1. Misconception about CES. 2. Incorrectly chosen angle when creating access. 3. Using the occlusal surface as a guide to begin penetration. Elimination methods: 1. Remove the roof of the tooth cavity before determining the location of the mouths of the CC. 2. Obtain a 360 degree view of the wall-bottom connection. 3. Direct the bur along the center of the CES perimeter. 4. Select the primary point of penetration based on the idea of the central nervous system.
Conclusion
To increase the likelihood of success of endodontic treatment, it is necessary to remove the pulp as completely as possible. In order to achieve this, it is necessary to find the mouths of all CCs. The only rational way is to use the laws of the anatomy of the bottom of the tooth cavity. To do this, it is necessary to create an access in such a way as to visualize the connections of the walls and the bottom of the tooth cavity along the entire perimeter. This article describes clinical conditions that may interfere with such imaging. The article is also supplemented with a schematic representation of possible problems that arise during the treatment process, and options for their prevention and elimination.
Amet Tabakov Kirill Kulik