Before deciding on dental implantation, patients want to know step by step how dental implants are placed.
The complete implantation procedure includes 3 stages:
- preparatory,
- surgical,
- orthopedic.
We have prepared a detailed description of each of them.
Why implantation?
All methods of dental prosthetics prior to implantation negatively affect the condition of the oral cavity in the future, often causing premature wear and loss of teeth. In particular, the manufacture of bridge-like prostheses - bridges, as they are also called - requires the depulpation and preparation of two, and sometimes three, teeth to replace just one lost tooth.
Such radical treatment, to put it mildly, is not beneficial for the jaw system and leads to overload of the supporting units with further root inflammation and tooth loss. At the same time, the average service life of “bridges” is 6-7 years.
The situation with removable dentures is even more complicated: for any removable device, the support is the gums and bone tissue of the jaw, which, in principle, is not adapted to a full chewing load. As a result, a chronic inflammatory process develops, and the bone atrophies and dissolves.
What to prepare for
Dental implantation is a technique that does not have the disadvantages of previous generations of prostheses. Implantologists consider it as the only way to restore lost teeth that does not harm the health of the oral cavity and has an unlimited (usually lifelong) service life.
Important! No other prosthetic method provides such high aesthetics as implantation.
But it should be taken into account that dental implantation is not a simple procedure during which an implant is simply inserted in place of the missing unit. The future tooth (more precisely, its root) must have a certain size, the proper position and direction, and a strictly defined inclination are selected for it.
In addition, it is necessary to restore all the tissue surrounding the tooth - and, first of all, bone tissue and gums. It is this comprehensive approach that allows us to achieve reliability, impeccable aesthetics, and durability of implant treatment.
Implantation is a slow process, except for one-stage implantation, as well as the “all on 4” and “all on 6” techniques. Treatment usually involves several stages, despite the common name of "two-stage" surgery.
Treatment always begins with diagnosis, which is the first and, perhaps, the most important stage that determines its outcome. Based on the results of the preliminary examination, a decision is made on implantation technology, types of implants, and the details of the upcoming operation are thought out.
Important! It is necessary to prepare for the fact that during the implantation process you will have to go through several stages. A standard scheme applies to all patients, so we have prepared a detailed description of each stage of dental implantation.
Dental implantation under anesthesia
Today, dental implantation is always performed under anesthesia. Local anesthesia is used and in some cases, when the operation is long and tedious, sedation is used. In some cases, general anesthesia may be used, but this usually occurs in rare cases where local anesthesia is ineffective.
It is believed that general anesthesia has some negative effects on the body and can worsen the survival rate of implants, so it is rarely used, making do only with local or combined anesthesia and sedation. In any case, the operation is completely painless for the patient and the period of return to normal after anesthesia takes a very short time.
The Dental Master clinic employs experienced, highly qualified implantologists, uses the most modern techniques and equipment, uses implants, components and instruments from the world's leading manufacturers, so implantation here is reliable, safe, effective and very economical.
Stage 1: diagnosis
It may take some time to choose a clinic and an implantologist, since this is one of the key points in the whole story. In addition, you need to get to know the orthopedist and, if necessary, the therapist - these doctors will also take part in the process of implantological treatment. If everything is satisfactory, then before implantation an examination is carried out by a surgeon.
He will tell you whether it is possible in principle to place an implant in this patient, and will develop further treatment tactics based on the following data:
- general oral health;
- the presence and condition of neighboring teeth and gums, which are located next to the future implant root;
- bite;
- hygiene quality;
- financial capabilities of the patient.
The price is usually included in the total cost of treatment, which is carried out in most clinics on a turnkey basis. The doctor will announce the approximate cost, the final price is determined after diagnostic testing and consultation with an orthopedist. If a patient needs the help of a physician, hygienist or periodontist, then their services should be considered.
Diagnostics includes instrumental and laboratory studies, without which surgery is impossible. These examinations are necessary to exclude a number of complications after the introduction of implant rods and achieve extremely good treatment results.
Instrumental studies – tomography and x-ray
They are performed on all patients, regardless of the chosen implantation technology. Based on the data obtained, the issue of the types of implants and the methodology of the implantation operation itself will be decided.
An X-ray is taken selectively, precisely in the part of the jaw where implants are planned to be installed. Using it, the doctor evaluates the condition and location of the roots of the teeth, near which the implant should be installed. The price of such a photo starts from 700 rubles.
A panoramic photograph is needed for any type of prosthetics, and implantation is no exception. Otherwise, it is called an orthopantogram and is performed to take into account the characteristics of the bite and the condition of the bone tissue. All this is of great importance, since a strong foundation is extremely important for the implant root.
The price of a 3D image - orthopantogram - from 1500 rubles.
But the most important study at the diagnostic stage is CT - computed tomography. Without it, not a single dental implantation operation is performed, and neither an X-ray nor an orthopantogram can replace it.
Computed tomography is the most expensive examination at the diagnostic stage, the price of which starts from 3,000 rubles. Based on its results, the quality of bone tissue is assessed, the sites for installing implants and their type are selected. It is the tomogram that allows the implantologist to conclude that bone grafting is necessary if there is insufficient bone volume.
Modern medical centers where implantation operations are performed are equipped with high-precision equipment and use navigation programs. All this makes it possible to plan the course of treatment in detail and even show its future results to the patient!
How to choose an implant brand?
Lab tests
The diagnostic stage before implantation necessarily includes a general and detailed blood test. This is a must for everyone. Certain categories of patients will need to provide the results of hormone tests (usually women) and other specific laboratory tests if there are concomitant pathologies.
A number of diseases are a relative contraindication for surgery to install implants, and then a preliminary consultation with a specialist is necessary. If necessary, before implantation, the condition is corrected to acceptable levels (for example, in the case of diabetes).
The price of sample collection services may vary and depends not only on the number of studies. Many tests are done in district clinics, and will be free if referred by a doctor. Thanks to this approach, diagnostic costs can be significantly reduced.
At the diagnostic stage, all patient data is collected, and based on the information obtained, the optimal method of dental implantation and type of implants are selected. After agreeing on the finished plan with the client, we begin to implement it. Next begins the stage of preparation for the implantation operation.
Who can undergo implantation and who cannot?
Implants cannot be installed in girls under eighteen years of age, and in boys under twenty-one years of age, since during this period the bone is still forming, and implantation can disrupt this complex process. As for the upper age limit, there is no upper age limit for installing implants. Absolute contraindications include disorders of blood clotting and bone regeneration. It is prohibited to perform the operation on pregnant women and people with an unbalanced psyche. In all other cases, implantation is possible.
Stage 2: preparatory
Details of the preparatory stage may vary significantly for different patients due to differences in the condition of the oral cavity in general and the jaw bone tissue in particular. Most people planning to have implants require dental hygiene.
Sanitation is carried out with the aim of eliminating bacterial plaque from the surface of tooth enamel, since a successful implantation operation requires, if not sterility, then maximum cleanliness of the oral cavity. The presence of pathogenic microflora can provoke the development of inflammation, which should be avoided at any stage of implantation.
Hygienic cleaning is done using ultrasound when there is existing tartar, soft plaque is removed using Air Flow technology. The price of such reorganization is from 6,000 rubles.
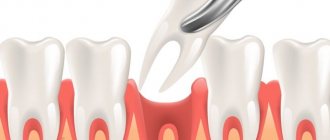
At the preparatory stage before implantation, it may also be necessary to remove teeth, treat caries and periodontitis. The price of each procedure is calculated separately.
But the most serious step before installing implants may be bone grafting surgery. Very often it is impossible to do without it due to a lack of bone due to its resorption - resorption, natural loss. Bone volume can be greatly reduced if a tooth is lost or removed long ago, or due to individual characteristics.
As a rule, bone grafting is performed in the case of classical two-stage implantation, which places high demands on the quality of the jaw bone tissue. In addition, bone grafting is almost always necessary for patients who have lost teeth a year or more ago. During this period, the bone undergoes rarefaction and becomes brittle, which creates certain difficulties with fixation of implant roots.
There are several methods for performing bone grafting, or osteoplasty, using different materials. Therefore, the price will depend on the selected operation technology. There are 3 options in total:
- sinus lift;
- directed regeneration;
- autotransplantation.
Calculation of dental implants for implantation: how they fit in
For each specific case, the doctor determines the amount individually. It depends on the structural features of the oral cavity, the volume of soft tissues, and other indications. Please note that only a qualified specialist can correctly calculate the chewing load.
The general practice is to start with ten pins in each jaw if the patient is completely edentulous. If the installation position is correctly calculated, a good result can be obtained using six or eight support elements.
Installing many implants is expensive. Therefore, people with limited income strive to reduce their number. A properly made prosthesis will distribute the load evenly. But, in this matter, it is recommended to exercise healthy wisdom and choose the best option, based on the recommendations of a specialist.
The next question that is often asked in the dentist’s chair is: what material should the pin be made of? There are many elements used in this field, therefore, only a qualified specialist can determine the appropriate ones based on contraindications.
A competent doctor will offer several options to choose from that can solve the problem, so that the patient can independently choose the one that is suitable for the price.
Sinus lift
Sinus lift or subantral augmentation surgery before implantation can only be performed on the upper jaw. Its essence is to raise the lower septum of the maxillary sinus in order to increase the space of the alveolar ridge. The space thus freed is filled with bone tissue.
On a note! Sinus lifting is scientifically called subantral augmentation.
If there are no contraindications, the implantologist can combine sinus lifting with the installation of implants. Otherwise, the latter are placed in the jaw bone 3-6 months after the subantral augmentation surgery.
Sinus lifting can be open or closed, and its price depends on the chosen method. Open operations are estimated at the amount of 40,000 rubles, closed ones - from 20,000 rubles. It is important to know that this cost does not include the price of the bone material itself.
Vertical and inclined installation
Most implants require exclusively vertical installation. And if several of them are placed, then the doctor must observe the principle of parallelism. But in some situations, implants can also be implanted into the bone at an angle of up to 45 degrees. Here, the main indication for inclined installation is a lack of bone height or low density due to atrophy or inflammatory processes. Angled placement allows for a larger area of bone to be used for contact with the implant surface. And also bypass areas of atrophy and anatomical structures (nerves or sinuses), and exclude additional bone grafting surgery[1]. True, not all implants are designed for this – and this must be taken into account.
Autotransplantation (autologous transplantation)
Another type of bone grafting performed before implantation. It is essentially a self-transplant since the recipient is his own donor. A similar technique is used for extensive burns, when areas of the patient’s healthy skin are transferred to the burned areas.
A similar technology is widely used by implantologists. During surgery, bone blocks taken from the patient are implanted into the jaw bone. The recovery period after installing implants using autologous transplantation is quite long and can last up to six months.
Implantation of implant roots is possible after completion of osseointegration, after 6 months. The asking price is at least 50,000 rubles.
Bone grafting stage
The implantologist will definitely inform you when developing a treatment plan that you will need bone grafting before installing implants. At the implantation planning stage, the technique by which bone tissue will be built up is also selected.
Osteoplasty can be performed:
- Technology of directed regeneration, which involves replenishing bone tissue deficiency by grafting bone material;
- By replanting bone blocks, which are obtained directly from the patient for surgery;
- Sinus lift, applicable only for implantation in the upper jaw.
The need for bone grafting before implantation increases the overall treatment time by an average of 4-5 months. After osteoplasty, all tissues must be restored qualitatively, and only after this can we proceed to the stage of installing implants.
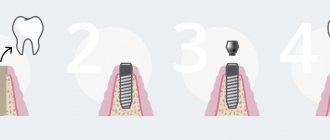
Stage 3: installation of implants
If bone grafting was performed, then the stage of dental implantation itself proceeds six months after the healing of the jaw tissue and successful integration of the bone. Surgical treatment for implantation of implant roots, in turn, is also divided into several stages, including:
- Stage 1 – pain relief. The type of anesthesia is planned at the diagnostic stage, and its choice depends on the scope of the intervention. When installing 1-2 titanium rods into the jaw, local anesthesia is usually given. If there are more, implantation may require general anesthesia or sedation;
- Stage 2 – incision of the gums and periosteum to gain access to the surgical field;
- Stage 3 – drilling a hole for the implant root in exact accordance with its dimensions and forming notches on the walls of the hole for better fixation of the future tooth in the jaw. The prepared hole is treated with an antiseptic, dried, after which the implantologist begins to screw in the implant itself;
- Stage 4 – installation of a plug to prevent tissue from growing inside the implant root;
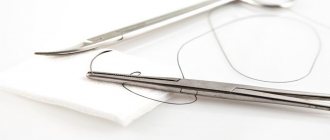
- Stage 5 – suturing the gums and suturing. Implantation is complete.
On a note! Implant sedation is often chosen by patients who experience panic attacks before dental treatment. It is also indicated for people with heart disease and hypertension. Sedation is a safer alternative to general anesthesia, which is advisable to use for multiple dental implantations and bone grafting.
After the implants are installed, the patient is under the supervision of a doctor for some time, who at the same time instructs him regarding further treatment and care. If there are no signs of complications, after a couple of hours the person goes home, where he takes medications to speed up the healing of the gums and stimulate the osseointegration of the implant roots. In addition, he is given a leaflet with recommendations regarding oral hygiene after implantation.
The sutures after implantation are usually removed after a week, then a temporary crown can be installed. The price of the main stage largely depends on the type of implants.
How it works today
There are several steps:
- Preparatory. Necessary for carrying out actions to clean the oral cavity, collect tests and other indicators that allow the installation of a pin.
- The insert of the supporting element, which is covered with a special gingival flap, is sutured for subsequent integration. It may take three to five months to heal.
- Then the support is installed, the abutment is covered with a temporary crown.
- Based on the impressions taken, a permanent chewing element is made.
The detailed process of how this is done, namely placing and implanting dental implants during surgery, and how they look after implantation is described below (photos of dentures can be found on the Internet).
If everything is done at once using permanent materials, there is a high probability that the foreign body will be rejected, since the additional load will lead to inflammation in open wounds. For this purpose alone, the technique is divided into 4 main stages. At the discretion of the doctor, their number can be reduced to two. Thus, the hole is immediately closed and the risk of bacteria entering is greatly reduced.
In this case, two options are possible:
- If there are no contraindications, the extension is performed during surgery.
- Otherwise, the patient will have to wait up to several months until the required volume is restored.
Stage 4: rehabilitation after implant installation
The rehabilitation period is the time during which the implant root takes root in the patient’s own tissues. Only after osseointegration is completed can one proceed to the orthopedic stage and place permanent crowns.
It is impossible to shorten the healing time of implant roots, even if you take special calcium supplements and other medications. Depending on individual characteristics, it can average 3-6 months, although in most cases it takes at least six months.
The implantologist may recommend regular visits to the clinic to monitor the survival of the implant root (or roots). However, in the absence of discomfort and complications at the rehabilitation stage, the patient makes the next visit to the clinic at the very end. Next, a date is set for placing a gum former on the implant.
Stage 5: insertion of the healing abutment
This detail is necessary to give natural contours to the gums in the operated area. The former is screwed directly into the implant rod by cutting the soft tissue.
In essence, the plug is replaced, which is unscrewed, and a former is placed in its place in the implant channel. The manipulation is very simple and quite fast. An experienced implantologist performs it in a matter of minutes, maximum in half an hour, regardless of the type of implant. But an anesthetic injection is still given due to the incision of the mucous membrane.
This is where the main and most serious part of dental implantation ends, and after a week or two they move on to screwing in the abutment.
Step 6: Abutment Installation
The abutment is screwed directly into the implant root; it is the abutment that is the connecting link between the implant and the crown/prosthesis. The abutment is installed 2 weeks after the former and is selected individually for each client.
For example, when implanting teeth in the smile area and thin gum tissue, it is recommended to install zirconium abutments, since titanium “spare parts” can negatively affect aesthetics.
Placement of the abutment completes the implantation procedure and treatment continues with the prosthodontist.
What methods exist
Dentistry is actively introducing new techniques for dental implantation - further in the article we will learn how it is done and how a dental implant is placed.
Scientists around the world are working to find new approaches to treating various dental ailments. Recently, junk food (including fast food) has led to the rapid development of caries and other diseases in the oral cavity. The spread of microbes negatively affects the enamel, therefore, protection from external damage and the environment.
One-stage
In clinics with modern equipment, such a manipulation can be performed within one day. Typically, this method is used when it is necessary to restore the jaw row.
However, many people confuse it with the one-step format of the procedure. This approach involves installing a permanent crown, skipping healing. It allows you to first attach the gum former, which will adjust the ideal smile, the correct position and angles for each masticatory organ. The permanent exterior will then be installed once the damaged areas have healed completely.
How new teeth are inserted and implants are installed along with the removal of damaged ones
A one-stage operation is only possible under ideal conditions:
- the unit was removed without further damage;
- hard tissues along with soft ones are not inflamed in the hole and around it;
- the gum volume is sufficient for one-step manipulation;
Unsatisfactory conditions completely change the scenario to the following:
- special medical material is poured into the hole to form bone tissue;
- the next step of screwing in the pins is postponed for two to four months.
The likelihood of such an intervention depends on the skill of the doctor, the degree of damage to the oral cavity, and the procedure itself for removing old chewing organs.
By template
A new method that allows you to foresee all the nuances in advance, reduce the risk of repeat surgery and correctly adjust the angles and strategy of how to place a dental implant and how to place teeth in the gum.
A special model is developed before the intervention begins based on an exact cast of the patient’s jaw. In the computed tomography department, images are taken and a projection of future prostheses is drawn up. Such a comparison allows you to identify the smallest inaccuracies, eliminate problems in advance and carefully prepare the oral cavity.
Computer models help the doctor adjust the aesthetics, correctly position the future masticatory organs, for which the program will automatically calculate the exact location and angle for the pins. Thus, improvisation during the process of dental implantation is eliminated as much as possible, as well as damage to the patient. This is an ideal solution when it is necessary to restore the jaw row.
Due to the fact that the calculation is completely transferred to the robot (algorithm), very high accuracy is achieved, along with it the quality of all parts that depend on the calculations. A responsible specialist must check the result on a computer in order to completely eliminate the possibility of any, even minor, errors. The collaboration between machine and man takes medicine to a whole new level.
Stage 7: prosthetics
After 1-2 weeks from the installation of the abutment, impressions of the teeth and jaws can be made. Crowns can be made from absolutely any material, but ceramic products are more suitable for front teeth. Implant roots in the area of chewing teeth are complemented by metal-ceramic or zirconium crowns.
The price of prosthetics varies depending on its type, since both crowns and removable, as well as conditionally removable dentures are placed on implants. In addition, the cost is affected by the material they are made of.
On a note! Zirconium is the most expensive, but also the most reliable material, which has high strength and excellent aesthetic qualities.
Important points about implant prosthetics:
There is often a situation where the required time has passed and it’s time to start prosthetics, but when the doctor starts to unscrew the plug screw or gum former from the implant – the implant is gone! and turns. This means that a thin layer of connective fibrous tissue has grown between the implant and the bone (this corresponds to the concept of “fibrous osteogenesis”) and indicates that contact fusion of the implant and bone has not occurred.
Most doctors immediately tell such patients that the reason is in their body, which “did not accept” the implant. It's a lie. In 99% of cases, the reason for this is the mistakes of the implant surgeon when installing the implant. For example, saliva could get into the bone bed formed under the implant, or overheating of the bone tissue occurred during the preparation of the bone bed, or the doctor, when inserting the implant, could first touch the mucous membrane of the lip or oral cavity, which led to bacterial contamination of the surface of the implant, etc. .
Problems with the osseointegration of the implant that arose BEFORE the start of prosthetics (i.e., before the implant receives a load) are solely the fault of the implantologist. That is why many clinics have a guarantee for implantation, which includes the condition that the clinic will perform a second operation for free or return the money if the implant fails before the start of prosthetics. Therefore, choose your implantologist carefully.
Other important points -
There are many important points where doctors can cheat or reduce costs - to the detriment of the quality of work. Below are some of these moments...
- Taking impressions – the accuracy of making crowns depends on the quality of taking impressions, and there are often situations when the manufactured crowns/bridges “do not fit” on the implants, and the doctor begins to sharpen them. There can be many reasons for this - cheap impression material, the doctor simply may have taken the impression poorly, or after taking the impression too much time passed before plaster models were made from it (i.e. the impressions had time to shrink).
Cheap impression compounds (for example, C-silicone) are usually used to reduce manufacturing costs. Therefore, you should be wary of promotional offers for implantation or too low a price. A good impression compound is A-silicone, or even better, polyester compound (the latter gives super-accurate reproduction of the smallest details).There are also 2 methods of taking impressions: the “closed tray method” and the “open tray method.” The second method allows for much higher impression accuracy, but requires more effort from the doctor. The open tray method cannot be used in only one situation – if implants are installed in distant areas of the dentition and the patient’s mouth opening is too small.
- Choice of abutments - if you are having a metal-ceramic crown made, then it is optimal to choose an individual titanium abutment (you should not settle for standard titanium abutments or individual abutments made of a cobalt-chrome alloy).
For crowns made of zirconium dioxide, the abutments should optimally also be made of zirconium dioxide, but it is also possible to make them from titanium. In the latter case, in order to achieve more satisfactory aesthetics, titanium abutments are anodized. Anodizing is necessary to apply a thin layer of titanium nitride to the abutment, which will give it a golden color (in this case, the gray color of the titanium abutment will not show through the ceramic crown or gum). You can find out about a comparison of all the options for standard and individual abutments, as well as their costs, at the link above.
- The choice of crowns and type of fixation – ceramic crowns made of zirconium dioxide with zirconium abutments are the best option if the crown on the implant will fall into the smile line.
The absence of metal will not only give the crown a natural look, but also, thanks to the ceramic abutment, it will be possible to preserve the natural color of the gums around the implant. Fixation of crowns on implants can be screw or cement. I sincerely recommend that you choose only the first option (since screw fixation is a guarantee of your safety from the doctor’s hackwork). Moreover, this issue must be discussed with the doctor before concluding the contract, and demand that a clause be included in the contract stating that the fixation will be screw. Otherwise, you may end up with a hack that will then be impossible to fix.
- Temporary crowns – if you are planning immediate or early loading implantation, then in this case you will have temporary crowns made first. Most often they are made from a plastic impression or from a composite filling material. But, if the issue of quality is important to you, it is best for temporary plastic crowns to be made using the milling method (CAD/CAM technology).
Life after implantation
Once the implants have settled in and the crowns have been placed, it is important to properly care for them in order to maintain the results for as long as possible. The rules for caring for teeth with implant roots are standard, but with some peculiarities.
Firstly, you should use a brush with medium-hard bristles to avoid traumatizing the mucous membranes and ensure high-quality cleansing of new teeth. An implantologist or orthopedist will advise which paste is best to choose.
Secondly, it is advisable to rinse your mouth after every meal, but alcohol-based rinses are not suitable for this due to their ability to dry out the mucous membranes. A person with installed implants should have dental floss and an irrigator in their arsenal.
On a note! Insufficiently careful care of teeth on implants can shorten their service life and even lead to rejection.
Prosthetics on implants: reviews
You will be surprised, but most of the patients dissatisfied with implantation are not dissatisfied with the shape or color of the crowns, or the implant rejection that has occurred.
Almost 95% of all complaints relate to the unsatisfactory appearance of the gums around the neck of the implant (if we are talking about implantation in the area of teeth falling into the smile line). This is especially true for patients with a gummy type of smile. Of course, complaints about the poor aesthetics of the crowns themselves are also common (if the crown does not match the color and transparency of the surrounding teeth, standing out against their background). However, most often patients are dissatisfied with the appearance of the gums around the implant - the bluish color of the gums, the absence of gingival papillae, the occurrence of gum recession (i.e., a lowering of its level, resulting in exposure of the implant neck).
Most implantologists will try to screw in implants for you as quickly as possible so that you won’t run away anywhere. But only some implantologists know how to work with gum aesthetics. Therefore, if you are planning to implant your front teeth and have a gummy type of smile, it will be very difficult for you to find a suitable implantologist. Below we will give a couple of reasons that will inevitably cause gum problems after dentures.
- Thin gum biotype - to achieve good gum aesthetics, its thickness should ideally be at least 5 mm.
If your gum thickness is less (for example, 2-3 mm), then this means a 100% risk of poor aesthetics and the absence of gingival papillae around the implant. Even when planning implantation, the doctor must assess the thickness of the gums and plan an intervention that will forcefully increase its thickness. Such an intervention is, for example, transplanting a flap from the palate. It is most often carried out simultaneously with the installation of the implant, less often - after the end of the period of osseointegration of the implant. The meaning of the operation is that a small section of gum is taken from the palate (donor area) and sutured on the crest of the alveolar process - in the area of the installed implant. Unfortunately, such an operation quite seriously increases the cost of implantation.
- Lack of attached gums – gums around the teeth can be of 2 types: attached gums and mobile gums.
The attached gum is tightly fused to the periosteum and therefore does not move when the lips/cheeks move. The width of the attached gum around the implant should be at least 3-4 mm. If it is less, then over time the gums will detach from the implant - with the formation of a “gum pocket” and the development of peri-implantitis. As a result, there will be bluish, inflamed gum around the implant, and the inflammation will gradually lead to lowering of the gum level and exposure of the metal neck of the implant. Therefore, even when planning implantation, the doctor must assess the width of the attached gum and, if it is insufficient, perform a minor surgical intervention to increase it.
One-stage, instantaneous implantation
Dental implantation of teeth can be not only two-stage, but also one-stage, one-step. If you choose one of these procedures, the installation of implants will take much less time, at least due to the absence of the need to build up bone before implantation.
In one stage, implantation is performed in two cases: with satisfactory bone condition and the use of special types of implants. During surgery, the implant is installed, and a temporary crown is immediately placed.
Unlike one-stage implantation, one-stage implantation involves the simultaneous removal of a tooth and the introduction of an implant into the same hole. But, like one-stage, one-stage implantation is performed with immediate loading, that is, after installing the implant, an abutment is immediately screwed onto it and a temporary prosthesis is placed.
Important! A temporary prosthesis on an implant can be replaced with a permanent structure after six months.
Classic one-stage implantation is also called non-surgical express implantation. It has a number of advantages, since the client:
- saves time - implants are installed in one visit to the doctor;
- saves money - the final cost of one-stage implantation is lower than classical two-stage implantation;
- obtains excellent aesthetics even in the absence of most teeth - and in the case of complete edentia, a dazzling smile can be achieved within 3 days;
- recovers quickly after installation of implants, and with a lower risk of infection, swelling and other complications, since simultaneous implantation is performed without an incision or stitches.
Thus, implantation in one visit to the dentist is the best solution, since it allows you to do without bone augmentation, which means saving time, money and preserving your own bone tissue in the area of the implant root.
Possible complications
One of the most serious consequences of medical intervention is the rejection of material implanted into bone tissue. The screw is rejected when the patient’s immune status is elevated and allergic reactions occur. Fortunately, this phenomenon is rare.
Often the gums respond with an inflammatory process to a foreign object, pain, swelling, and redness appear. In severe cases, surgical removal of the pin cannot be avoided. After this, rinsing and disinfection are performed, and a course of antibacterial and anti-inflammatory drugs is prescribed.
If the doctor does not follow the rules of asepsis, pathogenic microorganisms may enter the wound. As a result, acute infections develop, which are accompanied by dangerous symptoms, including suppuration. Also, treatment can be complicated by otitis media, neuritis of the facial nerve, and abscess. In such situations, intragingival injections and antimicrobial therapy using a dropper are indicated.
The procedure for installing dental implants, placement and treatment methods depend on the clinical picture, the degree of damage to the dentition, the presence of contraindications, financial capabilities, the age of the patients and other factors. The older a person is, the higher the likelihood of encountering such a problem. Many people are afraid that a smile looks unattractive to their interlocutors, although the real danger from missing elements in a row is more serious complications.
Time costs
For each client, the total implantation time will be slightly different, but in general we can guide you in terms of time and indicate approximate time costs.
1 day is a consultation with a surgeon who specializes in dental implantation.
Diagnostics before implantation will take 7 days (on average) - tests, CT scans and x-rays. All this can theoretically be completed in 1 day, but in practice it often takes longer to wait for test results.
It will take some time for filling, removal and hygienic cleaning of teeth. It is impossible to predict the exact timing here.
From 3 months to a year and a half - it will be required for the implanted bone and implant rods to heal, and for the installation of a former with an abutment. Crowns and dentures are made in approximately 2 weeks.
An exact implantation plan with all the necessary diagnostic tests and dental services, including their cost, can be obtained from your doctor.