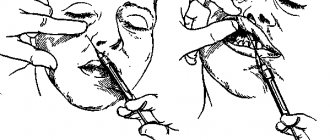
This video demonstrates a variant of the crown down root canal treatment technique (from the crown down), called the simplified anatomic technique by the author. The technique was developed by Professor Andre Machado, Brazil; the performer is one of his students.
The technique involves the absence of pressure (pressureless) and is recommended for curved canals. According to the author of the video, one of the advantages of this technique is the successful combination of low cost of its use and high efficiency.
The technique includes five steps.
- Pulp removal (with a “carpet path”).
- Formation of the coronal and middle thirds.
- Snapshot to determine the full working depth of the tool.
- Formation of the apical third of the canal.
- Final irrigation (not shown in this video).
The video shows all 27 steps and is almost 11 minutes long. If desired, you can “skip” a step when its essence becomes clear. Below is the protocol in text, and at the very end of the article is a short English-Russian glossary of terms used in the video. For those who want to improve their “dental English”.
Subscribe to the YouTube channel Stomanet.ru!
[yuzo_related]
Pulp removal
- Pulp removal. File No. 15 H, 16 mm, filling motion.
- Irrigation.
- Pulp removal. File No. 10 K 18 mm, reciprocating twisting movements (as when winding a watch), alternating with pulling.
- Irrigation.
- Pulp removal. File No. 10 K 20 mm, reciprocating twisting movements (as when winding a watch), alternating with pulling.
- Irrigation.
- Pulp removal. File No. 08 K 22 mm, reciprocating twisting movements (as when winding a watch), alternating with pulling.
- Irrigation.
- Pulp removal. File No. 06 K 24 mm, reciprocating twisting movements (as when winding a watch), alternating with pulling.
- Irrigation.
- "Carpet". File No. 08 K 24, vertical reciprocating movements (up and down)
- "Carpet". File No. 10 K 24, reciprocating movements vertically (up and down)
- Irrigation.
- "Carpet". File No. 15 FF 24, reciprocating movements vertically (up and down).
CHAPTER 5. COMBINED (HYBRID)
PREPARATION METHODS
Using a hybrid technique for root canal preparation, instruments of various types and tapers are used according to various individual techniques. It becomes possible to eliminate many problems that arise during endodontic treatment.
Expanding the mouth of the canals and passing it to the first bend using machine processing provides good access, and most importantly, the contents of the most infected section of the canal are removed first. After this, you can carefully process the apical part by hand. Preparation of curved canals. The success of root canal treatment largely depends on the angle of bending. There are easily accessible canals for instrumentation (bending angle up to 25°), hard-to-reach (26-50°) and inaccessible root canals (bending angle more than 50°). The advent of nickel-titanium alloy tools greatly expands the machining capabilities, but the figures given should serve as a guide for the choice of expansion method.
The need for a hybrid technique combining step-back and crown-down
technique, arises:
n if there are obstacles in the channel even for one of the smallest files - No. 8 - go to No. 10-15, then return to 8;
n for curved root canals, use Gates Glidden burs and large files to reach the bend, then switch to the “step-back” technique.
It should be remembered that narrow curved canals are recommended to be expanded by 2-4 sizes from the initial width to prevent root perforation. When treating a curved canal, its length can be reduced by 0.5-2 mm due to straightening. Endodontic instruments smaller than size 10 are disposable; the shine of the cutting edge indicates that the instrument is dull.
Basic rules to avoid mistakes (instrument breakage in the canal, perforation, etc.):
1. When working with K-reamer and K-file, they must be given a bend corresponding to the curvature of the root.
2. The root part of the canal must be straightened during the preparation process. Curved canals should be prepared with flexible instruments made of nickel-titanium alloy with an inactive tip. The movement of all files should be reciprocating within limits not exceeding 90-100°.
Root canal expansion technique:
1. Using an x-ray, determine the angle and location of the root bend.
2. Then, they pass through the canal and determine the working length. With the Step-back technique, the necessary files are bent according to the curvature of the root. The silicone stopper marks the working length of the tooth, and the cutout on the stopper indicates the direction of bending of the tool.
3. The file is inserted into the canal so that the bend of the file and the root coincide. An important condition for success in the work is the use of EDTA and sodium hypochlorite solution.
It should be remembered that if the bend of the instrument does not correspond to the bend of the channel, then perforation may occur during the straightening process.
Expansion of curved canals using profiles, GT files and propapers is carried out according to generally accepted methods.
The “step back—step down” method is a modified method of passing in two directions with the following working steps:
I. Preparation of the coronal part of the root canal with H-files of sizes 15, 20 and 25 to a depth of 16 to 18 mm or until the canal begins to curve. ISO size 08 and 10 instruments are used in narrow, complex root canals.
Thanks to this, it is possible to control the patency of the root canal. Additionally, an H-file is used, which is constantly reused to double-check the patency of the root canal.
P. Expansion of the canal opening with Gates Glidden instruments size 1, 2 and 3. Gates Glidden size 3 should be inserted into the canal only 1-2 mm.
III. Determination of the working length of the tooth.
IV. Preparation of the apical part of the root canal using the “step back” method.
The combination of methods eliminates many of the disadvantages of the “step back” method.
Complications of the method:
· perforation or blockage, especially of narrow root canals. These disadvantages can be avoided by strictly following the preparation technique.
'Buchanan' technique
The purpose of the Buchanan technique is to prepare the canal for a single, but non-standard gutta-percha pin.
1. Passing the canal with instruments of the K-files series No. 10-25 until the working length of the tooth is obtained.
2.Formation of the channel. Carry out with GT-files tools having four taper options: 0.06; 0.08; 0.10; 0.12 mm/mm with a tip diameter of 0.2 mm.
Purpose of GT-fils:
0.06 - for very thin channels;
0.12 - for wide ones;
0.08 and 0.10 - for most channels.
Select the appropriate GT-file.
3. Setting the tool to working length (minus 2 mm).
4. Rotating clockwise 90-180°, move along the channel with gentle pressure. Before each advance in the root canal, the instrument is rotated counterclockwise. At a distance of 3 mm to the apical tip, it is possible to expand the apical part of the canal to the entire working length of the root canal using K-files instruments from No. 15 to No. 35.
5. Prepare with the safe tip of the GT-file over the entire working length of the root.
Finally, the canal acquires a standard taper, corresponding to the taper of non-standard gutta-percha pins: 0.06 mm/mm - “thin”; 0.08 mm/mm - “thin-medium”; 0.10 mm/mm - “average”; 0.12 mm/mm - “medium size”. With all other preparation methods, the amount of taper is unpredictable, as it is created arbitrarily by a variety of different endodontic instruments.
GT-Rotarv technology
The name "Jiti Rotary" is associated with the use of a modification of manual GT-files. This modification primarily concerns the size rather than the taper of the GTfiles. A special set of machine tools allows you to quickly and classically carry out work using the “crown down” method with a small combination of “step back” elements.
Stage I is the actual “crown down”. Channel processing begins with GT-file No. 12/20 (marked with two blue stripes) at a rotation speed of 150-350 rpm. With light movements up and down to a depth of 3-4 mm, the instrument is advanced apically. As soon as progress becomes difficult, the tool is removed, cleaned and a new GT-file No. 10/20 is taken (marked with two red stripes). Repeat the same steps.
As a result, the file should reach the middle part of the root canal or slightly further. The tool is removed, cleaned (as it is usually completely clogged with sawdust) and replaced with GT-file72 -f . No. 08/20 (marking - two yellow stripes). Repeat the same steps until the tool stops moving forward. At this stage, the last change of the tool GT-file 06/20-(marking - two white stripes) takes place and advances forward approximately 1-2 mm to the root apex. The length of the tooth is estimated approximately using a diagnostic radiograph.
Stage II - determination of the working length of the tooth is more accurately carried out X-ray or with an apex locator using a K-file of 10-20 sizes.
Stage III - apical preparation. Using the second part of the tool kit, take GT-Rotary-file No. 04/20 (marking - one yellow stripe). Using a silicone stopper, set the length to 0.25 mm shorter than the working length of the tooth determined above and carefully move apically to reach it. Using the new tool GT-file 04/25 (marking t-one red stripe), they repeat the passage already. to a shallower depth - 0.5 mm from the root apex. Using the next GT-file No. 04/30 (marked with one blue stripe), the canal is expanded 0.75 mm from the root apex. If necessary, take the last tool GT-file 04/35 (marked with one green stripe) and advance it 1 mm from the root apex.
Stage IV - processing of the mouth of the canal (“flaring”). It is carried out with a complex shape of the mouth and the mouth of the canal using the third additional part of the set of instruments. The QT-Rotary-file is rotated using both conventional contra-angle handpieces and an endodontic handpiece.
Ruddle technique
It is a combination of several well-known technologies: “step down”, “crown down”, balanced force, “step back”.
The main goal of the technique is to prepare the canal for three-dimensional obturation.
The main idea of this method is a wide cone-shaped development of the canal, which allows for effective preparation, irrigation and cleaning of the apical part. In the future, this shape of the channel guarantees its three-dimensional filling.
Unlike the Buchanan technique, the Ruddle method uses from 15 to 40 tools. The shape of the prepared canal is conical, but in each case it is individual.
Formation of the apical third of the canal
- Irrigation.
- Formation of the apical third of the canal. File No. 35 FF, 20 mm, reciprocating twisting movements (as when winding a watch), alternating with pulling.
- Irrigation. Passing the file 10 K, movements - as when removing pulp.
- Formation of the apical third of the canal. File No. 30 FF, 22 mm, reciprocating twisting movements (as when winding a watch), alternating with pulling.
- Irrigation. Passing the file 10 K, movements - as when removing pulp.
- Formation of the apical third of the canal. File No. 25 FF, 24 mm (passing), reciprocating twisting movements (as when winding a watch), alternating with pulling.
- Irrigation. Passing the file 10 K, movements - as when removing pulp.
Show your patients how their teeth work. This will help them understand you better and appreciate the treatment you provide more. The posters “Anatomy of a tooth blueprint”, “Anatomy of a tooth light” and “How a tooth works” will help you in this matter:
Stylish, light and bright. Choose:
https://lavka.stomanet.ru/product/stomatologicheskie-plakaty-anatomiya-zuba-blyuprint-a2/
https://lavka.stomanet.ru/product/stomatologicheskie-plakaty-anatomiya-zuba-lajt-a2/
https://lavka.stomanet.ru/product/stomatologicheskij-plakat-kak-ustroen-zub-a2/
Determination of the working length of the root canal
Determining the working length of the root canal can be considered a key point in endodontic treatment. Being an integral stage, it does not take much time, however, it should not be neglected.
The working length can be defined as the distance between a conventional point on the tooth crown (for example, any preserved cusp), which we remember throughout the treatment, and the physiological apex.
There is a difference between certain types of constrictions in the apical third that must be remembered.
Physiological narrowing is the point of transition between endodont and periodontium; the walls of the canal in this place are made of cement.
Anatomical apex is the anatomical tip of the tooth root.
X-ray apex – image of the anatomical apex on the Rh-gram.
Methods for determining the working length of the canal include the use of an apex locator, X-ray, tactile, tabular, paper pins and the sensitivity method.
Apex locator
It is impossible to imagine modern endodontics without an apex locator. Its action is based on determining the location of the enamel-dentin border. The hard tissues of the tooth and the mucous membrane have different resistance indicators (higher for hard tissues). When the instrument is inserted into the canal, the resistance on the metal part of the mouthpiece increases sharply. An open electrical circuit is created. When the constriction is reached, the circuit closes.
Modern apex locators work equally well in dry or wet canals. The method has an accuracy of 90% or more, provided that the canal is not blocked by sawdust from infected dentin.
Tabular method for determining working length
The tabular method for determining the working length is based on the use of the average long-studied lengths of the root canals of each tooth. But no one has canceled the individual parameters of each person.
X-ray method
The radiographic method is suitable for filling the canal up to the radiographic apex. On the plus side, the method is objective; in most cases, it is easy to recognize the top with a correctly taken picture. The disadvantages are that the structures may overlap each other in the image, there is a high probability of poor visualization of curved canals, difficulties in performing in some patients (increased gag reflex, radiation exposure).
Paper point method
The paper pin method is based on moistening the tip of the pin while bringing it to the top. It can be wetted with blood, serum, pus.
Tactile method
The tactile method is the determination of the working length of the canal based on one’s tactile sensations. The result depends on the doctor’s experience, since the technique is complex and is not effective if the apex is unformed.
The patient's pain can also help in determining the working length at the moment the instrument penetrates the apex and comes into contact with the tissues of the apical periodontium.
After determining the working length, preparation or mechanical treatment of the root canal begins. Today, many methods have been invented, each of them has a specific purpose, and also has advantages and disadvantages. To understand the specifics of creating a root canal shape and subsequent filling, you should start with the basic techniques.
Learning Dental English
Coronal third, middle third, apical third
– coronal third, middle third, apical third (tooth root).
Glide path
– “carpet path”, a processed section of the canal that makes it easier.
Working length
– working length (for example, endotool).
Mesiobuccal
– medial buccal (about the root); mesial - medial, buccal - buccal.
GG drill
– Gates-Glidden drill
Patency
– channel passage
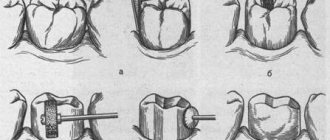
“Crown Down” technique (from the crown down)
The “Crown Down” technique involves staged processing of the canal from the mouth to the apex with a sequential change of instruments from larger to smaller sizes. In this case, parietal dentin is removed only by the apical part of the instrument, which improves tactile control and reduces the risk of jamming and fracture of the instrument.
Mechanical treatment of the canal in accordance with the “Crown Down” technique is carried out as follows.
The first stage is the introduction of a K-file No. 35 into the root canal to a depth of 16 mm.
First, they try to insert a K-file No. 35 according to ISO to a depth of 16 mm into the root canal. If it is not possible to insert this file to such a depth, an x-ray of the tooth is taken with the instrument inserted into the canal. The purpose of this operation is to find out what caused the instrument to get stuck: curvature of the root canal or narrowing of its lumen.
If the reason is a narrowing of the root canal, then it is expanded with thinner K-files to a depth of 16 mm until a K-file No. 35 is inserted at 16 mm.
If the reason for the stuck K-file No. 35 is curvature of the root canal, then the canal is processed to the area of curvature.
If the K-file was immediately inserted into the canal 16 mm or more, mechanical treatment of this part of the canal is performed.
The second stage is the determination of the “temporary working length”.
For this purpose, a “measuring” radiograph is taken with a K-file in the canal, which is approximately 3 mm short of the physiological apex. The length of the channel is calculated. The indicator assigned when analyzing such a radiograph is called the “temporary working length”.
To determine the “temporary working length,” a diagnostic radiograph can also be used if it was taken at the first stage of instrumentation of the canal.
The third stage is the passage of the apical part of the canal to the “temporary working length”.
This stage begins by inserting a K-file No. 35 into the canal until it stops, then, without apical pressure, make two full turns of the instrument clockwise and remove it from the canal. Next, take a K-file No. 30, insert it into the canal all the way and rotate it clockwise without pressure until maximum movement in the apical direction and remove it from the canal. Then a similar operation is carried out with K-file No. 25, then No. 20, etc. until the “temporary working length” is reached (for example, up to No. 25).
The fourth stage is determining the “final working length”.
A “measuring” radiograph is taken with the endodontic instrument inserted into the canal to a “temporary working length”. The “final working length” is determined.
The fifth stage is expansion of the root canal.
This stage begins by inserting a K-file No. 40 into the canal until it stops, then without apical pressure, make two full turns clockwise and remove the file from the canal. Next, take a K-file No. 35, insert it into the canal as far as it will go and rotate it clockwise without pressure until the instrument moves maximum in the apical direction and remove it from the canal. Then a similar operation is carried out with K-file No. 30, then No. 25, No. 20, No. 15, etc. until the working length is reached (for example, up to No. 30).
After this, the same manipulations are repeated, starting with K-file No. 45, then with No. 50. Each time they strive for deeper penetration of files.
Mechanical treatment of the canal is continued until its apical part is expanded to the desired diameter, but not less than to No. 25 (for example, to No. 40).
Using the “Crown Down” technique allows you to maintain the original shape and direction of the channel, however, this method is quite labor-intensive. Therefore, it is most often used when expanding root canals using machine tools: profiles or GT files.
The canal must be widened enough to carry out full medicinal treatment and reliably seal it. On the other hand, excessive expansion of the canal can lead to lateral perforation, weakening of mechanical strength and root fracture. At the same time, it should be remembered that mechanical treatment of the canal must be carried out, regardless of the diagnosis: both in the treatment of pulpitis, and in the treatment of periodontitis, and when depulping an intact tooth for orthopedic indications. The main criterion for the sufficiency of mechanical treatment of the root canal should be the appearance of white dentin filings.
Did you like the article? Share with friends
0
Similar articles
Next articles
- Errors and complications arising during instrumental treatment of root canals
- Root canal filling
- Filling with one paste
- Single pin method
- Lateral (side) condensation method
Previous articles
- Apical-coronal methods
- Methodology for instrumental treatment of root canals
- Retrograde pulpitis
- Chronic hypertrophic pulpitis
- Chronic gangrenous pulpitis