MAKE AN APPOINTMENT
- Removal cost
- Indications
- Preparation
- Methods and steps
- Complications
- What to do after the procedure
- Our doctors
- Reviews
- To make an appointment with a doctor
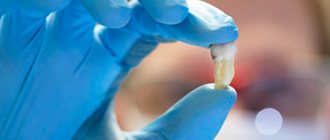
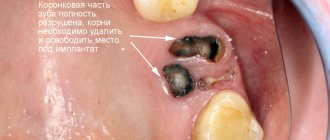
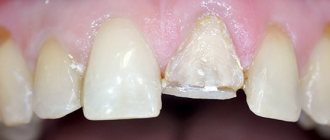
In practice, specialists at Plomba dentistry periodically encounter cases of complete destruction of the crown of a tooth and infection of the root system, in which a purulent-inflammatory process occurs. Most often, this problem can be solved only by removing the root and remains of the tooth. But sometimes the root system can be preserved for subsequent prosthetics. How the removal will be carried out, what measures and tools will be used, the doctor will be able to decide after familiarizing himself with the clinical picture.
Indications for tooth root removal
- Complete destruction of the coronal (supra-gingival) part, affecting the root system;
- extensive purulent-inflammatory process at the root: cyst, abscess;
- longitudinal axial fracture;
- previous incorrect extraction - during removal, fragments remained in the hole, causing an inflammatory process that affected nearby tissues.
The damaged area of the tooth is easily identified visually. Additional symptoms of the need for urgent medical intervention and even possible removal of a diseased tooth are:
- twitching, throbbing pain;
- acute pain due to mechanical action - pressing, biting, chewing food;
- unpleasant odor;
- gum hyperemia;
- a purulent process is a direct indication of the need to remove the root of a diseased tooth;
- elevated body temperature.
If one or more symptoms are present, the destroyed units are removed. In some cases, incomplete removal is performed - resection of the tooth roots. This usually occurs when the root apex is affected by periodontitis, a small cyst, or granuloma. Often in such diseases the coronal part is preserved. In this case, the damaged part is removed through an incision in the gum. Subsequently, installing a crown solves the problem of restoring the chewing unit.
Main indications and contraindications
Complex removal is required in a number of complex clinical cases when it is not possible to perform surgical intervention using standard techniques and instruments. Very often it is carried out in relation to the last painters (“eights”). As a rule, they do not have enough space, against which they begin to grow incorrectly (for example, erupt towards the cheek, injuring the mucous membrane), slowly erupt, accompanied by painful sensations. The last molars do not participate in the chewing process, so most often the dental surgeon decides to remove them in such situations.
Complex surgical procedures are resorted to in the presence of a chronic inflammatory process, against the background of which the bone tissue and the molar or premolar itself have fused. A complex operation cannot be avoided if the molar has several roots or its area is severely curved. Benign neoplasms (for example, granulomas or cysts) are often an indication for removal if the tooth is destroyed and there is no point in trying to restore it. Sometimes a complex extraction of a previously treated tooth is performed several times. This is due to the fact that it is not durable, its density is weakened, and it is capable of cracking.
As with any surgical intervention, there are a number of absolute and temporary contraindications to complex removal of molars or premolars. Among them:
- diseases of viral etiology;
- serious deviations from the cardiovascular system;
- pregnancy and lactation;
- blood diseases (anemia, poor clotting, leukemia);
- chronic pathologies during exacerbation;
- recent strokes and heart attacks;
- serious mental disorders (schizophrenia);
- long-term use of medications that affect blood clotting.
Preparing for tooth extraction
Removing a tooth or its roots is a rather complex surgical dental procedure, but it will not be difficult for the patient to prepare for it. If local anesthesia is planned to be used for pain relief, the patient should eat a large meal before visiting the dentist because:
- After removing a tooth or root, it is forbidden to eat for several hours;
- salivation after eating is significantly reduced, which will make the dentist’s work easier;
- after eating, blood glucose levels are normalized and the risk of loss of consciousness under the influence of local anesthesia is reduced
In the case of general anesthesia, on the contrary, it is necessary to abstain from eating for several hours before the removal procedure begins. Drinking alcohol before visiting the dentist is prohibited. Alcohol affects the structure of the blood and does not combine well with anesthetics, not to mention the negative impact on the human psyche and behavior.
Inflammatory and infectious diseases of any nature must be cured before surgery to remove a tooth or its roots. The dentist must be warned about the presence of allergies to certain medications, in particular to anesthesia drugs.
A normal pregnancy in general is not a contraindication to dental procedures. However, during this period the use of a number of drugs used in dentistry is prohibited, so information about pregnancy is entered into the patient’s dental record. Also, detailed information about the patient’s chronic diseases, especially heart pathologies, is recorded in the dental record.
Get a consultation
We will answer all your questions before visiting the clinic!
+7
Online registration
Content
1 The difference between atraumatic tooth extraction and conventional
2 Advantages of atraumatic tooth extraction
3 Indications for atraumatic tooth extraction
4 Stages of atraumatic tooth extraction 4.1 Comprehensive diagnostics
4.2 Preparation of membrane from plasma
4.3 Removal with a piezo scalpel and periotome
4.4 Application of blood plasma membrane
5 Disadvantages of piezosurgery for tooth extraction
6 Dental implantation immediately after extraction
7 Prices for atraumatic tooth extraction
Methods and stages of removing teeth or their roots
Most often in modern dentistry, only two methods of removing teeth or their roots are practiced:
- removing a tooth from the gum using forceps;
- rocking of the tooth and its rotation around its axis by elevators.
In cases where the roots are deep, the gum tissue can be cut with a scalpel. In general, the process of removing teeth or their roots is divided into the following stages:
- separation of the round ligament from the neck of the tooth (ligamentotomy);
- applying (installing) forceps to the tooth;
- advancing the fixing elements of the forceps under the gum;
- final fixation of the forceps;
- rotation (rotation) or luxation (swaying) of the tooth;
- extracting a tooth or its roots from the socket.
Tooth extraction involves forcibly tearing the tissues connecting the tooth root with the walls of the socket and gum, and removing it from the alveolus. When diverging and curved roots are removed from the hole, its walls shift during the intervention, and the entrance to it expands.
The tooth is removed with special forceps and elevators. In some cases, they cannot remove the tooth. Then a drill is used to remove the bone that is preventing the root from being extracted (root cutting operation). When using a drill, it is necessary to cool it with an isotonic sodium chloride solution or Ringer's solution to prevent overheating of the bone.
When removing teeth, the lever principle is used. The pliers for removing teeth and roots have cheeks, handles and a lock. Some pliers have a transition part between the cheeks and the lock. The cheeks are designed to grip the crown or root of a tooth. The handles are the part of the forceps by which they are held and to which force is applied during surgery. The lock is located between the cheeks and handles and serves for their movable connection. To better hold a tooth or root, the cheeks have a groove on the inside with a fine longitudinal groove. The outer surface of the handles is corrugated over a considerable extent, while the inner surface is smooth.
The design and shape of the forceps are not the same. Their design depends on the anatomical structure of the tooth and its place in the dentition.
To successfully perform the operation, you should use forceps, the design of which corresponds to the anatomical features of the tooth being removed.
The operation begins with the separation of the circular ligament from the neck of the tooth and the gum from the edge of the alveoli. It is best to do this with a smoothing iron or a narrow flat rasp. Careful separation of the circular ligament and gums facilitates the advancement of the cheeks of the forceps under the gums and prevents rupture of the mucous membrane during the intervention.
Tooth extraction consists of a number of techniques carried out in a certain sequence: 1) application of forceps; 2) moving the cheeks of the forceps under the gum; 3) closing the forceps (fixation); 4) tooth dislocation (luxation or rotation); 5) extraction of the tooth from the socket (traction). The success of surgical intervention depends on the precise and consistent implementation of these techniques.
The tooth extraction operation is performed in a dental chair. The outcome of the operation largely depends on the correct position of the patient and the doctor during this intervention.
Removal of individual groups of teeth in the upper jaw. The method of removing each tooth has its own characteristics. It depends on the shape, number and location of the roots, the thickness and density of the bone around the root of the tooth, as well as the type of instrument.
Removal of incisors. The central and lateral incisors have one root that is cone-shaped and rounded; the lateral one is thinner and shorter than the central incisor. The root of the lateral incisor is slightly compressed from the sides, so its cross section has the shape of an oval. The apex of the root is sometimes curved towards the palatine side. The outer wall of the socket in the area of these teeth is thinner than the inner one.
To remove incisors, the doctor must stand to the right and in front of the patient. When removing a lateral incisor on the left side, the patient should turn his head slightly to the right, and when removing the right lateral incisor, he should turn his head slightly to the left. For a good overview of the surgical field and fixation of the alveolar process during the operation, the doctor with the second finger of his left hand moves the patient’s upper lip and places it on the outside in the area of the alveolus of the tooth being removed, with the first finger covering the alveolus from the palatal side. The central incisor is removed with straight forceps with wide cheeks, the lateral incisor is removed with the same forceps, but with narrower cheeks.
Due to the cone-shaped and rounded outline of the roots of the central and lateral incisors, they are removed by rotation (rotation). Sometimes rotational movements fail to dislodge these teeth from their sockets. Then they resort to rocking the tooth in the labial and palatal sides, then rotate it again. After this, the tooth becomes mobile and is easily removed down and out, where the wall of the socket is thinner.
Fang removal. The fang has one long, massive and laterally compressed root; its cross section resembles the outline of a triangle. The upper part of the root is curved in 30% of cases. The bone on the outside of the root is thinner than on the inside. However, both walls of the alveoli are much thicker than those of the incisors. All this creates certain difficulties when removing a fang.
The position of the doctor and the arrangement of the fingers of the left hand are the same as when removing incisors. When removing the right canine, the patient must turn his head slightly to the left, and when removing the left one - to the right. This head position is more convenient for surgery.
The canine is removed using straight, wide-browed forceps. When removing, combine rocking to the labial and palatal sides with rotation around the longitudinal axis of the tooth. The first dislocation movement is made to the outer wall of the alveolus, since it is thinner than the palatine wall, then in the opposite direction. After this, rotation is carried out.
When removing a fang, significant force is often required due to anatomical features. By successively rocking and rotating, they break the periodontal fibers that hold the root and push the walls of the socket apart. After this, the tooth is brought down and out.
Removal of small molars. The roots of these teeth are compressed in the anteroposterior direction. The root of the first small molar in 50% of cases is completely split into two thin roots (buccal and palatal), rarely - into three (two buccal and one palatal). The root of the second small molar is flattened, has longitudinal grooves on the lateral surfaces, and its apical section is split. If the root of the first small molar is split, then the palatal root is located deep in the bone. The outer wall of the alveoli of these teeth is thinner than the inner.
During removal, the patient's torso is tilted posteriorly and the head is thrown back. It is more convenient to remove the right small molar when the patient’s head is slightly turned to the left, and when removing the left one, to the right. When removing these teeth, the doctor stands to the right and in front of the patient, with the first finger of his left hand (for removal on the right) or the second finger of the same hand (for removal on the left), he pulls the upper lip and the corner of the mouth outward. Accordingly, he places the second or first finger on the side of the palate and fixes the alveolar process from the vestibular and palatal sides in the area of the tooth to be removed.
The upper small molars are located in the middle part of the dentition, so they are removed with special forceps that have an S-shaped bend. This shape of the forceps allows you to correctly apply them to the tooth and carry out lateral dislocation movements without encountering obstacles from the lower jaw.
Small molars are removed by rocking to the vestibular and palatal sides. The first dislocation movement is made outward, towards the thinner and more pliable wall of the alveoli. Movements should be smooth, especially when removing the first small molar, since sudden movements can cause a fracture of its thin roots. These teeth are removed from the hole downwards and outwards.
Removal of large molars. The first and second molars each have two buccal and one palatal roots. The buccal roots are compressed laterally, shorter and thinner than the palatine. The palatine root is massive, cone-shaped. Sometimes (especially in the second large molar) fusion of the buccal roots occurs with each other or the buccal with the palatal, less often - all three roots. The roots of the first large molar are longer than those of the second and diverge more to the sides (especially the palatal root). The top of the roots of these teeth may be slightly crooked.
The outer wall of the alveolar process in the first large molar is thickened due to the zygomaticalveolar ridge, in the second it is thinner than the palatine one. Due to the divergence of the roots, these teeth have powerful bony interradicular septa. All this complicates their removal.
The position of the patient, the doctor and the fingers of the left hand is the same as when removing small molars. The first and second large molars are removed using S-shaped curved forceps, which have different cheek structures for the teeth on the left and right sides. One of the cheeks has a spike at the end; it is placed on the outside of the tooth. The spine enters the groove between the buccal roots. The other cheek with a semicircular or flat end is located on the palatal side.
Large molars are removed by rocking to the buccal and palatal sides. The dislocation of the first large molar begins in the palatal direction, the second - in the buccal side. The tooth is removed from the socket downwards and outwards.
Removal of the third major molar. This tooth has several, often fused roots, forming a conglomerate of a cone shape. The crown of the tooth is smaller and the roots are shorter and more curved than those of the first and second molars. To remove this tooth, special forceps are used, which have short and wide cheeks with rounded ends and pits (to cover the crown of the tooth) on the inside.
The tooth is dislocated by rocking first to the buccal side, then to the palatal side. Removing a tooth with fused roots is usually not difficult. Removing a tooth with diverging, curved, or bent roots can be more difficult.
Removal of individual groups of lower jaw teeth. Removal of incisors. These teeth have one straight, thin and significantly compressed root from the sides, having the shape of an elongated oval in cross section. The root of the lateral incisor may be slightly bent. The bone of the alveoli in the area of these teeth is thinner on the outside than on the inside.
When removing the lower incisors, the patient sits in a chair in an upright position, the head is tilted slightly forward, the chin is down. The doctor stands on the right and slightly in front of the patient, with the first finger of his left hand he pushes back the lower lip and rests it on the outside against the alveoli of the tooth being removed, with the second finger he presses the alveoli from the inside, with the third finger he places it on the chin and holds the lower jaw with it.
The lower incisors are removed using rib-curved forceps with narrow cheeks. Wide jawed forceps can cause damage to the adjacent tooth. The forceps are placed on the tooth so that one of the cheeks is located on the lingual side, the other on the labial side, and the handles are on the outside of the jaw. The tooth is dislocated from the socket by rocking. First, it is shifted to the labial side, where the bone is thinner and more pliable, then to the lingual side. The tooth is removed from the socket upwards and outwards.
Fang removal. The root of this tooth is wider and longer than that of the incisors. It is compressed from the sides and has a cone-shaped shape. There are well-defined longitudinal grooves on the lateral surfaces. The apex of the root is curved and very rarely bifurcates into lingual and labial parts. The outer wall of the alveoli is thinner than the inner.
The position of the patient when removing the lower canine is the same as when removing the lower incisors. The doctor stands to the right and in front of the patient. When removing the left fang, the patient turns his head slightly to the right, and the right one - to the left. The placement of the fingers of the doctor's left hand is similar to their position when removing the lower incisors.
To remove a fang, forceps are used that are designed to remove lower molars and have wider cheeks. The tooth is dislocated by swinging it first to the labial, then to the lingual side. To finally free the tooth root from the tissues holding it, you can make light rotational movements. The tooth is removed from the socket upwards and outwards.
Removal of small molars. These teeth have one rounded root, somewhat compressed from the sides (especially in the upper part). Sometimes it is crooked. The root of the second molar is more massive and long; its bifurcation at the apex is very rare. The buccal wall of the alveoli in these teeth is somewhat thinner than the lingual, or both walls are almost the same thickness.
When removing right small molars, the doctor stands to the right and slightly behind the patient. Grasping his head with his left hand, he inserts fingers I and II into the oral cavity and grasps the alveolar process on both sides. At the same time, the second finger pulls back the corner of the mouth and pushes back the cheek, the first finger - the tongue. The remaining fingers of the left hand support the lower jaw by the chin.
When removing small molars on the left side, the doctor stands to the right and in front of the patient, turns his head towards him, with the second finger of his left hand he pushes back the cheek, with the third finger he moves the tongue, with the first finger he supports the lower jaw by the chin.
Forceps for removing small molars are the same in shape and design as for removing lower incisors, only with wider cheeks. Due to the thick walls of the alveoli, it is not possible to push the cheeks of the forceps deeply. This causes certain difficulties during removal, especially if the tooth crown is insufficiently strong.
The small molars are dislocated by rocking, first to the buccal, then to the lingual side. The shape of the tooth roots allows these movements to be combined with light rotational movements. The dislocated tooth is removed from the socket up and towards the cheek.
Removal of large molars. The first and second lower molars have two roots: anterior and posterior. The roots are compressed in the anteroposterior direction, flat. The anterior root is longer and thicker, often having a slight arched bend forward. The posterior root is straight, deviated posteriorly. In some cases, significant divergence and curvature of the roots are possible. Complete fusion of roots or only their apical sections rarely occurs. The sockets of these teeth have thick and durable walls. In the first large molar, the thickness of the buccal and lingual walls of the socket is the same, in the second, the buccal wall, due to the oblique line passing here, is thicker and more powerful than the lingual.
The position of the patient, the doctor and the fingers of the left hand is the same as when removing small molars. Remove with beak-shaped or plane-curved forceps, which have wide cheeks with triangular protrusions (spikes) at the ends. The forceps are applied and advanced so that the triangular protrusions (spikes) of the cheeks enter the space between the roots.
These teeth are dislocated with rocking movements. The first large molar is dislocated first in the buccal, then in the lingual side, the second - in the lingual, then in the buccal side. The tooth dislocated from the socket is removed upward and to the buccal side. The presence of two diverging roots and the significant thickness of the bone walls of the alveoli sometimes create great difficulties when removing large molars.
Removal of the third major molar. This tooth has anterior and posterior roots, which can grow together into one cone-shaped root. Often the roots are significantly curved and bent back. In some cases, this tooth has three diverging or fused roots or more. On the outside the alveolus has a very thick compact layer of bone (due to the oblique line), on the inside it is thin.
Anomalies of the tooth (size, shape, eruption), and structural features of the bone often create great difficulties when removing it. The position of the patient, the doctor and the fingers of his left hand is the same as when removing small and large molars. Removal is carried out using beak-shaped forceps or forceps curved along a plane, having triangular protrusions at the end of the cheeks. Dislocate the tooth with smooth movements, shifting it first to the lingual, then to the buccal side. Sometimes it is not possible to remove a tooth with forceps, then elevators are used. The tooth is removed from the socket up and towards the cheek.
"Surgical Dentistry" edited by Robustova T.G.
Fourth edition. Moscow "Medicine" 2010
Common complications after tooth extraction
Tooth extraction is essentially a full-fledged surgical intervention. Symptoms such as pain and inflammation in the surgical area are considered normal for the rehabilitation period, unless they are too severe and are not eliminated 3-4 days after tooth (root) extraction. The rehabilitation period may also be characterized by increased body temperature and enlarged lymph nodes.
More serious clinical complications include:
- renewed bleeding from the socket after tooth (root) removal - methods for eliminating minor bleeding can be discussed by the dentist; in case of intense bleeding, it is necessary to urgently consult a specialist;
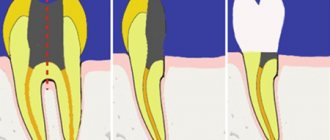
- incomplete removal of the tooth root - the presence of residues is diagnosed by x-ray and follow-up and quickly eliminated;
- alveolitis is a dangerous, but easily eliminated by antibiotics, inflammatory process in bone tissue, characterized by a significant increase in body temperature, swelling, severe pain, and requires immediate treatment, as it can lead to sepsis.
In the first hours after removal, the patient should not eat. Cotton swabs from the surgical area can be removed 30 minutes after completion of all manipulations. In the first days after surgery, it is not recommended to eat sour, sweet, salty, very chilled or hot foods. Short-term cold compresses can relieve pain in the first days after tooth extraction.
Tooth extraction is a last resort in modern dentistry. A qualified specialist must strive by all means to save the tooth even in the most difficult cases.
The final stage of restoring oral health is not the removal, but the replacement of teeth (except for wisdom teeth).
Get a consultation
We will answer all your questions before visiting the clinic!
+7
Online registration
Preparation of plasma membrane
The membrane is made in the morning or 4 hours after eating (water can be drunk, even necessary). The procedure takes about half an hour.
- In the treatment room, blood is taken from a vein in the patient's elbow.
- The biomaterial is placed in a specialized apparatus, where it is centrifuged to separate the plasma.
- In laboratory conditions, doctors obtain the necessary plasma and saturate it with anticoagulants.
The procedure is quite quick and painless. To minimize risks, you should carefully approach the search for a good clinic and an experienced doctor. Implantmaster employs highly qualified specialists who regularly improve their skills and knowledge.
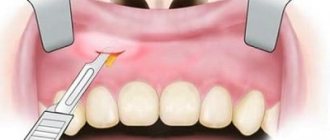
Removal using a piezo scalpel with a periotome
At the Implantmaster clinic, all surgical interventions are performed using anesthesia. Our specialists perform atraumatic removal of any teeth using ultrasound.
The dentist-surgeon, first of all, uses a periotome to separate the adjacent gum from the tooth on all sides. To preserve the bone septum between the roots, the doctor separates the roots from each other. An innovative piezo scalpel - the VarioSurg LED ultrasonic surgical system - separates the roots from the coronal part and their subsequent segmentation. Removal is as safe and painless as possible. Even the most difficult operations are carried out without further complications.
Application of blood plasma membrane
The use of platelet membranes containing cell growth factors accelerates tissue regeneration and healing. During surgery, the membrane covers the defect, implanted bone material or artificial root. Sometimes a fibrin clot is combined with the patient's bone material and introduced into the defect area. Afterwards, suture material is applied. If the membrane was installed to prevent inflammation, then sutures are not applied. It is not advisable to rinse your mouth during the first 3 days.
The introduction of a platelet membrane naturally activates cellular growth factors of the jaw bone and periodontal tissues, increasing the rate of recovery. Regeneration and acceptance of implants or bone material by the body is much faster, and the likelihood of inflammation is significantly minimized.
Blood plasma membranes have a positive effect on:
- increase in the rate of cellular growth factor in the bone after implantation;
- absence of allergies that could occur when interacting with foreign materials;
- accelerated gum recovery after implantation or plastic surgery;
- prevention of inflammation around the implant;
- reduction of swelling and pain after surgical procedures;
- optimal tightening of the socket after tooth extraction;
- minimizing inflammation during gingival curettage and cleaning periodontal pockets.
What to do after tooth extraction
The operation cannot be prescribed without an X-ray examination, which makes it possible to determine the amount and degree of root destruction and the extent of the inflammatory process. Before root removal, the patient is given anesthesia, after which the gum is separated from the neck of the tooth. The surgeon's further actions are determined by the clinical picture. Dentists call the most difficult operation the removal of the deep and often twisted roots of the “figure eight” – the eighth tooth in the dentition. But the specialists of the Plomba clinic successfully cope with this too.
Price
The cost depends on the technology used:
| Name of service | Price |
| Easy removal | 13,500 rub. |
| Difficult removal | 23,000 rub. |
The case includes:
- anesthesia;
- operation;
- removal and application of sutures.
Additional services:
| Name of service | Price |
| Sedation (per hour) | 12,000 rub. |
| Consultation with existing x-ray examination | 2,000 rub. |
| Consultation and X-ray diagnostics (CT scan in our Center on disk) | 5,200 rub. |
| Sight shot | 500 rub. |
Healing process after surgery
After surgery, the recovery period begins. The duration of its continuation is individual, as a rule, 1-2 days. In particularly advanced clinical situations, negative symptoms may persist for about 5-7 days. After a few hours, the effect of the anesthetic wears off, causing the patient to experience severe discomfort. If the pain is pronounced and does not go away on its own, experts prescribe non-steroidal anti-inflammatory drugs and analgesics.
The day after the operation, redness and slight swelling may occur in the area affected by surgical instruments. It gradually goes away on its own when the blood supply to the area is normalized. Sometimes the patient needs to take antibacterial agents (as prescribed by the attending physician).
Immediately after tooth extraction, bleeding may occur. This is due to the fact that a small bloody clot appears in the formed hole. Most often, it can be stopped in the dental chair, but for some, the hemorrhage continues for another 1-2 days. Prolonged bleeding may be due to a number of factors, such as high blood pressure or a bleeding disorder.
To avoid the appearance of hemorrhagic syndrome, it is important to strictly follow all the instructions of the surgeon. People suffering from hypertension are advised to drink motherwort tincture before tooth extraction. With its help, the functioning of the nervous system is normalized and there will be no surges in blood pressure. To monitor the healing process after surgery, you need to see a dental surgeon on days 5-7. There is usually no need to remove sutures as they dissolve on their own. To avoid complications during the recovery period, the following measures are required:
- During the first days, it is recommended to brush your teeth with a soft brush and be especially careful so as not to touch the soft tissues. This will avoid bleeding;
- You should not eat food for the first 2-4 hours. Throughout the entire recovery period, only soft foods and drinks at room temperature are recommended. Chewing on the operated side is prohibited;
- do not rinse your mouth or take baths for the first 24 hours;
- do not undergo strenuous physical activity. Such actions cause an increase in blood pressure, which can lead to hemorrhage.
Signs of good wound healing
During treatment, the patient should understand whether the gums have managed to heal after removal. There are a number of signs of adequate healing:
- Gradual reduction of pain in the gum area.
- Formation of a blood clot.
- After three days of removal, a thin layer of epithelium forms on the surface.
- After epithelialization, granulation is formed.
- A week later, granulation tissue forms from the blood clot and is replaced by bone tissue.
- In the 2nd week, the wound is completely epithelialized.
- In the fourth week, the hole is completely filled with bone tissue with trabeculae.
- After 3–4 months from removal, the wound heals completely and takes on a normal shape.
It happens that a clot does not form in the wound. The repair process in this case is lengthened, but does not differ from normal.
In what cases should you consult a doctor?
For the most part, tooth extraction takes place and is well tolerated by patients. But there are several symptoms that you should consult a doctor if they appear:
- The appearance or increase in intensity of pain after three days.
- Pain of a different nature a week after the manipulation.
- Long lasting bleeding.
- High temperature, chills.
- Unmotivated nausea, vomiting.
- Bad breath, strange taste in the mouth.
These signs are the first signs of incipient complications, which can only be cured by a dentist.