1248
The plaster model is still the main tool and instrument of dental orthopedists and orthodontists.
Despite the fact that modern equipment makes it possible to produce models using 3D printing without taking impressions (by digitally scanning the teeth in the patient’s mouth), most dentists prefer to work with a plaster model molded from an impression.
And this preference is quite understandable. The plaster model provides easy and convenient access to any area of the dentition, to each tooth, allowing the doctor to work without the stress that he experiences when performing manipulations directly in the patient’s mouth.
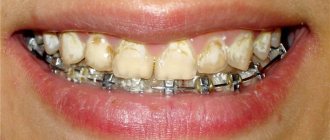
Procedure for installing braces
How braces are installed, whether it hurts or not, how long the procedure takes - most often these are the questions that concern those who decide to fix their smile. Orthodontists remind dental-phobic patients that beauty sometimes requires sacrifice, so you will have to be patient a little.
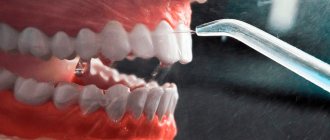
Also, be patient. Installing a brace system on the upper and lower jaw is not a quick task; you will need to sit with your mouth open for 1.5 - 2 hours. This is precisely what worries patients the most, and not the fact that it will hurt. An orthodontist’s work is responsible and he doesn’t like to rush. Get distracted and your new smile may be at risk. An error of even 1 mm is critical! One by one, the doctor glues brackets to the teeth, which are then connected with a metal arch. This is a guide for crooked teeth, it shows the place to which they should move. Don’t believe those who say that installing braces is very painful. The stage is responsible, but painless.
Contraindications for installing braces
- If there are problems with the gums, installation of a braces system is possible only in the absence of an inflammatory process.
- Caries is also considered a temporary limitation for the fixation of orthodontic appliances.
- Poor oral hygiene is a serious barrier to starting treatment. If a person doesn’t brush his teeth well, then braces will only make the situation worse.
- An increased tendency to caries, coupled with poor hygiene, is a contraindication to fixing braces.
How long does the process take?
The orthodontist’s direct manipulation of attaching braces to the teeth takes up to 1.5 hours for one jaw. The duration of the procedure depends on a number of factors:
- Professionalism of a specialist. The more clinical experience an orthodontist has, the faster he will be able to carry out all procedures.
- Type of design. Vestibular, that is, external, ones are much easier to install than lingual ones - those that are attached to the inside of the teeth, preserving the aesthetic appeal of the dental row for the patient. Ligature systems require fixing the arch after gluing it to each tooth, but self-ligating systems are easily secured with clasps.
- Defect complexity. The more complex the pathology requiring correction, the longer the doctor will take to install the structure.
Stages of installing braces on teeth
There are two ways to place braces: direct and indirect. The first is considered a classic and widespread. The indirect method of fixing the bracket system is more progressive, but is still considered new. So far, not all clinics use this method.
Direct method
If braces are installed using the direct method, the orthodontist glues one clasp to each tooth, that is, installs them individually. It is impossible to make a mistake, so the doctor checks his actions with panoramic photographs. This work can be compared to jewelry; accuracy of up to 1 mm is important here. Today this is the most common method of installing braces.
The process of installing braces using the direct method
- An expander is installed in the mouth, with which the orthodontist can clearly see all the teeth.
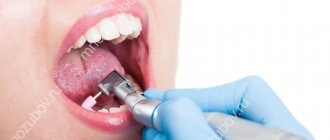
- The tooth surface is polished and dried with a stream of air.
- First, braces are installed on the upper jaw. Locks are glued to the teeth, and dental cement is first applied to them. Then the cement residues are removed, and the solution hardens under ultraviolet light. Installation of braces on the lower jaw can be carried out immediately or after 1 – 8 months, depending on the indications.
- The mouth is freed from the expander, and arches are installed in the braces.
Indirect method
In this case, an accurate plaster model of the teeth is made where the clasps are placed. All this is transferred to a mouthguard, which is placed on the dentition. In this way the entire system is fixed at the same time. Very convenient: the installation time for braces is reduced to an average of 30 minutes, and the design details are installed more accurately. It is clear that the future lies with this technique.
Stages of installing braces using the indirect method
- A plaster cast of the jaw is first taken.
- A plaster model of the dentition is created.
- Locks are installed on the plaster model and connected with an arc.
- The finished structure is fixed on the teeth.
Installing lingual braces on the inner surface of teeth requires highly qualified orthodontist.
Kinds
Dental impressions differ in many parameters that determine their purpose and information content.
The main parameters by which prints are classified:
- Purpose. There are anatomical and functional casts.
The first ones carry only morphological information about the teeth and do not contain data on the functional state of soft tissues. Functional casts are usually made from edentulous or partially edentulous jaws, and take into account the condition of the mucous membrane of the alveolar process and the mobility of its folds. The main parameter that distinguishes anatomical casts from functional ones is the height of their edges. - Method of displaying the jaw. The impression can be complete, made from the entire dentition, or partial, showing only a certain segment of the jaw.
- Type of impression material used. This is the most important parameter that determines the basic properties of the print. This will be discussed in more detail below.
- Number of phases (layers). There are two-layer and single-layer prints.
Two-layer ones involve the use of two materials - dense and viscous, which serves as the basis for the impression, and an easily flowing, corrective one, giving the impression high clarity. Essentially, applying a base coat transforms a standard spoon into a custom one. - Number of withdrawal stages. There are one-stage impressions (removed with one placement of a spoon into the oral cavity) and two-stage impressions, which require two placements of the impression mass into the mouth.
- The nature of pressure on soft tissues. Distinguishes between compression and unloading impressions.
The first ones are removed under arbitrary or chewing pressure. When removing them, viscous materials are used. Relieving impressions are obtained using low pressure with flowing impression materials. There are also combined (compression-unloading) impressions, which are obtained with measured pressure.
Taking into account the layers and stages, the following types of prints are distinguished:
- Single layer one stage . An impression is taken from one material at a time. Advantages: accuracy, uniformity, speed of removal. Disadvantages: voids, pores, errors in displaying the necks of teeth.
- Two-layer one-stage (relatively rarely used).
Having filled the spoon with the basic, viscous material, the doctor makes indentations in it in the projection of the teeth and fills them with a flowing corrective paste. A spoon is inserted into the mouth and an impression is taken. Advantages: speed and accuracy. Disadvantage: requires the help of an assistant. - Two-layer two-stage. First, an impression is taken using the main viscous mass, it is modified to create space for a flowing corrective paste, the latter is placed, and a second, final impression is made.
Advantages: high accuracy. Disadvantage: duration of removal, possible deformation of the base layer.
Features of installing braces in adults, adolescents and children
Installing braces for a teenager is not much different from installing braces for an adult.
Correcting the bite in children simply happens faster. The need for treatment with braces and the appropriate age will be determined by the orthodontist. For a teenager, the cost of braces in Moscow depends on the clinic and the chosen design. Braces are not used on baby teeth. If they are placed too early, the child may be left without teeth. To install braces, you will have to wait at least 10 to 12 years until your teeth change. The age after 14 years is optimal for using braces. Treatment occurs faster than in adults and is easier to tolerate.
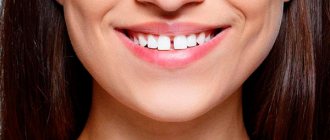
Parents often doubt whether teenagers should get braces. Crooked teeth can lead to health problems over time. Incorrect positioning of teeth provokes the development of caries, periodontitis, and digestive problems.
On-site 3D scanning from Star Smile company
While on-site scanning
operates in Moscow and St. Petersburg. Thanks to this service, all our clients - clinics or doctors - can call a Star Smile employee with an intraoral scanner, who, by agreement, will come to your clinic at the appointed time and scan the patient.
How much does on-site 3D scanning cost?
By the way, the on-site scanning service is free when ordering Star Smile aligners. It increases the accuracy of aligners, speeds up the process of their production, and eliminates the possibility of errors when taking impressions. And as an added bonus: your clinic will look more advanced, high-tech to your patients.
For now, this service is available in Moscow and St. Petersburg. Since we Star Smile operates in more than 70 cities of Russia, we are already considering other cities in which on-site scanning will be in demand by orthodontists and dentists.
What should you do before installing braces?
- Pictures before installing braces.
At the initial appointment, before installing braces, the doctor will conduct an examination and draw up a preliminary treatment plan. To clarify, you will need to take x-rays and casts.
- Impressions before installing braces.
They are done only if it is planned to fix the system using an indirect method.
- Sanitation of the oral cavity.
The main rule is that braces are installed only on healthy teeth. All problems must be resolved before the responsible moment. Maintaining oral hygiene with braces will become more difficult; unattended caries will definitely take advantage of this. Individual braces will have to be removed; treatment will be difficult and expensive. Of course, caries can appear after installing braces on your teeth. In this case, treatment cannot be postponed until later.
- Cleaning before installing braces.
Teeth should not only be healthy, but also clean. At least one day, or better yet several days before, teeth are cleaned before installing braces.
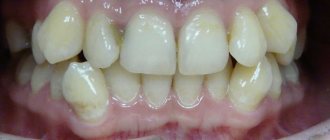
Consolidate the result
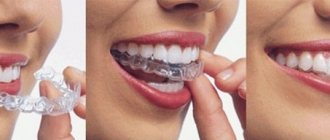
Once the teeth are in the correct position on the jaw, the orthodontic structure is removed. But this is not the end of the treatment. If you do not record the result obtained, the teeth will very quickly shift to their previous positions, since their new position is still very unstable. The fixation period is quite long and amounts to several years. The minimum period of wearing a retainer or transparent aligners is 2 periods of bite correction with braces.
Dentists prefer retainers. This is a thick wire or strip of fiberglass that is secured to the back of your teeth. A person cannot remove the retainer on his own, which means the result of the correction and subsequent fixation will be more predictable. The average period of wearing a retainer is 5 years, but sometimes lifelong use is possible.
The only disadvantage of a retainer is the difficulty in cleaning the interdental spaces. Special removable night guards do not limit your teeth cleaning options. But it’s very easy to “forget” to put them on every evening. Mouth guards are made individually based on a dental impression taken immediately after the orthodontic structure is removed. If you do not use a mouth guard for some time, you may be surprised to notice that it no longer fits over your misaligned teeth.
Adaptation after installation of braces
The first days after installing braces are the most difficult. May have problems.
- Teeth hurt after installing braces.
- The mucous membrane is irritated.
- Diction has worsened.
- Difficulty chewing food.
- Braces interfere with the tongue.
All of the above is a natural reaction of the body to foreign objects. Teeth begin to move in the right direction immediately after treatment begins. It's painful, you'll have to be patient for a while. After installing braces, how much your teeth hurt is the most common question for an orthodontist. If he calculated everything correctly, after a few days the discomfort will decrease. If you can't stand it, take a painkiller. Continuous unbearable pain is a reason for an immediate visit to the doctor.
Pain after installing braces can be caused by irritation of the mucous membrane, in this case orthodontic wax will help. If there is strong pressure from the staples on soft tissue, rinse your mouth with a solution of 1 teaspoon of regular salt per glass of warm water. It is better to treat wounds in the oral cavity with disinfectants.
Gradually, the teeth will change their incorrect position, and the orthodontist will change the metal arch. After this, pain may appear again for a few days, but not as severe as on the first day after installing braces.
Caring for braces after installation
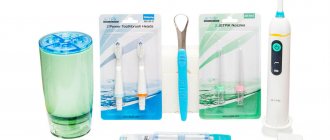
Caring for braces after installation is more difficult than caring for teeth without them. There are more hard-to-reach places in the mouth to clean, and plaque forms faster. It is necessary to responsibly follow all the doctor’s recommendations so that later, after straightening, you do not have to put fillings on all your teeth. You will need an orthodontic brush, brush, dental floss and irrigator.
How to care for braces after installation?
- Teeth with braces must be brushed 3–4 times a day, slowly and thoroughly, ideally for 10–15 minutes. It is recommended to use a special orthodontic brush: you can recognize it by the inscription Orthodontic or Ortho. You will also need a brush to help clean your teeth around the braces. Dental floss can handle even the smallest food debris. An irrigator - a device that can clean the most inaccessible places - completes the care.
- Sticky food is a no-no as it can get stuck under your braces. It is better to postpone sweets, especially toffees, until after treatment, as well as foods and drinks high in sugar and acids.
- Sapphire, ceramic and plastic braces require an expanded list of limited products. Drinks containing high amounts of dyes—tea, coffee, soda, and some juices—can affect the color of your orthodontic system.
- In the first days after installing braces, it is not recommended to eat solid food. As for small children, everything should be pureed and liquid. This even applies to fruits. Anything that needs to be chewed is excluded. You can use meat, but be careful not to get stuck in the fibers. It is better to choose tender varieties and cut into small pieces.
If it is not possible to brush your teeth after eating, you should at least rinse your mouth. Even if you care for your braces according to all the rules, periodically undergo professional cleaning and rinse your mouth with a fluoride solution.
How to install braces inexpensively?
Of course, everyone wants to have beautiful, straight teeth. But in the pursuit of the perfect smile, not the least important question is where the installation of braces in Moscow is inexpensive. The compulsory medical insurance policy does not include bite correction and teeth straightening, which means you have to pay for them. Orphans, disabled children, and children with congenital jaw pathologies have the right to preferential treatment. Free installation of braces in the clinic is provided for patients injured due to medical errors.
You can use tricks and look for great deals at dental clinics. Often, braces are offered as a gift during orthodontic treatment. There are also gifts from trial batches of new products. Many clinics actively use savings systems. The bonuses accumulated over the year may well be enough to pay for braces. The most profitable offers are in the turnkey format.
It is immediately clear how much you will have to spend, and in the future - to avoid mark-ups.
However, be prepared for serious financial costs. Orthodontic treatment is not quick; it takes from 1 to 2.5 years to correct a bite. The most economical braces are metal, from 15,000 rubles. Ceramic models will cost more - from 35,000 rubles and sapphire - from 40,000 rubles. For invisible lingual braces you will have to pay significantly more than for vestibular models - from 100,000 rubles. All prices are for installing braces on one jaw.
.
Materials used
The first material for taking dental impressions was beeswax, which was proposed to be used in 1756 by dentist Gottfried Purman. Gypsum began to be widely used by the mid-19th century.
The cheap material, which accurately depicts teeth, quickly gained popularity among doctors. Its use became an epoch-making event in dentistry.
To date, a huge number of materials have been developed for taking impressions, the properties of which make it possible to make a high-quality impression for any clinical picture. Impression compounds are divided into hard, elastic, thermoplastic, polyester and modeling.
Solid
The traditional, best-known solid material for impressions is gypsum, containing calcium sulfate, borax, starch, and hemihydrate. Hardening time is 2-3 minutes.
Advantages of gypsum:
- ease of use;
- cheapness;
- lack of taste and smell;
- clear drawing;
- good spreading on mucous membranes;
- maintaining the initial dimensions and, therefore, the ability to work for a long time, with breaks;
- easy control of the hardening process by introducing calcium sulfate and borax.
Flaws:
- fragility;
- slow set of final hardness;
- incompatibility with some materials;
- insufficient reflection of undercuts;
- dry mouth after taking an impression;
- moisture absorption.
Other hard materials
- Dentol (a mixture of zinc oxide eugenol and guaiacol). It has low shrinkage, is suitable for taking precise impressions of both teeth and soft tissues, is harmless, and long-term storage is possible.
- Neogenat.
- Repin.
- Vikopres
Elastic
This is the most popular class of modern impression materials, which are also used in treatment with braces.
Elastic (elastic) masses include alginate, thiokol and silicone materials. One of their components is agar - a mixture of polysaccharides with the formula (C12H18O9)n (Malay agar means jelly). When heated they soften and when cooled they become elastic.
Alginate
Standard composition of alginate mass: 18% hydrogel-forming sodium alginate (C6H7O6Na)n, 24% calcium sulfate, 2% sodium phosphate, 10% potassium sulfate, 4% sodium silicofluoride, 56% fillers.
The material is easy to use, highly elastic, creates a clear contour, easily separates from the model, and is cheap. Disadvantages: low strength, shrinkage over time (impressions are not recommended to be stored longer than 15-20 minutes, they are stored in water), poor adhesion to spoons (perforated ones must be used).
Silicone
The material is liquid polymers mixed with a hardener. A distinction is made between A-silicones and C-silicones:
- A-silicones (polyvinylsiloxane) - additive, polymerized through the polyaddition process, eliminating by-products - the highest quality impression materials.
They have an advantage over alginate masses and C-silicones - they are more durable, elastic, retain dimensions better (low shrinkage), and provide greater accuracy of the impression. It is necessary to make models from A-silicones no later than 3 hours after taking the impression (due to the onset of shrinkage).
- C-silicones are condensation silicones that polymerize as a result of a polycondensation reaction.
Models should be made no earlier than 2 hours after taking the impression (the shape is restored after extraction), and no later than 24 hours (shrinkage increases). Disadvantages of C-silicones: they actively absorb moisture, it is undesirable to use them for making more than one model, they can cause the growth of staphylococcus, therefore, after removing the impressions from the mouth, copious rinsing is necessary.
Let's consider methods for determining central occlusion and discuss the goals pursued.
Learn how braces work in this post.
Here https://orto-info.ru/sistemyi-vyiravnivaniya-zubov/breketyi/po-raspolozheniyu/mozhno-li-stavit-na-koronki.html we will tell you whether braces are placed on crowns.
Thermoplastic
Thermoplastic materials include rosin, gutta-percha, walls. Mixtures are produced in the form of discs Ø 100 mm. Melts at 50-70 °C. Warm up in water before use.
Advantages of thermoplastic materials:
- easy separation from models;
- amenable to metallization;
- can be used (introduced into the oral cavity) repeatedly.
Flaws:
- reduced accuracy of casts;
- difficulty at work.
Polyester
These are the most expensive materials with good characteristics:
- High accuracy of relief transfer.
- Versatility.
- Multiple uses.
- Fast curing.
- High strength.
- Admissibility of sterilization.
The most famous brand of polyester materials is Impregum.
Modeling
The materials are combinations of paraffin, wax and other components. They are mainly used in the manufacture of metal prostheses.
The advantages of modeling compounds include accurate representation of the relief. The main disadvantages are low strength and tendency to deform, especially when the temperature rises.