A systematic approach to modeling anterior teeth
The anterior teeth of the upper jaw are characterized by both functional and aesthetic parameters. By their nature, these are the teeth that are visible both when talking and when smiling. That is why there are such a significant number of approaches trying to imitate as much as possible all the subtleties of the anatomy of the teeth of the upper jaw. Considering that in addition to shape, the technician must also understand the characteristics of color, texture, rotation and spatial position of the teeth, it is quite easy for him to get lost in all these details. That is why in this article we will focus not on individual modeling elements, but on a systematic approach to restoring the morphology and structure of the frontal group of teeth.
After completing the modeling of the basic shape, the technician can begin to restore the individual characteristics of the tooth, following the proposed protocol, thereby saving a huge amount of time.
The described approach is unique in both modeling all six anterior units and restoring the shape of a single tooth, regardless of whether the technician is working with wax or final structures, in conventional or digital mode. After all, the most important thing lies in the details, which are emphasized after modeling the basic form of future restorations.
Step by step protocol
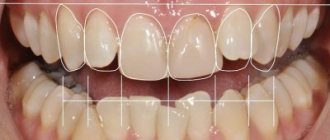
1. When restoring several anterior teeth, modeling should always begin from the middle of the row, namely from the labial cutting edge of the central incisors. The middle of the restoration is determined by the median anatomical landmarks of the face: along the line connecting the bridge of the nose, the apex of the nose and the center of the chin. The second interpupillary line (photo 1) is modeled perpendicular to the midline of the face: the cutting edges of the incisors on the labial side should be parallel to the interpupillary line.
Photo 1. Facial landmarks and transfer of the interpupillary line to the horizontal plane of the central incisors.
2. After this, contact points are modeled: the position of those from the incisors to the canines shifts more and more towards the cervical area, as shown in the photo with a red line (photo 2 - 3).
Photo 2. The area of contact points shifts more cervically from the incisors to the canines.
Photo 3. The area of contact points moves more cervically from the incisors to the canines (red lines).
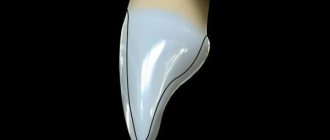
3. At the next stage, the lingual surfaces are modeled. Since all teeth take part in the act of chewing, it is therefore simply impossible to model their lingual surface without taking into account the interaction with antagonist teeth. The cutting edge of the teeth, in essence, is their cutting ridge; in the photo, the line of the cutting edge on the labial side is shown in red, and on the lingual side - blue (photos 4 - 5). These edges are the boundaries of the cutting ridge. We should not forget that the lingual edge of this ridge is not only an aesthetic, but also a functional component that interacts with the lower incisors during chewing, while the labial edge of the upper teeth is visualized when the patient smiles and talks. The labial margin of the restoration can be lengthened or repositioned as long as it does not compromise the function, esthetics and phonetics of the teeth being modeled. The cutting edges are rarely symmetrical and parallel (photos 4 - 5). Simply put, the function of the lingual side of the incisors is derived from their labial contour.
Figure 4. The incisal ridge consists of a labial edge (red line) and a lingual edge (blue line).
Figure 5. The incisal ridge consists of a labial edge (red line) and a lingual edge (blue line).
4. The mesial angle line, which is represented in the photo by a black line, is the next element for modeling (photo 6). If you look at the teeth from the front side, they can be divided into segments vertically (photo 3): the central one can be divided into three parts, the lateral incisors and canines into two. The line of the mesial angle of the central incisor begins near its contact point and ends in the cervical part of the tooth in the region of the mesial third of its lateral side. The line of this angle should correspond as much as possible to the line of the adjacent central incisor. A similar lateral landmark for the lateral incisor begins at or above the contact point and ends in the cervical region near the middle of the tooth side. The line of the mesial angle of the canines also begins above the contact point and moves towards the middle of the tooth.
Photo 6. Mesial angle line (black line).
5. After this, they begin to model the lines of the distal angles (photo 7), again moving from the area of the central incisors to the canines. These landmarks should coincide as much as possible between the teeth on the right and left sides. Of course, the width of a symmetrical tooth may differ, but they can be optically modified to ensure that the lines of the distal angles coincide as much as possible.
Photo 7. The distal angle line moves from the incisors to the canines.
6. The height of the cervical contour, drawn with a white line (photos 8 - 9), should follow the contour of the soft tissues (pink) as much as possible. Therefore, when modeling this parameter, it is necessary to use a duplicate of the soft tissue position. The apex of the cemento-enamel junction of the central incisor is located in the area of the distal third, and the lateral incisor and canine are in the area of the middle of the tooth (photo 6).
Photo 8. The height of the cervical contour (white line) follows the contour of the soft tissues.
Photo 9. The height of the cervical contour (white line) follows the contour of the soft tissues.
7. The last step in modeling is to adjust the labial component of the incisal edge. The shape of this formation (photo 10) can vary greatly, since it does not interact with the cutting edges of the lower incisors during chewing.
Photo 10. Shape of the labial edge.
Typically, the labial edges of the central incisors and canines follow a horizontal line, but during modeling the author uses a Kois Waxing Guide (Panadent) (Figure 11) to ensure that the incisors and canines are exactly in the same horizontal plane.
Photo 11: Kois Waxing Guide is used to check the horizontal plane of the incisors and canines.
If you outline the main forms of modeling without teeth, then everything becomes simple and clear (photo 12). It is important to correctly fill in these lines during restoration and connect the corresponding points correctly. After rough modeling, the technician begins to restore individual parameters. With the vestibular view of the teeth, the distal side of the canines disappears from the field of view or is very faintly traced (photo 13), so the visual shape of the dental arch can be expanded due to better visualization of the distal side of the third teeth.
Photo 12. View of the base lines without teeth.
Photo 13. In the vestibular view, the distal part of the canines is faintly visible.
conclusions
Recreating the aesthetic contours of anterior teeth requires considerable experience, knowledge and skill. During this process, all constituent aspects are important: dental morphology, facial aesthetics, soft tissue contour, as well as occlusal parameters. During modeling, it is important not to focus on any particular shape or tooth, but to take into account the entire concept of the dentition based on a basic optimal algorithm. In the future, the modeling elements can be individualized, significantly saving time in the process of restoring the necessary dental characteristics.
Posted by Steve McGowan, CDT
Resting height and bite height
Bite height is the distance between the upper and lower jaws in the position of central occlusion
Bite height - the distance between the upper and lower jaws in the position of central occlusion
Physiological rest height is the distance between the upper and lower jaw when all jaw muscles are relaxed. Normally, it is usually 2-3 mm greater than the height of the bite.
Normally, it is 2-3 mm greater than the height of the bite
The bite can be high or low. Overbite due to improperly manufactured prosthesis. Roughly speaking, when artificial teeth are higher than their own. The doctor sees that the bite height is 1 mm less than the resting height, or equal to it, or greater than it
The lower third of the face is significantly larger than the middle third
Underestimated - with pathological abrasion of teeth. But there is also the option of incorrectly manufacturing the prosthesis. The doctor sees that the height of the bite is greater than the resting height. And this difference is more than 3 mm. In order not to underestimate or overestimate the bite, the doctor measures the height of the lower part of the face.
In the photo on the left, the lower third of the face is smaller than the middle third
Now you know everything you need, and we can return to the doctor.
2) He received wax bases with bite ridges from the technician. Now he carefully examines them, assessing their quality:
- The boundaries of the bases correspond to those drawn on the model.
- The bases do not balance. That is, they fit tightly to the plaster model throughout.
- The wax rollers are made with high quality. They do not exfoliate and are of standard size (in the area of the anterior teeth: height 1.8 - 2.0 cm, width 0.4 - 0.6 cm; in the area of chewing teeth: height 0.8-1.2 cm, width 0. 8 – 1.0 cm).
3) The doctor removes the bases from the model and disinfects them with alcohol. And he cools them for 2-3 minutes in cold water.
4) The doctor places the upper wax base on the jaw and checks the quality of the base in the mouth: does it hold, does the boundaries correspond, is there any balancing.
5) Next, the dentist forms the vestibular surface of the wax roller. He trims or extends it so that the patient's lip looks normal. That is, it did not stick out and did not sink.
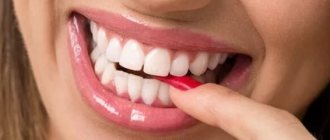
6) After this, it forms the height of the roller in the anterior section. Here everything depends on the width of the red border of the patient’s lips. If the lip is medium, then the upper incisors (and in our case the ridge) stick out from under it by 1-2 mm. If the lip is thin, the doctor makes the roller stick out 2 mm. If it is too thick, the roller ends up to 2 mm under the lip.
The length of the incisor protruding from under the lip is about 2 mm
7) The doctor proceeds to forming the prosthetic plane. This is a rather difficult stage. We will dwell on it in more detail.
Determination of the central relationship of the jaws
At this stage, you cannot simply tell the patient, close your mouth correctly. Even my grandmother often complained that these words were confusing: “And you don’t know how to shut your mouth. It seems that no matter how you close it, everything is right.”
To close the mouth “correctly,” the doctor places his index fingers on the bite ridges in the area of the chewing teeth of the lower jaw and at the same time pushes the corners of the mouth apart. Next, he asks the patient to touch the posterior edge of the hard palate with his tongue (It is better to make a wax button in this place - not all patients know where the posterior edge of the hard palate is.) and swallow the saliva. The doctor removes his fingers from the chewing surface of the roller, but continues to move the corners of the mouth apart. When swallowing saliva, the patient will close his mouth “correctly.” They repeat this several times until the doctor is absolutely sure that this is the correct central ratio.
11) Next stage. The doctor fixes the rollers in a central ratio.
Determination of the height of the lower part of the face
Dentists divide the patient's face into thirds:
The upper third is from the beginning of hair growth to the line of the upper edge of the eyebrows.
The middle third is from the upper edge of the eyebrows to the lower edge of the nasal septum.
The lower third is from the lower edge of the nasal septum to the very bottom of the chin.
The lower third of the face is significantly larger than the middle third
All thirds are normally approximately equal to each other. But with changes in the height of the bite, the height of the lower third of the face also changes.
There are four ways to determine the height of the lower part of the face (and the height of the bite accordingly):
- Anatomical
- Anthropometric
- Anatomical and physiological
- Functional-physiological (hardware)
Anatomical method
Determination method by eye. The doctor uses it at the stage of checking the teeth setting to see if the technician has overestimated the bite. He looks for signs of overbite: whether the nasolabial folds are smoothed, whether the cheeks and lips are tense, etc.
Anthropometric method
Based on the equality of all third parties. Different authors have proposed different anatomical landmarks (Wootsword: the distance between the corner of the mouth and the corner of the nose is equal to the distance between the tip of the nose and the chin, Jupitz, Gisi, etc.). But all these options are inaccurate and usually overestimate the actual height of the bite.
Anatomical and physiological method
Based on the fact that the height of the bite is 2-3 mm less than the resting height.
The doctor determines the height of the face using wax bases with occlusal ridges. To do this, he first determines the height of the lower third of the face in a state of physiological rest. The doctor draws two dots on the patient: one on the upper jaw, the second on the lower jaw. It is important that both are on the center line of the face.
The doctor draws two dots on the patient
The doctor measures the distance between these points when all the patient's jaw muscles are relaxed. To relax him, the doctor talks to him about abstract topics, or asks him to swallow his saliva several times. After this, the patient’s jaw takes a position of physiological rest.
The doctor measures the distance between the points in a position of physiological rest
The doctor measures the distance between the points and subtracts 2-3 mm from it. Remember, normally it is this number that distinguishes physiological rest from the position of central occlusion. The dentist trims or extends the lower bite ridge. And measures the distance between the drawn points until it becomes as it should (rest height minus 2-3 mm).
The inaccuracy of this method is that some people need a difference of 2-3 mm, while others need 5 mm. And it is impossible to calculate it accurately. Therefore, you just need to assume that it is 2-3 mm for everyone and hope that the prosthesis will work.
Whether the doctor has correctly determined the interalveolar height is checked using a conversational test. He asks the patient to pronounce sounds and syllables (o, i, si, z, p, f). When pronouncing each sound, the patient will open his mouth to a certain width. For example, when pronouncing the sound [o], the mouth opens 5-6 mm. If it is wider, then the doctor determined the height incorrectly.
When pronouncing the sound “O”, the distance between the teeth (ridges) is 6 mm
Functional-physiological method
It is based on the fact that the masticatory muscles develop maximum strength only in a certain position of the jaw. Namely, in the position of central occlusion.
How does chewing force depend on the position of the lower jaw?
If there are bodybuilders among you, you will understand my comparison. When you pump your biceps, if you extend your arms halfway, it will be easy to lift a 100 kg barbell. But if you straighten them completely, then lifting it will be much more difficult. The same is true for the lower jaw.
The thicker the arrow, the greater the muscle strength
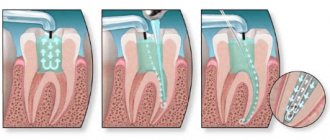
This method uses a special device - AOCO (Apparatus for Determining Central Occlusion). Hard individual spoons are made for the patient. They are edged and inserted into the patient's mouth. A sensor is attached to the lower spoon, into which pins are inserted. They make it difficult to close your mouth, i.e. set the bite height. And the sensor measures chewing pressure at the height of this pin.
AOCO (Apparatus for Determining Central Occlusion)
First, a pin is used that is significantly higher than the patient's bite. And record the force of jaw pressure. Then use a pin 0.5 mm shorter than the first one. And so on. When the bite height is lower than optimal even by 0.5 mm, the chewing force is reduced by almost half. And the desired bite height is equal to the previous pin. This method allows you to determine the bite height with an accuracy of 0.5 mm.
Our dentist uses the anatomical and physiological method. It is the simplest and relatively accurate.
9) Next, the doctor fits the lower roller to the upper one. They should fit snugly against each other. There should be no steps.
10) The doctor determines the central relationship of the jaws.