Determination of the working length of the root canal
Determining the working length of the root canal can be considered a key point in endodontic treatment. Being an integral stage, it does not take much time, however, it should not be neglected.
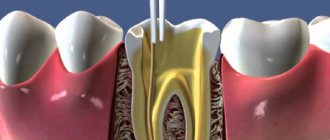
The working length can be defined as the distance between a conventional point on the tooth crown (for example, any preserved cusp), which we remember throughout the treatment, and the physiological apex.
There is a difference between certain types of constrictions in the apical third that must be remembered.
Physiological narrowing is the point of transition between endodont and periodontium; the walls of the canal in this place are made of cement.
Anatomical apex is the anatomical tip of the tooth root.
X-ray apex – image of the anatomical apex on the Rh-gram.
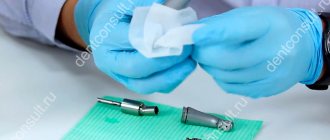
Methods for determining the working length of the canal include the use of an apex locator, X-ray, tactile, tabular, paper pins and the sensitivity method.
Apex locator
It is impossible to imagine modern endodontics without an apex locator. Its action is based on determining the location of the enamel-dentin border. The hard tissues of the tooth and the mucous membrane have different resistance indicators (higher for hard tissues). When the instrument is inserted into the canal, the resistance on the metal part of the mouthpiece increases sharply. An open electrical circuit is created. When the constriction is reached, the circuit closes.
Modern apex locators work equally well in dry or wet canals. The method has an accuracy of 90% or more, provided that the canal is not blocked by sawdust from infected dentin.
Tabular method for determining working length
The tabular method for determining the working length is based on the use of the average long-studied lengths of the root canals of each tooth. But no one has canceled the individual parameters of each person.
X-ray method
The radiographic method is suitable for filling the canal up to the radiographic apex. On the plus side, the method is objective; in most cases, it is easy to recognize the top with a correctly taken picture. The disadvantages are that the structures may overlap each other in the image, there is a high probability of poor visualization of curved canals, difficulties in performing in some patients (increased gag reflex, radiation exposure).
Paper point method
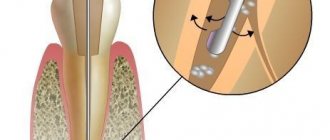
The paper pin method is based on moistening the tip of the pin while bringing it to the top. It can be wetted with blood, serum, pus.
Tactile method
The tactile method is the determination of the working length of the canal based on one’s tactile sensations. The result depends on the doctor’s experience, since the technique is complex and is not effective if the apex is unformed.
The patient's pain can also help in determining the working length at the moment the instrument penetrates the apex and comes into contact with the tissues of the apical periodontium.
After determining the working length, preparation or mechanical treatment of the root canal begins. Today, many methods have been invented, each of them has a specific purpose, and also has advantages and disadvantages. To understand the specifics of creating a root canal shape and subsequent filling, you should start with the basic techniques.
Electronic apexlocation
In modern dental practice, a method for measuring the working length of a tooth, based on the principle of a constant difference in electrical resistance between the soft and hard tissues of the oral cavity, has become widespread. In teeth this indicator is always higher than in the mucous membrane. If it is necessary to measure the length of the root before treating caries in children, one electrode is fixed on the patient’s lip, and the second is placed in the canal and, after achieving physiological narrowing of the periodontal tissue, closes the circuit, which is indicated by the sound signal of the device. The electronic apex location method provides minimal radiation exposure to the body compared to x-ray examination, which is very important when treating children. It is also highly effective when working with patients who have permanent teeth. However, in cases with small children in whom root formation has not been completed, this method gives inaccurate results.
Step back technique (step back)
The Step back technique is considered basic in the study of the art of endodontics. It, being the most popular, is easy to learn and perform.
Stage 1 – passage of the root canal and determination of its working length
Root canal passage is performed using K-reamers. After passing the canal to the apical foramen, the working length is established using a targeted Rh-gram with the instrument inserted into the root canal. The established working length is fixed with a stopper.
Stage 2 – formation of the apical stop
The purpose of this stage is to create an apical stop for the subsequent gutta-percha pin and endosealant to prevent protrusion beyond the apical foramen into the periodontal tissue.
We begin this stage by processing the root canal with a K-file of the same number, which managed to reach the apical foramen and with which we felt it jammed in the apex area. The instrument is inserted into the root canal and processed with sawing movements up and down. After this, the canal is washed with an antiseptic solution. Next, use the tool of the next number with the same length set by the stopper. Mechanical and medicinal treatment of the canal is repeated. Use tools 3-4 numbers larger than the original (but not less than No. 25 - for adequate preparation and rinsing of the canal). The last tool is called Master file. After these manipulations, the root canal acquires a conical shape, which corresponds to the taper of the instrumentation and standard gutta-percha pins.
Stage 3 – treatment of the apical third of the root canal
Continue processing the canal with the next instrument number, but reduce the length by 1 mm. The next tool will be 2 mm smaller, then 3 mm smaller, and so on. Between tools we return to the Master file each time to smooth out the steps in the apical third. Do not forget about antiseptic treatment of the channel between all instruments.
Stage 4 – formation of the middle and upper thirds of the root canal
The goal is to create a funnel-shaped canal mouth for subsequent adequate rinsing with an antiseptic and filling.
It is recommended to use Gates Glidden sequentially from number 1 to number 3. We use it in the straight part of the channel. This stage is completed by passing the Master file over the entire length of the channel.
Stage 5 – final alignment of the canal walls
To give the final conical shape to the canal, its walls are passed and smoothed using a Master file.
In addition to the apical-coronal methods, which include the standard technique (canal preparation with K-reamers from smaller to larger sizes) and the “step back” technique, there are coronal-apical methods, including Step Down and Crown Down.
The difference between them is that they first start with preparing the upper and middle third of the canal, then determine the working length and, at the very end, form the apical stop.
The advantage of coronal-apical methods is to simplify the antiseptic treatment of the canal, facilitate access to the apical third of the canal, prevent jamming of the instrument and the creation of a dentinal plug in the lower third of the canal, prevent the pushing of infected tissues beyond the apex, maintain the anatomical shape of the canal and there is no “loss of working length.” The disadvantage is the difficulty in determining the working length and patency of the root canal.
How many canals are there in the 5th, 6th, 7th and other teeth of the upper and lower jaw, what is the length
Teeth differ from each other in shape, structure, and number of roots.
The space inside the root is called the root canal. The number of roots has a relationship with the load that falls on the tooth, but the number of canals in the tooth does not have a direct relationship with the number of roots. And even in the same tooth, the number of canals may vary among different people. The key to high-quality endodontic treatment is the accurate determination of the tooth canals: their number, length, shape.
Typically, the deeper a tooth is in the mouth, the more canals it has. The number of canals in the teeth of the upper and lower jaws differs: the upper teeth have more of them.
A preliminary assessment of the number of canals in a tooth is carried out according to the table (the probability of a certain number of roots depending on the location of the tooth):
Thus, the canals of the 24th tooth (the left quad in the upper jaw) in 85% of cases are determined by the number 2. That is. This tooth usually has only two canals. But 9% of people can only have 1 channel, and 6% have 3 channels. On the other hand, the “seven” of the lower jaw most often (77%) has 3 canals in the teeth. We can judge with the greatest confidence how many canals there are in the front tooth on the upper jaw - only 1.
It is statistically impossible to answer the question of how many canals there are in a wisdom tooth: for the upper ones, the number varies from one to five, for the lower ones – about three.
The exact number can only be found out when opening the tooth or based on the results of radiography (targeted, for a specific tooth, or orthopantogram, to assess the condition of all teeth).
Step Down technique
Stage 1 – preliminary assessment of working length
The instrument is not inserted to the top. The radiograph determines the number of root canals, their curvature and estimated length.
Stage 2 – expansion of the mouth, formation of the upper and middle third of the canal, creating access to the apical third
A thin K-file (No. 8 or 10) is inserted into the root canal 4-5 mm or until the beginning of the curvature. Processing of this part of the canal begins with K or H-files, thus not reaching the apex. The stage is completed by using Gates Glidden from 1 to 3 numbers, inserting it into the canal only 1-2 mm.
Stage 3 – passing the apical part and determining the length of the root canal
They pass with a K-rimmer until it jams and determine the working length as in the “step back” technique.
Stage 4 – treatment of the apical third with an instrument and formation of the apical stop
The treatment is carried out in the same way as in the Step back technique. The channel takes the shape of a cone.
Stage 5 – final alignment of the walls
The final alignment is carried out with the same instrument used for processing the apical third of the canal.
Advantages and disadvantages of the technique
With a large number of advantages of coronal-apical processing methods, the inability to determine the length of the canal is a significant drawback.
Coronal-apical processing methods have the following advantages:
- Allows you to reach the farthest part of the tubule
- Gradual removal of waste particles reduces the risk of intracanal infection
- It is easy to inject medicine into the resulting depression
- The risk of the tool getting stuck inside the tooth is minimized
- The risk of blocking the far part of the canal with dentin particles and destroyed soft tissues is minimal
- The method allows not to reduce the working depth
- The natural shape of the root canal is not disturbed
The main disadvantage of the technique is that the doctor cannot determine in advance how long the canal is and how clogged it is. Therefore, it takes him quite a lot of time and effort to process the withdrawal.
Tactile method
This method is based on the principle that after removing obstructions in the mid-coronal portion of the canal using a small K-file, the apical narrowing can be felt before exiting the root canal.
Flaws:
- Depends on the skills of the specialist;
- Ineffective when the root apex is unformed, in excessively curved or sclerotic canals;
- Unpredictable and difficult to reproduce.
Patency of dental canals
In addition to the number and length, important information is the patency of the root canals, which depends on the degree and location of the curvature. If the curvature is less than 25 degrees, then the canal is instrumentally accessible, from 25 to 50 degrees it is difficult to access (the so-called difficult tooth canals), and over 50 degrees it is inaccessible. When the curvature is localized near the mouth of the canal, it is possible to expand the latter and improve patency.
If the examination reveals a too narrow, deep canal in the tooth, a CT scan may be required to clarify its configuration. Treatment of complex teeth requires particularly painstaking work, which can be made easier with the help of a microscope.
Sometimes the doctor cannot find the canal in the tooth. This situation is usually associated with obliteration (narrowing or overgrowing) of the canals due to an inflammatory or tumor process, incorrect treatment in the past, or age-related changes.
Remember that only a specialist can assess the condition of the root canals and, depending on their structural features, determine treatment tactics.
Treatment of canals using chemicals
Chemical treatment is used when mechanical cleaning is not possible. Usually the procedure is performed using chemicals when the canals are too narrow or completely impassable. After chemical treatment, mechanical treatment can be carried out.
Previously, nitric and hydrochloric acids were used for the procedure. But later they abandoned these substances, since they burned the surrounding tooth tissues when they got on them. Today, calcium salts and chelating agents are used. They can be in liquid or gel form. Solutions of calcium salts penetrate well into narrow channels. The advantage of these substances is their antiseptic property. In addition, they contain EDTA, which provides good glide for instruments. Chemical treatment is carried out in several stages:
- The cavity in the tooth is thoroughly dried.
- A solution is placed in it and injected.
- After penetration of the chemical, the channel is expanded mechanically.
Solutions do not have a negative effect on surrounding tissues. Drugs must meet the following requirements:
- Have a bactericidal effect.
- Do not damage surrounding tissues upon contact.
- Do not cause allergies.
- Do not cause resistance in microorganisms.
- Have a quick effect.
- Be active in the presence of organic compounds.
- Do not have a strong odor.
Today it is almost impossible to select a substance that will meet all of the above requirements. The most popular drug used in dentistry for root canal treatment is sodium hypochloride. It is effective, has broad bactericidal activity, thanks to which it protects the tooth from various microorganisms.
After the treatment, filling is performed. For this purpose, high-quality materials are also selected that will retain their shape and volume in the canal cavity. This property will provide reliable protection against bacterial infection.
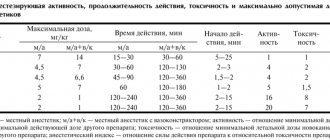
Table method
Over a long period of clinical observations, doctors have accumulated an extensive database on the working length of root canals. So, if there are no other options, you can take a conventional cutter and check the readings in the table. If there is no apex locator and x-ray, then this method should be supplemented with tactile. However, the anatomy of each person is individual, so the reliability of the table values is also not high. The data itself is listed below. The eighth teeth are not represented, since they very often have extra canals with unique anatomy.
Tips and Tricks
- Always measure working length on preoperative radiographs;
- Check the working length at all stages of endodontic treatment: from exploration to glide path creation and canal formation. The more curved the channel, the greater the tendency to reduce the working length;
- Carry out preliminary passages of channels;
- Be alert to the presence of metal restorations, which may cause false apex locator readings;
- Determination of the working length should be made gradually using the apex locator scale;
- The device must have close contact with the canal walls for correct interpretation; in the presence of wide canals, larger files are used;
- Do not measure the device readings when the channel humidity is high.
The translation was made specifically for the
Stomatologija forum. su. Please, when copying material, do not forget to provide a link to the current page.