Canal unsealing is a dental procedure that is aimed at removing a previously installed filling. Another name for it is “disobturation”. The process requires expansion of the canals in the direction from the crown to the apex of the root for the purpose of high-quality cleaning of dental cavities. The procedure is resorted to after endodontic treatment carried out with violations of technology. It must be carried out on time, since infectious agents that have penetrated the dental tissues will provoke the development of inflammatory processes, which, in turn, can cause the loss of the entire tooth.
The therapeutic department of dentistry CELT invites you to undergo root canal retreatment in Moscow. Our clinic is multidisciplinary and has been offering paid medical services for more than two decades. Our dental therapists have a modern diagnostic and treatment base in their arsenal, thanks to which they are able to accurately and promptly make diagnoses and carry out treatment in accordance with international standards. You can find out the approximate price for unsealing canals by going to the “Services and Prices” tab. We regularly update the price list, but in order to avoid misunderstandings, we recommend that you check the exact numbers with our operators or at a doctor’s appointment.
Consultation with a dentist-therapist - 1,000 rubles.
Unsealing a previously obstructed canal (1 canal) - RUB 3,000.
Unsealing the canal under the stump tab - 1,700 rubles.
At CELT you can get advice from a dental specialist.
- The cost of a consultation with a dentist-therapist is 1,000
Make an appointment
Indications and contraindications for root canal filling
Indications
- Painful symptoms, inflammatory processes and swelling of the gum tissue in a patient who some time ago underwent endodontic treatment;
- Insufficient quality of the filling is its depressurization or poor fit at the edges, which makes it difficult to remove food debris and provokes the development of a carious process;
- Inflammatory or infectious processes of the dental canals under the filling;
- The need for retreatment of root canals for pulpitis, periodontitis, cystic formation, granuloma;
- The need to install an intracanal pin;
- Violations of the previously performed root canal obturation technology.
Contraindications
- Serious damage to the periodontal tissues surrounding the unit, which is not an obstacle to saving the tooth;
- The unit is unsuitable for restoration;
- Impossibility of intervention on its closed part;
- Neoplasm of malignant etiology in the area of the affected unit;
- A purulent-necrotic process that affects bone tissue;
- General serious condition of the patient.
When is root canal filling recommended with gutta-percha?
Lateral canal condensation is a universal method of restoring dental function in the treatment of a wide range of dental pathologies. It allows you to stop the penetration of pathogens of infectious diseases into the dental canals, preventing severe complications, including tooth loss and death (in the absence of high-quality diagnostics and timely assistance).
Filling must be performed only after comprehensive preparation of the tooth and its canal: the affected tissue is removed and the nerve is “killed.” Gutta-percha in dentistry has established itself as a good, proven filling material with high elasticity and filling ability.
Features and stages of unfilling root canals using medication
Chemical deobturation is carried out using one of two methods:
- Moderate complexity - performed in one visit and indicated if you need to remove hardening pastes. The latter dissolve well with organic solvents and are easily removed using endodontic instruments. In this case, canal retreatment under a microscope is carried out in one visit to the dentist;
- High complexity - indicated if the canals were filled with cement or resorcinol-formalin paste, rarely required when treating patients with old fillings. A dissolving gel is instilled into the canal, and after the filling has softened, a special tool is inserted into it, which allows it to be removed by turning it clockwise and counterclockwise. The dentist must work very carefully so as not to damage the integrity of the canal walls or break the instrument. This type of filling requires two visits to the doctor.
Stages of chemical unsealing:
- Removing a surface filling with a dental bur;
- Applying solvent to old material;
- Careful removal of the filling material after it has softened;
- Removal of tissue affected by caries, treatment of other diseases;
- Re-filling of canals.
Unsealing of channels
Author: Bobby Patel
There are many ways to remove gutta-percha from root canals. These include mechanical (stainless steel files or nickel-titanium rotary instruments), thermal (System B), chemical (gutta-percha solvents such as chloroform) methods, or a combination of these.
Mechanical methods for removing gutta-percha
1. Stainless steel hand files
The use of only the mechanical method is effective if the canals are sealed using the standard one-pin method or the filling material is not compacted enough (Fig. 1).
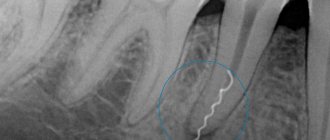
Figure 1. Clinical photographs of retrograde revision of tooth 21. (a) Preoperative radiograph showing a root canal filled using the single-pin method. The source of periapical bone loss is the 21st tooth. Positive thermal and electrical test of the adjacent tooth 22, (b) gutta-percha point removed using mechanical and thermal methods. (c) The canal is filled using the hot vertical compaction method.
In both cases, there will be free space between the filling material and the root canal wall, allowing the Hedström file to be inserted and grip the filling material. Before removal, the file is rotated a quarter turn clockwise to ensure further interaction with the gutta-percha. In this case, the filling material should be easily removed from the root canals. Sometimes the Hedstrom braiding technique is used, in which two or three files are inserted into the memoral canal, hooked, and twisted until they come out (Figure 2).
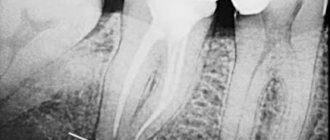
Figure 2. Clinical radiographs and photographs of tooth 22 undergoing endodontic retreatment. (a) Preoperative radiograph demonstrates the removal of the filling material beyond the root apex and periapical radiolucency, (b) the gutta-percha point is removed using a combination of mechanical (Hedström weaving technique) and thermal methods.
Figure 2 (c) The canals are filled using the hot vertical compaction method. (d) A repeat radiograph 6 months later shows a decrease in the size of the lesion and continued healing.
This technique is especially useful in removing filling material from root canals where the filling material has extended beyond the apex.
Removal of gutta-percha most often depends on the technique of the previous obturation. If the root canal is filled with a single pin method or the filling material is poorly sealed, then it can be removed mechanically, in one movement, using only hand tools. The quality of obturation, canal length, curvature, internal anatomy and cross-sectional diameter can influence the ease of extraction of a root filling and sometimes require the use of a combination of additional gutta-percha removal techniques.
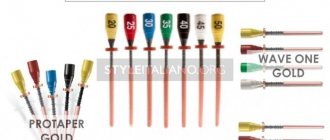
2. Nickel titanium machine tools
Machine nickel-titanium files are used to remove gutta-percha from root canals. For such purposes, special ProTapers have been developed. Such rotary files are used at a set speed of 500 to 700 rpm, which ensures effective capture and removal of obstructive tissue.
Reviews of doctors providing the service - root canal unfilling
Words cannot express my gratitude to Elena Nikolaevna Kiseleva.
This is the best doctor in the world. I got an appointment after many years of being ignored by the dentist’s office and with the bitter experience of treatment in another paid clinic, the mistakes of which had to be corrected in the first visits. Thank you for this... Read full review Roman Stanislavovich Sh
25.07.2020
I would like to thank the wonderful doctor Natalya Olegovna Elizarova for her high professionalism, sensitive and kind attitude, the doctor has golden hands! He is honestly dedicated to his work and a wonderful person who treats his patients with understanding. I wish you health and success!!! Thank you, ... Read full review
Larisa
15.01.2018
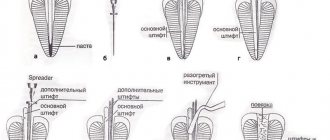
Lateral condensation of gutta-percha points: stages of filling
The procedure for dental canal filling with gutta-percha pins is performed in several key stages:
- Preliminary preparation of the tooth for filling
All affected tissue is removed and a suitable dental canal cavity is formed. It is washed with a stream of clean water and dried. The cavity is treated with antiseptic agents. - Lateral condensation is performed
The dentist selects a master pin suitable for the canal - it must match the size of the endodontic instrument used to finish the root canal. The selected pin, in its length, should be 1 millimeter shorter than the entire length of the canal - this will ensure reliable, even filling of the upper part of the tooth. The selection of the length of the pin can occur in three different ways: visual (the least reliable), tactile and using x-rays (the most reliable).
- Selecting a side seal
The sprender (dental instrument) is selected so that its length is 1-2 millimeters less than the working length of the dental canal and the master pin;
- Filling a dental canal with paste
The dentist fills the previously prepared root canal with endosealant (special filling paste). The paste should be evenly distributed along the walls of the canal, up to the apical opening, but the canal itself is not completely filled.
- Obturation of the canal with gutta-percha
A pre-prepared pin is installed into the canal (it is pre-coated with filling material). There should be no cavities or air bubbles left in the root canal. To improve the quality of filling, the pin is installed using rotational movements.
- Compaction with spreader
The instrument is inserted into the filling canal using rotational movements - this helps fix the pin to the canal walls. Remains of filling paste are also removed;
- Installing a temporary filling
It is performed if the dentist is not sure about the quality of the filling and wants to check the condition of the canal within 1-3 days after the procedure. As a rule, a temporary filling is installed on teeth with complex root canals.
- Installation of a permanent filling
It is the final stage of gutta-percha filling. Performed in the absence of any problems or complications. Depending on the dentist’s recommendations and the patient’s wishes, various filling materials can be used, including composite and polymer.
Why is the procedure so effective?
With the right approach, the procedure allows you to save the tooth due to:
- removal of tissue affected by caries;
- no need for anesthesia;
- eliminating the symptoms of diseases that developed under the filling
The use of a microscope in the process significantly improves its quality, since it allows you to correctly assess the features of the anatomical structure and the condition of the root canals. It is worth noting that the cost of canal retreatment with their use is higher, however, the effectiveness of the procedure increases significantly.
Advantages and disadvantages of the lateral condensation method
Like any other dental procedure, gutta-percha canal filling has its advantages and disadvantages, which the doctor must take into account when choosing a treatment method.
Advantages of the method:
- The simplicity of the method does not involve the use of high-precision, technologically complex dental equipment;
- The risk of complications after the procedure is performed correctly is minimal;
- Provides high-quality filling of the channel. A gutta-percha pin is installed in the most difficult places and fixed with a special compound, which guarantees the absence of cavities (if performed correctly);
- The durability of the result is due to the complete filling of empty spaces during the filling process and the high strength of the materials used;
- It has hypoallergenic properties and does not cause irritation or allergic reactions;
- After complete drying, the filling does not change its previously formed shape;
- The doctor can check the quality of the canal filling using an x-ray;
Despite a whole range of advantages, the gutta-percha filling method also has a number of disadvantages.
Disadvantages of the method:
- Products can only be used to close wide canals, which significantly limits the possibilities of dental treatment of teeth with small root branches, as well as teeth of irregular anatomical shape;
- During the installation of pins, high pressure is applied to the dental canal, which can provoke a fracture of the tooth root - this can lead to the need for complete tooth extraction for restoration with an implant or bridge;
- The use of a large number of pins in one canal increases the risk of destruction of the filling during further use - this is due to the need to apply several layers of endosealant during the filling of the canal;
- There may be only one rod at the top of the root canal, which sometimes reduces the quality and tightness of the filling.