In this article you will learn the main clinical and laboratory stages of making a stamped crown. If you don’t know, or want to learn more about the stamped crown itself (What is it?), you can read our article at the link.
Ready? Then let's go!
So, first we simply list the stages of making a stamped crown:
(All stages are divided into clinical and laboratory. Clinical stages are performed by a doctor, laboratory stages are performed by a dental technician.)
Clinical:
- Tooth preparation
- Taking impressions
- Casting a plaster model based on the impression
- Determination of central ratioLaboratory:
- Plastering the model into an articulator or occluder
- Modeling a future crown from wax
- Cutting out a plaster die from the model (on which the crown is modeled)
- Making a die from low-melting metal
- Selection of a blank sleeve
- Direct stamping Clinical
- Checking the crown in the clinicLaboratory
- Grinding, polishingClinical
- Fixation of the crown.
Now we can look at each stage in more detail:
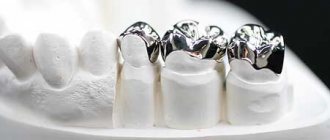
Preparation for a stamped crown
As you probably know, the thickness of the cap for a stamped crown is 0.3 mm. The volume of preparation will be the same. The tooth is shaped into a cylinder, removing 0.3 mm in the neck area (where the ledge is created). In the area of the equator, they are prepared to create a cylindrical stump. The occlusal surface is also prepared by 0.3 mm, and the relief of the cusps is approximately preserved.
Taking impressions
Since a stamped crown is a budget prosthesis, and the technology for its manufacture does not imply high accuracy, the impression does not have to be accurate.
In the USSR, the most popular impression material was gypsum. Now, out of humanity towards patients, impressions are often taken with alginate.
As usual, 2 impressions are taken: a working one - of the jaw where the crown will be. And auxiliary - jaws with antagonist teeth.
Modeling a tooth from wax
Before proceeding directly to the modeling, the technician outlines the clinical equator on the model. The crown is modeled 1 - 1.5 mm short of this equator. This is important for the future tight fit of the crown to the neck of the tooth.
The technician then applies liquid wax to the stump in an even layer, restoring the crown of the tooth. While the wax has not cooled, you need to close the models to get an imprint of the antagonist tooth, this makes it easier to model the chewing surface.
Once the wax has cooled, the technician finalizes the anatomy of the tooth crown. It is important that the crown modeled by the technician is 0.3 mm smaller than the one being restored, i.e. by the thickness of the metal layer. In the future, this gap will be filled with a crown.
a - outlining the line of the neck of the tooth with a pencil. b - border of wax application (dotted line) c - beginning of modeling the chewing surface
Indications and contraindications
Porcelain structures are used for dental prosthetics:
- destroyed as a result of injury or carious process;
- for fluorosis and other non-carious lesions;
- if the enamel changes color or chips, it is an aesthetic defect;
- abnormally located: rotated along the axis, crowded or at intervals when orthodontic treatment is inappropriate.
Porcelain crowns are not suitable for:
- for the manufacture of bridge structures;
- for dental prosthetics with parafunctions of the masticatory muscles;
- to restore the shape of teeth in case of pathological abrasion;
- for prosthetics for severe periodontitis.
A metal-free ceramic bridge can be made from zirconium dioxide. This material is not inferior to metal in terms of strength characteristics, but in aesthetic terms it is inferior to ceramics. To obtain a prosthesis with ideal aesthetics, a frame made of zirconium dioxide is covered with a glass-ceramic veneer.
Cutting from a plaster die model
To obtain a metal stamp, a plaster stamp is cut from a plaster model of the jaw. A low-melting stamp will be exactly the same. Before cutting, the model is immersed in water for several minutes.
The plaster stamp is cut using a flat saw. An important point is that the width of the base of the stamp should be equal to the equator of the tooth. (Wider - and the stamped cap will rest against the base; narrower - there will be folds on the crown).
In the finished plaster stamp (on its base), another line is drawn 1 mm below the previously outlined clinical neck. Use a sharp spatula to make a groove along this line. Then the plaster is cut between the first and second lines.
Important: the area between the first and second lines determines the parameters of the subgingival part of the crown. Its diameter should be equal to the diameter of the neck. If it is wider, the crown will be large. If it’s already, the crown simply won’t fit. Ideally, this area should appear as a vertical line below the clinical neck.
As a result of the above steps, we will eventually lengthen the crown by 1 mm. What is it for? To create a reserve for future circumcision and crown grinding. Otherwise, the crown may end up short. And also, so that it is located 0.2 mm under the gum.
I - highlighting the simulated tooth on the model; II - contours for processing a gypsum column. III - guidelines for determining the length and width of an artificial crown: a - correct, b - incorrect.
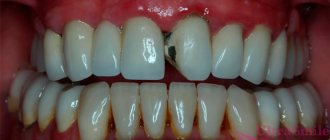
What shortcomings can be found
There are few disadvantages (in number) of plastic crowns on teeth, but they are quite significant. See for yourself:
- fragility of the material,
- a high probability of gum inflammation during long-term use due to a not very tight fit to the gum and support (this does not apply to milled dentures made using CAD/CAM technologies),
- there is a high probability of caries appearing under the prosthesis if the period of wearing it is exceeded,
- risk of allergies,
- rapid loss of color, darkening, pigmentation from food and other dyes: due to the presence of micropores on the surface.
Afterwards, the plastic prosthesis is replaced with a more durable, aesthetic, durable one - for example, ceramic, metal-ceramic, zirconium dioxide, ceramic composite. That is, a permanent one that will last for many years.
Only until 30.09 South Korean implant Osstem - 19,900 rubles.
Hurry up to sign up for a free consultation and lock in promotional prices.
Call now or request a call
Opening hours: 24 hours a day - seven days a week
Making a die from low-melting metal
To make a metal stamp from a plaster stamp, use a special metal frame. The blanks are immersed in water for 5-10 minutes to prevent them from sticking to the plaster mold. Then the plaster is mixed, poured into the mold and smoothed with a spatula. The plaster stamp is half immersed in plaster and waits for it to harden. After this, the mold is removed from the frame, 2 recesses are made (to accommodate the protrusions of the other half of the mold) and lowered into cold water (to prevent sticking). This structure is then filled with plaster again to form the second part of the mold.
After hardening, the mold is opened (with a hammer), the plaster stamps are removed, the 2 parts of the mold are connected and secured in a special retainer. Low-melting metal is melted (there is a spoon with a spout) over an alcohol lamp and poured into a plaster mold, into specially pre-made holes. In total, you need to cast 2 dies for each tooth. One is for preliminary stamping, the second is for final stamping.
Making a metal stamp
Selection of a blank sleeve
Standard steel sleeves are used for stamping. They are produced by the manufacturer in various diameters. All that remains is to choose the appropriate technique. If suddenly a suitable sleeve is not found, you can reduce the sleeve to a larger diameter.
To reduce shell casings, two types of devices are used: the Sharp apparatus and the Samson apparatus. The mechanism of operation of these devices is as follows: There is a matrix with holes of a given diameter and metal pins (Punches). The gap between them is 0.3 mm, just the thickness of the metal. When the handle is twisted, the pin lowers and enters the hole, and the sleeve is pulled out along the diameter of the specified hole. A correctly selected sleeve is difficult to fit onto the die.
During machining, the liner loses its plasticity. Therefore, it needs to be periodically calcined (annealed); without this, the sleeve is difficult to process.
Before stamping, the sleeve is subjected to free forging. In this case, the sleeve is given the orienting shape of the future tooth using a hammer on the anvil. The sleeve is annealed.
Preliminary stamping (Carried out on a special lead plate. Before stamping, a small recess is made on it, using the first stamp, for the occlusal surface of the tooth. The stamp is hammered into the lead plate with a hammer): the sleeve is put on the first stamp and hammered into this stamp in the indicated recess, so that the contours of the chewing surface are imprinted on the sleeve. Forging continues, striking from the chewing surface to the equator. Once the chewing surface is completely finished, the sleeve is removed from the die and annealed again.
Direct stamping
The sleeve is put on the second stamp and stamping begins. It can be performed using one of two methods: the Parker method or the MMSI method.
Stamping of crowns using the Parker method (external method)
They are carried out in a special Parker apparatus. The device consists of a hollow base and a cylinder included in it.
The cavity in the base is filled with moldin (special clay). The sleeve, put on the stamp, is immersed in the mold (crown down), the cylinder is inserted and hit hard with a hammer. From impacts, the mass becomes compacted and evenly presses on the sleeve. The stamped crown is removed by melting the stamp in a melting spoon.
Then the crown is boiled in hydrochloric acid for 1-2 minutes, annealed and cut with crown scissors along the recess line. The edges of the crown are smoothed with carborundum roots. The accuracy of trimming is checked on a plaster stamp blank.
Stamping using the MMSI method
(MMSI - Moscow Medical Dental Institute)
In this method, instead of a mold, a counter stamp made of low-melting metal is used. This counter-stamp is obtained as follows: the second stamp is wrapped with a layer of adhesive plaster. Low-melting metal is poured into a special cuvette (it narrows downwards, turning into a cone). Until it hardens, the stamp is completely immersed in it. Then the resulting form is removed from the cuvette (a stand is placed on the ring and hit with a pestle). And they split it in half so that the stamp can be removed from it. The wax is then removed from the stamp and the crown is placed. Place in the original location in the counter stamp. The counter-stamp is placed in a cuvette and the crown is stamped with hammer blows. As a result, the counter-stamp enters the cuvette and presses on the walls of the sleeve. Stamping is completed when the counter-punch touches the bottom of the sleeve. Everything else is the same as in Parker's method.
Service life
The service life depends on the manufacturing method and the characteristics of the materials used. Thus, for those manufactured by the direct method, the service life is 1-2 months. For laboratory ones – up to 1 year. For those models whose walls are reinforced with fiberglass or metal thread, as well as those made by milling, the service life can be 1.5-2 years. But, of course, if you take good care of the prosthesis - clean it regularly and do not subject it to heavy loads.
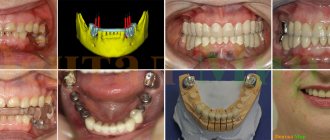
DENTAL PROSTHESIS ON 4 IMPLANTS - from RUB 140,000.
The price includes all procedures for installing Osstem implants (South Korea), including anesthesia and diagnostics.
Hurry up to sign up for a free consultation and fix your prices.
Call now or request a call
Opening hours: 24 hours a day - seven days a week
Fixation of a stamped crown
The finished crown is transferred to the clinic, where the doctor fixes it. First, the doctor checks the quality of the crown again. The stamping is fixed using special cement, usually GIC or zinc phosphate. The crown is treated with alcohol and dried. Dry the tooth stump. The cement is mixed to the consistency of liquid sour cream, added to the crown and placed on the tooth. The patient closes the teeth tightly and waits for the cement to harden. After this, excess cement is removed, and the patient is given recommendations on how to care for the prosthesis. And that is all.
Conclusion: This article lists all the basic steps of crown stamping. I hope everything became clear to you. Read other articles, watch the video AND REMEMBER: It’s not a shame not to know – it’s a shame not to want to know.
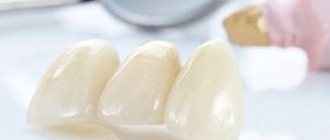
Main characteristics
The products are presented in the form of special orthopedic structures, which are made from pressed ceramics without the addition of metal impurities. For production, porcelain is used, obtained by pressed casting followed by firing.
This material began to be used by dentists in France in the 18th century. Today, porcelain products are most popular in the manufacture of prosthetics. Such crowns are very strong and reliable (in these indicators they are slightly inferior to metal-ceramic and metal structures), look aesthetically pleasing, and exactly replicate the characteristics of the teeth. In addition, they are characterized by hypoallergenicity and compatibility with oral tissues. Such indicators are explained by the complex stages of manufacturing porcelain crowns. High-precision equipment is used in the production process.
The best area for placing such structures is considered to be the front teeth, but some people install them on the molars. Experienced specialists do not recommend using such products on teeth, which are subject to maximum stress during chewing. This is due to the insufficient strength of porcelain, so with regular exposure it can deteriorate.
Structures are divided according to the method of attachment to the base. Crowns come in two classes:
- crampon;
- diatonic.
The last group of products is presented in the form of hollow structures that are attached to the base using dental cement. Often, due to these features, they are called perforated. In most cases they are used for reconstruction of lateral teeth.
Crampon crowns are equipped with a special element made of metal wire. With its help, the prosthesis is fixed. Silver or palladium wire is often used. This is due to the fact that the coefficient of thermal expansion of these materials is as close as possible to that of porcelain during firing. Typically, such crowns are placed on the front teeth.