Content
- Indications for stump restoration
- Formation of a tooth stump
- Dental prosthetics
- Care after crown installation
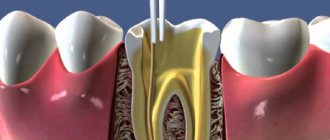
A tooth stump is a smaller version of a tooth onto which a crown is subsequently fixed. If there is enough natural tooth tissue, the stump can be easily formed using the preparation method. If there is not enough natural material, it is necessary to restore the stump under a prosthesis. There are several ways to do this.
PROMOTION
Installation of crowns, dental bridge
RUB 3,450
Manufacturing and installation stages
First, prepare the tooth:
- remove damaged dental tissue;
- root canals are filled;
- unseal the canal to a third or half the length;
- prepare the tooth;
- make an impression of the jaws (usually silicone A is used for this);
- cover the tooth with a temporary filling.
The impression is then sent to a laboratory where the inlay is modeled (using a computer) and cast.
Patients are interested in how long it takes to make a stump inlay. This process will take at least five days.
How to place a stump tab?
Dental prosthetics with inlays consists of several stages:
- a temporary filling is removed from the tooth;
- wipe the insert with alcohol to degrease;
- the tooth is treated with an antiseptic;
- An inlay is placed into the tooth cavity and fixed with special cement (thanks to the cement, the inlay fits tightly to the tooth, which prevents the formation of cracks);
- a crown is installed on the stump tab.
When is stump restoration required?
It is necessary to give the remaining tissues of the upper part of the tooth the desired shape in order to subsequently successfully secure the prosthesis - a crown or bridge. A properly shaped stump is required:
- After endodontic treatment, when tooth restoration with a filling or inlay is undesirable.
- In case of severe destruction of the crown, when restoration by other methods is impractical.
It is important to provide the crown with reliable support. In this case, the tooth root can be preserved for a long time.
Composite vs ceramic
Composite is most often used in cases of direct restoration of teeth with filling material. With the indirect restoration method, the main material is ceramic, which has great strength and flexibility during installation. In addition, ceramics are resistant to stress and do not wear out for a long time.
The big advantage of the composite is its relatively low price, thanks to which even non-rich people can restore teeth.
Direct and indirect composites
Composite materials used in dentistry can be used in two versions.
Direct composites for teeth - the procedure for their manufacture and installation takes place directly in the patient’s oral cavity. In this way, dental gaps are restored and gaps between teeth are filled.
The indirect method involves the production and hardening of the material outside the oral cavity. Moreover, such materials have greater strength, so they are used in the following situations:
- For the manufacture of composite overlays;
- To restore interdental spaces;
- Restoring the integrity of teeth;
- Making crowns.
Composite crowns
The disadvantages of such products are their fragility, therefore they require regular replacement or correction. Dentists use composite crowns to cover the entire tooth.
Indications for use:
- Impossibility of installing metal-ceramic crowns;
- Temporary crowns.
Metal composite bridges
Composite bridges have a special shell that contains the composite. A type of composite bridge involves installing the product on one or more teeth. Thus, an adhesive bridge is more often used, which involves installation on one tooth. Used when the patient does not have normally developed bone tissue for implantation. The procedure has a lower cost than other restoration methods.
Recovery procedure
The procedure for tooth restoration with a composite includes the following steps:
- Anesthesia;
- Preparation of the oral cavity - includes sanitation of the oral cavity and removal of old fillings, cleaning the site where the composite was introduced, selecting a shade and insulating the tooth;
- Direct restoration using bonding techniques and the use of a binder component.
After complete composite restoration of teeth, final finishing and polishing of the tooth surface, bite testing and additional whitening occur. Restoration of the front teeth with filling material is also used.
How does the stump form?
Several methods are used depending on the situation:
- Formation of a stump without a pin. This is possible if the tooth is not severely damaged and there is enough healthy tissue to provide reliable support for the crown.
- Creation of a stump supported by a pin. In this case, the channel, which was previously tightly sealed, expands and a pin is inserted into it. The pin is fixed to durable cement and serves to hold the material and compensate for the chewing load in the future.
- Installation of the stump tab. This approach is used when there is little native tissue and creating a stump from a composite material is impractical.
Pins and stump inlays: choice when restoring a tooth
The topic of restoring damaged teeth using a core insert is relevant both for endodontics and general dentistry. At the same time, each clinician has his own approach to achieving a successful treatment result using stump inlays, but be that as it may, the process of their use itself requires taking into account many important points. To facilitate the algorithm for such a restoration, factory-made, pre-prepared pins are often used, which optimize the process of restoring damaged tooth tissue. On the other hand, given the saturation of the market, it is difficult for a doctor to determine which system is the best for each individual clinical case. Although in fact the very definition of “the best pin” is at least a matter of debate. The more conservatively the clinician approaches root canal treatment, the greater the chance of achieving a positive treatment result and ensuring the long-term functioning of the restoration. This article analyzes methods of conservative root canal treatment and their relationship with promising clinically successful results of complex restoration of dental tissue.
Root Canal Access
Ultimately, the goal of endodontic treatment is to preserve the patient's tooth for as long as possible. Even with the doctor’s maximum desire to carry out endodontic treatment, he may encounter the problem that essentially there is not enough tooth tissue left to further perform any restoration.
Photo 1 shows access to the root canals through a zirconium crown, which was formed under limited conditions.
Photo 1. Limited access.
If the root canal access is too small, the following three problems arise:
- clinicians lack sufficient space to ensure effective cleaning of the root canal space;
- the risk of instrument breakage inside the root canal increases due to a lack of a direct path for file insertion;
- Some of the channels, if the access is too narrowed, may go unnoticed altogether.
When creating too much access, the dentist can provoke too much reduction of hard tissues, thereby compromising the functional prognosis of the entire tooth. Thus, the concept of consensus plays a very important role in endodontic practice. The most reasoned approach is to search and treat root canals under a microscope, in this way it is possible to minimize the volume of prepared tissue and ensure adequate visualization of the entire working field.
Types of pins
Dental restoration using pin structures can be carried out using factory pins, their cast analogues, or even fiberglass versions of the structures. The most biologically substantiated design is fiberglass pins, while metal ones remain the most popular. The latter are factory analogues of different sizes and shapes, which remain the cheapest and most accessible. Also, these pins are characterized by varying degrees of flexibility, which allows them to be used adapted in different clinical cases. The purpose of the pin structure is to restore the tooth stump. The latter can be restored using composite, metal, amalgam, thus ensuring a strengthening of the connection between the future coronal restoration and the residual natural tooth tissues.
Principles of pin placement
To form a successful restoration, it is necessary to take into account certain principles for installing pin structures.
These principles are a kind of recommendations, and require the clinician to take into account:
- amount of remaining tooth structure,
- quality of residual dental tissues,
- features of the structures adjacent to the tooth,
- specifics of occlusion and the presence of parafunctional habits,
- details of the future restoration.
Understanding these principles will allow clinicians to take a more individualized approach to each individual clinical restoration.
Amount of residual tooth structure
When assessing the amount of residual tooth structure, the golden rule applies: if more than half of the tooth tissue is missing, it is necessary to install a pin. The problem is different; it is necessary to assess whether there is enough residual tissue for adequate retention of the crown. This criterion is determined by the ferrule, which is essentially a 360-degree metal collar of the crown surrounding parallel dentin walls and extending from the coronal portion of the tooth to the shoulder of the preparation area. In some clinical situations, ferrule may be sufficient, but in others, its deficiency limits the possibilities of treatment. Under ideal conditions, to restore a tooth, it is necessary to have at least 3 mm of walls on one side and 2 mm on the other, which indicates the presence of a 2 mm ferrule. In such a case, the chance of achieving an adequate treatment option is quite high. If the ferrule parameters are deficient, the possibility of ensuring an effective outcome of the intervention also exists, but the doctor must understand the risk of developing potential complications in specific clinical cases.
Quality of residual tooth structure
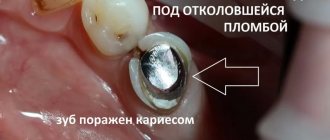
When studying the quality of the tooth structure, the clinician must evaluate the so-called non-ideal conditions for restoration, such as existing discolourations, cracks, undercuts and various concavities. Typically, the latter are more common in premolars, but sometimes they can also be found in the molar area, such as on the distal surface of the lower teeth or on the palatal surface of the upper teeth. In this case, the pin must be installed in as straight a channel as possible. In the 5th tooth, this is predominantly the palatal canal, and only in whitening cases – the buccal canal. It all depends on the individual specifics of their morphology. Photo 2 shows a situation where the doctor treated caries and opened the pulp chamber. Considering that the buccal and lingual walls were intact, although not high, and the tooth structure still contained not only remnants of amalgam, but also cracks, all parameters indicate the need to install a pin. When restoring a tooth without a pin due to the presence of cracks, it would be simply impossible to predict functional changes in its structure, which could ultimately lead to its complete loss.
Photo 2. Minimum volume of residual walls.
Related structures
When a tooth is placed isolated in the dentition, it is subject to a large functional load, due to the absence of adjacent teeth that allow the functional stress to be distributed. Photo 3 shows an x-ray of a single tooth, in front of which it was planned to install 3 implants. At the same time, the clinician had to consider whether it would be possible to retain the given tooth until the implants achieve full integration. Photo 4 depicts a situation that will soon require the placement of a dental implant. For more than ten years, the patient had a functioning bridge, the edge of which, however, hung from the side of the premolar. The placement of the pin in this case was far from ideal, since it was installed only in the distal canal, and not all gutta-percha was removed from the endospace. Ensuring an accurate fit of the post to the walls of the tooth is one of the most important tasks of this type of restoration. Regardless of whether the doctor uses smooth pins or threaded pins, excess gutta-percha must be removed, since its structure is far from the density of the tooth structure. All this ultimately provokes an increase in the mobility of the pin, and as a result, an increase in the mobility of the entire prosthesis.
Photo 3. Single tooth.
Photo 4. Clinical case with the need for a dental implant in the future.
Photo 5 shows an interesting situation in which the apex of the tooth root remained in the socket after extraction. An anesthetized area was observed in the premolar area, which provoked pain. All this was complicated by the fact that the patient was a heavy smoker. He previously had three dental implants installed, but none of them took root. To compensate for the complications, the doctor installed a wider implant for the patient, but that one was unsuccessful. Thus, it turned out to be impossible to implement the concept of prosthetic rehabilitation using a bridge and sometimes implants. Therefore, it was decided to fix the prosthetic restoration on the molar and the opposite canine, but biomechanically this design was too long. The use of partial dentures at the patient's age was not very acceptable. In the end, the doctor and the patient came to the conclusion that it was best to preserve the existing bridge for as long as possible, and when it had to be removed, to restore the defect area with a partial prosthetic structure.
Photo 5. Remaining root after tooth extraction.
Photo 6 shows a root canal, which did not cause any pain in the patient, but did cause a feeling of discomfort. It would seem that there is nothing special in the picture. But the depth of probing of the patient’s tooth area demonstrated the presence of a 6 mm pocket, which suggested a suspicion of a crack in the tooth. In fact, the patient was later confirmed to have a buccal fracture of the mesial root. A certain amount of bone tissue was present apical to the fracture site, but bone support was completely absent coronally.
Photo 6. View of a successfully treated tooth.
During the treatment, root resection was performed, with augmentation of the socket with demineralized lyophilized bone, and covering the intervention area with a collagen membrane. The situation was certainly not ideal. It would be best to remove the existing bridge and install implants. But on the other hand, given that the previous four implants had already failed, I did not want to repeat the bitter experience of disintegration. Also, this type of treatment is also more expensive, which again, given the loss of the previous four implants, was not justified. The patient’s existing bridge functioned for 14 years, and after root resection it lasted another 5.5 years before finally breaking. The question of whether the additional five retentions were worth the restoration of all the above-mentioned problems remains only an individual one. Due to the fact that the pin was installed incorrectly, it provoked an increase in functional stress, which led to a fracture of the medial root.
Occlusal parameters of the restoration
Occlusion, as a rule, is most often not taken into account during endodontic treatment, although in fact it is one of the key factors determining the success of treatment. Patients who are bruxists and clenchers require a specific approach to endodontic treatment, taking into account the distribution of functionally applied forces. Photo 7 shows an x-ray of a patient with bruxism: the patient reacted to hot and cold stimuli, and there was a need to determine which tooth was actually reacting. The periapical radiograph indicated a problem in the area of tooth 2, tooth 3 had a crown, and tooth 4 had a huge restoration. So each could be a major problem. After performing bitewing radiography, it became obvious that in the area of the 3rd tooth there was a significant carious defect, which was not visualized on the periapical radiograph, and in the area of the 2nd tooth there was a periodontal defect and the presence of calcifications in the pulp chamber.
Photo 7. Bruxism.
In the area of the 30th tooth, an area of class V carious lesion was identified, the presence of a pin in the 31st tooth, and additionally it was possible to verify caries in the 2nd tooth. The pin available in 32 was essentially useless, since it did not correspond to the parameters of length, width, or size, but in general. If the pin is too short, the fulcrum increases, and with it the risk of fracture. If the pin is too long, the risk of fracture increases due to excessive potential bending. In addition, if the length of the pin is too short, it essentially does not serve any function in the tooth, and its biomechanical value is reduced to zero. In general, it is preferable to place pins in teeth that will receive a cemented single restoration. When fixing parts of a bridge to such teeth, the risk of potential iatrogenic complications increases several times.
Figure 8. A bitewing radiograph helped visualize the existing problems.
Taking into account the specifics of future restorations
Photo 9 shows a problematic situation with the 12th tooth, which, in principle, should be solved quite simply. However, during treatment, significant bleeding began. The reason for this could be either non-reversible pulpitis or root perforation. The radiograph showed damage to the distal root, which the doctor was able to restore using MTA (photo 10), after which endodontic treatment was successfully performed. After this, a pin of the appropriate length and width was installed in the root space of this tooth. Photo 11 shows the result of treatment 8.5 years after the intervention.
Photo 9. Clinical case, which was characterized by significant bleeding during treatment.
Photo 10. The initial result of the restoration was successful.
Photo 11. The tooth lasted another 8.5 years.
The patient consulted a doctor about the presence of sensitivity in the tooth, which progressed to pain, which required endodontic intervention. After the tooth was restored, it lasted another 9.25 years, after which the restoration finally broke. This case is special in that it demonstrates the possibility of restoring teeth even with the most critical defects and even in the most unfavorable clinical situations, while providing an almost 10-year successful treatment prognosis. In this particular situation, it was possible to save the tooth after restoration of the restoration area due to the presence of a sufficient ferrule that supported the coronal part of the restoration. In addition, the perforation was located not just below the level of the gums, but in the area adjacent to the bone tissue, which is also an advantageous factor for achieving the required therapeutic result.
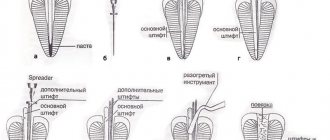
Photo 12 shows an example of using a pin that is too long. No more than 1 mm of gutta-percha was present at the apical end of the root, while the proper length of the apical plug should be 4-5 mm. Photo 13 shows the situation of root resorption after endodontic treatment and placement of a pin. Such problems can be avoided by ensuring that the post installation procedure is performed by the same doctor who performed the endodontic treatment. Indeed, in this case, the doctor is already familiar with the specifics of the morphology of the root canal, and knows what length and width of the pin is best to use. In addition, it is important to ensure the installation of the pin after isolating the working area with a rubber dam, because saliva entering the root space over the years will cause the development of periapical changes that compromise the final outcome of treatment. The rules for installing a pin are based on achieving the required retention: the longer the pin, the greater the retention. In addition, it is important to ensure that the pin length corresponds to 2/3 of the root length, while not forgetting that 4-5 mm of gutta-percha in the apical part of the tooth is optimal to ensure proper sealing.
Photo 12. The pin is too long.
Photo 13. Tooth root resorption.
Photo 14 shows the situation of tooth restoration with a pin, inlay and crown. The threaded post used was too short for the tooth, so re-treatment became necessary. It is logical that it was necessary to remove the crown of the tooth. Given the patient's limited financial resources, the goal of the treatment was to keep the tooth in place for a certain time before the patient raised the appropriate amount for the installation of a dental implant or bridge. Thus, the tooth was removed, segmented, filled with MTA, then installed in the socket and sutured. After 2 weeks he showed adequate stability. Photo 15 shows an x-ray taken immediately after treatment, and photo 16 shows a radiograph taken 4.5 years later. Although the probing depth around the tooth increased from 3 to 4 mm, the achieved treatment result could be classified as successful, since it was possible to ensure tooth retention for a sufficient period of time.
Photo 14. The pin is too short.
Photo 15. X-ray after treatment.
Photo 16. X-ray after 4.5 years.
Pin diameter, texture and material
The choice of pin diameter and texture are important aspects to consider during treatment. It is necessary to ensure that the pin diameter is no more than 1/3 smaller than the root diameter, while leaving 1 mm of root dentin around the supporting element. Without taking these features into account, the risk of fracture increases. One millimeter of surrounding dentin is the minimum acceptable value, while 1.5 mm is ideal from a biomechanical point of view. In terms of texture, pins with a non-smooth surface provide better retention. In addition, pin designs can be sandblasted. An important element in the retention scheme is also the cement used for fixation. The best choice of these are composite and glass ionomer analogues. For very large or oval canals, especially in the maxillary anterior teeth, it is preferable to use custom casting pins and inlays. Factory pins are more suitable for round channels, and they are also cheaper. However, to provide more predictable results, especially in cases of restoration of multiple teeth with compromised structure, doctors are increasingly turning to cast customized posts. The diameter of the pin is determined by the diameter of the canal, but not by the diameter of the root. In very large canals, if the size of the pin or inlay is insufficient, they can simply scroll in the endospace. To minimize this effect, additional preparation procedures can also be performed.
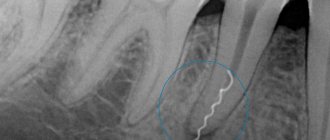
As for the pin material, literature data indicate that fiberglass pins have greater flexibility and can minimize the risk of developing a vertical fracture. In addition, such pins are characterized by better aesthetic parameters, which is important for both anterior and posterior teeth. The problem with these pins is that they can get stuck in the measles space, and under such conditions it is quite difficult to remove them. For this purpose, you can use either a diamond bur or an ultrasonic attachment. But be that as it may, metal threaded pins are also quite difficult to remove, but in most cases this problem is solved using ultrasound. At the same time, glass fiber posts are characterized by a more adapted elasticity modulus, which is as close as possible to that of dentin. On an x-ray, such pins are visualized rather poorly. Photo 17 shows a clinical case using a fiberglass pin. When problems arise with teeth treated with fiberglass posts and sufficiently sealed in the endospace, pain problems are most easily resolved through an apicoectomy. In this way, it is possible to minimize both the volume of intervention and the risk of potential complications.
Photo 17. Visualization of the fiberglass pin.
Considering other parameters
When deciding whether to use a pin at all, the clinician must consider the influence of certain factors that determine the success of treatment in each individual clinical case. Photo 18 shows a case where the use of a pin was completely useless, and the parameters of the supporting structure did not correspond to the morphology of the canal walls. Photo 19 shows how the tooth looked without a post: signs of caries were noted, but there was still a chance to save the tooth. Photo 20 shows an x-ray after treatment, and photo 21 shows six months later.
Photo 18. The pin does not correspond to the parameters of the endospace.
Photo 19. View of the tooth without a pin.
Photo 20. X-ray after treatment.
Photo 21. X-ray after 6 months.
Further treatment of the tooth could follow two algorithms: (1) continue the doctor’s strategy, which consisted of further restoration of the tooth core from a composite, or (2) use a fiberglass pin. Another condition limiting the installation of a pin is the presence of signs of external or internal resorption. Photo 22 shows a tooth with signs of internal resorption. Today, such a pathology would of course be most easily identified by CBCT. In this case, the doctor filled the resorption area with gutta-percha, after which he completed the entire remaining coronal part with composite. Photo 23 shows a radiograph after treatment, and photo 24 shows a radiograph after 2 years. The only pin that could be installed in this case is fiberglass. To restore the supporting core of the tooth, the doctor can use different materials, but it is optimal to take into account the ratio of their parameters with the parameters of the tooth dentin. It is also important for the doctor to understand the clinical situation comprehensively, taking into account all the elements in three-dimensional space. Many may think that photo 25 shows a fairly good treatment result, unless, of course, the access cavity is taken into account. But in another section we see that this tooth is unsealed by approximately another 20%, which in turn indicates that the sealing of such a tooth is almost reduced by 100%. Thus, the analysis of the results of endodontic treatment is based only on data.
Photo 22. Internal resorption.
Photo 23. X-ray after treatment.
Photo 24. X-ray after 2 years.
Photo 25. Initial treatment results may appear acceptable.
If a patient experiences sensitivity after treatment that is difficult to explain, it may be helpful to have an additional CBCT scan to help visualize any “invisible” problem areas.
Photo 26. Detailed analysis can verify quality problems in endodontic treatment.
conclusions
Methods of pin placement, as well as the decision about the need for pin placement in principle, depend on the specific circumstances of each individual clinical situation. It is best to ensure a minimally invasive and as conservative approach to treatment as possible by choosing between a prefabricated post or a fiberglass post. In addition, clinicians must fully understand the basic principles of retention and enhancement of the connection between the post and the coronal restoration. Successful designs of pin-supported restorations must also consider their potential relationship with adjacent surrounding structures, as well as occlusal parameters, the impact of existing parafunctions on the final outcome, and the performance prospects of future restorations. The doctor should also not forget about the treatment goals that are important for the patient himself, as well as his financial capabilities. Thus, the choice of a pin and the rationale for its use are the result of a comprehensive analysis of the initial parameters, taking into account the success of the already performed endodontic intervention.
Author: Joseph Chikvashvili, DDS
Prosthetics
When the inlay is ready, a crown can be installed on it. If we are talking about the front part of the dentition and a crown made of ceramics or zirconium dioxide, the inlay should be light. Crowns made from these materials are as close in appearance to natural teeth as possible. They also have the required level of transparency. The metal stump insert will be visible through the ceramic layer. Therefore, it is important that the support meets aesthetic requirements. A composite stump based on a pin or an intraradicular stump made of zirconium dioxide can be used.
For prosthetics of chewing teeth, strength is much more important than aesthetics. In this area, metal ceramics are often used, for which the color of the stump is not important and the main role is played by its ability to withstand loads. When the stump is ready, an impression is taken of the jaw to make a model. Based on this model, a crown is subsequently made.
From the point of view of reliability, the option with prosthetics based on a stump intraradicular inlay is considered preferable. Reinforcement with pins is considered less reliable and is associated with the risk of destruction of the restoration.
Pins used in "DENTiK LUX"
Pins have been used in dentistry for a very long time. This element is a supporting structure that allows you to install any type of prosthesis (removable or fixed). A pin is a rod with which the doctor is able to strengthen the damaged crown. An element is fixed in the dental canal, from which the nerve is first removed.
In our clinic we use titanium pins from DENTSPLY (USA) and fiber pins from VDW.
- Titanium pins are made of titanium alloy, provide strength and full biocompatibility with the human body. Titanium is highly resistant to
18 Quintascorrosion and hypoallergenic. This strength is necessary in cases where there is minimal tooth structure or the tooth has thin canals. However, these pins may contribute to root fractures. Almost all prefabricated posts are tapered, whereas the roots and canals of teeth are tapered.
- Fiber posts are not as strong as metal posts, but they are less prone to root fracture because their modulus of elasticity is the same as that of tooth dentin. Also, fiber pins have high light conductivity, which achieves a high aesthetic result, which is necessary to ensure aesthetics in the frontal region. The only disadvantages include the difficult removal of pins from the canal; without a microscope it is almost impossible. Extraction may be required if there is a need to re-treat the canals.
Structure modification
The need to modify hybrid compounds, realized due to the created industrial conditions, is determined by the need for a separate space for the filler, which contains dissimilar elements. Fine particles fill the hollow areas of the mass, which guarantees the strength of the formed structure, provides the possibility of high-quality polishing of the outer layer, and, as a result, increases the aesthetic characteristics, which are important when restoring elements of the dentition. At the same time, larger elements are a kind of basis, which guarantees complete filling of the structure and the resistance of the created composition to mechanical influence from the outside.
Due to the uneven distribution of microfragments, which tend to stick together, it became necessary to use a homogeneous distribution technique that supports the creation of coating and resin impregnation of small compounds. As a result of scientific research, hybrid mixtures have emerged - modified materials that are characterized by strength and long-term preservation of aesthetic properties.
Types of composites and bonding techniques
The practice of using composites goes back more than half a century. Dental restoration with composite material is carried out using polymer compositions that differ in filling. According to the accepted classification, the following varieties are distinguished:
- Traditional polymers;
- Micro- and fine-grained composites;
- Compositions with silicon dioxide;
- Hybrid variations.
The evaluation indicators are the mechanical capabilities and aesthetics of the filling. The chemical bond between the polymer and the crown structure ensures that the integrity of the tooth is restored. To level dentin in dental practice, etching with phosphoric acid is used, which can eliminate irregularities at a depth of up to 30 micrometers. During the operation, a bonding agent is used, usually supplied with the composite material, and providing the required level of adhesion.
Implantation stage
Next, the chief physician of the Research Center, implant surgeon Magomed Umatgireevich Dakhkilgov, removed the patient’s failing teeth, atraumatically, with dissection of the roots. Were held:
- dental implantation on the upper and lower jaws using Nobel Parallel implants,
- sinus lift of the upper jaw,
- osteoplasty (bone grafting) on the lower jaw.
Now we will not go into the moment of implantation, but I would like to note that the implantation was carried out very extensively and with pinpoint precision, 14 Nobel implants were aligned according to a surgical template - 8 implants on the upper jaw and 6 implants on the lower jaw.
After the implantation was completed, we began prosthetics.
Fixing fiberglass pins
I want to offer you a technique for creating, individualizing and fixing fiberglass pins (stump inlay) directly at the workplace in a direct way.
This will make it possible to obtain a mechanically fitted polymer pin, reduce and actually level out the adhesive-composite stress of the ligament. Obtain a reliable adhesive connection.
Transluma pins (manufactured by Bisco) are excellent for these purposes (Fig. 3). This is an export version of radiopaque fiber pins specially developed by the company for the European and world markets. These pins are made from a homogeneous solid prestressed fiberglass (long-lasting cyclic loading), they are classified as light transmitting, they have a simple tapered design, and they come in 3 sizes (this is a very old advert).