Home / Articles / Methods for removing tartar
Tartar: when and how to remove it?
After eating, its remains remain in the mouth in any case, getting stuck between the teeth until the next brushing. It is not always possible to brush your teeth after every meal, so plaque begins to form in the periodontal areas over time. This formation has an extremely negative effect on the teeth and gums, causing caries and periodontitis. Plus, having a rough surface, dental plaque further increases the adhesion of food debris. After a week, the plaque increases and over time turns into tartar, which cannot be removed with just a toothbrush.
Basic methods for removing tartar:
- ultrasonic,
- chemical,
- mechanical;
- laser.
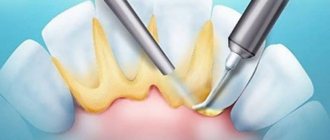
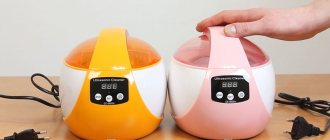
Ultrasound method
Cleaning stones using ultrasound is considered to be the highest quality and least traumatic. It refers to physical methods of removing dental plaque. Recently it has been used very often.
The devices used in this method are called scalers. Plaque and tartar are removed by applying ultrasonic vibration to the tooth surface. The frequency and amplitude of vibrations in the scaler are specially selected in order to easily separate tartar from the tooth surface without harming the tooth enamel. In addition, this method also allows you to whiten your teeth (by 1-2 tones) without the use of chemicals.
Ultrasonic removal takes place without blood and is not painful at all. There is one contraindication for this method - the patient has a pacemaker, and when treating people with cardiovascular diseases, ultrasound machines are used with great caution.
At the end of the tartar removal procedure, a course of anti-inflammatory therapy becomes necessary. At home, an alternative may be to use special anti-inflammatory toothpastes for several weeks.
Chemical method
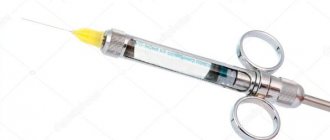
In cases where the use of the mechanical method causes difficulty (moving teeth or the stone is tightly fixed), the use of chemicals that dissolve tartar (acid and alkali) is indicated.
Apply the product to the treated area using a cotton swab. Then the tampon is removed and the tooth is rinsed with water. Softened tartar after this procedure can be easily removed.
The only downside to this procedure is that chemicals can damage tooth enamel.
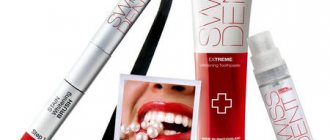
Paste and gel for removing tartar
Removing dental plaque is also possible at home, for example, using a special abrasive paste or gel for this purpose. With their help you can:
- remove microbial pigment plaque;
- prevent the appearance of new deposits;
- clean well and even slightly whiten the tooth surface.
The most popular products for removing dental plaque at home are PRESIDENT White Plus and LACALUT White pastes. They contain pyrophosphates, diatomaceous earth, and silicon dioxide, which makes it easy to deal with hardened plaque.
To increase the effect of using these products, they additionally use a gel or rinse, which cannot cope with plaque on their own.
The gel for stone removal also works using the same method; it is recommended to apply it at the end of the hygienic procedure.
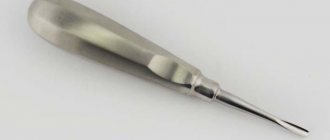
Mechanical method
Removing tartar using instruments (curettes), which are hooks for “scraping off” tartar, is practically not used in our time. Reason: poor quality of removal and traumatic for the gums.
Air abrasive method
The Airflow method is also mechanical. Using a special apparatus under pressure, the teeth are treated with a special medicinal mixture (sodium bicarbonate (soda), water and air), which mechanically removes soft plaque and stones quickly and painlessly. The sandblasting method does not harm the teeth, the procedure is quick and painless.
There is one “but”: this method is effective only for small amounts of pigmented plaque and tartar.
Laser tartar removal
The most modern and therefore infrequently used method is the removal of dental plaque using a laser. They are crushed into small particles and then washed off the tooth surface with a special spray of air and water.
The laser does not have any negative effect on tooth enamel, because the procedure is non-contact. In addition, after using this method, the enamel begins to more easily absorb beneficial substances contained in food or toothpaste.
Methods for sharpening periodontal instruments
Dianne Glassco Watterson, RHD, BS, MBA1
1 Lecturer, writer, dental consultant, CEO of Professional Management in Dentistry (Frederick, Maryland, USA)
What factors can influence the quality of professional oral hygiene? Why do hygienists so often suffer from arm, wrist, neck, shoulder and back pain and are forced to retire early from their professional activities? The reason for this is the rapid dulling of periodontal instruments. What do you think is the least favorite job of hygienists? That's right, sharpening tools.
Imagine having to remove old paint from your house using nothing but a football sword. Now you understand how difficult it is to remove mineralized dental plaque using dull periodontal instruments. Hygienists are forced to perform this procedure every day, and all because most of them are not familiar with the correct technique for sharpening instruments.
Every hygienist is faced with the problem of rapid dulling of periodontal instruments. Since rounding the cutting edge of an instrument reduces the effectiveness of removing mineralized dental plaque, hygienists are forced to increase the pressure applied to the instrument to compensate, which ultimately contributes to physical fatigue. In addition, when treating tooth surfaces with blunt periodontal instruments, it is impossible to completely remove all dental plaque, which promotes active bacterial growth (Fig. 1).
When using a periodontal instrument, its cutting edge, located between the front and side surfaces, is gradually rounded. It must be remembered that the working surface of a blunt periodontal instrument reflects light, but the working surface of a sharp instrument does not.
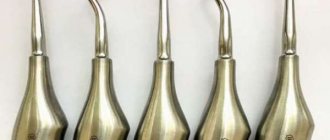
Structure of the working part of scalers and curettes
The scaler is characterized by a triangular cross-sectional shape of the working part and a pointed tip. The lateral surfaces of the tool form a linear angle (Fig. 2, 3).
As the tool is used, its cutting edge gradually becomes rounded. In order to sharpen a tool, it is necessary to grind the metal either from the cutting surface or from the side surfaces of the tool (in Fig. 3, the processed surfaces are indicated by red lines).
The working part of the curette has a crescent shape in cross section. Due to the presence of a rounded tip and the absence of an acute angle between the side surfaces (Fig. 4, 5), curettes are less traumatic instruments compared to scalers and can be used to remove subgingival dental plaque.
In order to properly sharpen periodontal instruments, it is necessary to understand the structure of their working part, position the instrument at the correct angle to the surface of the abrasive bar (the angle between its cutting part and the surface of the abrasive bar is 70°), and also maintain the inclination value constant throughout the entire process sharpening.
When sharpening tools manually, it is quite difficult to follow all the recommendations described above. Thus, when the angle of inclination decreases, the structure of the cutting surface of the tools changes and their cutting ability decreases, and when it increases, a rapid dulling of the tools is observed (Fig. 6).
Automatic sharpening systems for periodontal instruments
There are many different systems for sharpening periodontal instruments on the dental market. The most progressive of them is the automatic sharpening system for instruments PerioStar 3000 (Kerr Dental Specialties; PerioStar 3000, Kerr Dental Specialties). This system is unique: during the sharpening process, the tool is clamped in the machine and the abrasive polisher automatically sharpens its surface. Thus, when working with this device, the user is unable to adjust the position of the tool and the pressure of the abrasive polisher on the tool.
Another popular device for sharpening tools is the Sidekick Sharpener (Hu-Friedy; Sidekick Sharpener, Hu-Friedy). To simplify the adjustment of the position of the cutting edge of the tool, this device is equipped with special grooves and a vertical backstop. The device is powered by 2 AA batteries (Fig. 7).
Manual sharpening of periodontal instruments
Previously, the “fixed abrasive stone” method was widely used for manual sharpening of periodontal instruments. In this case, the abrasive bar was fixed motionless on the surface of the table, after which the tools were sharpened on its surface. The disadvantages of this technique include the lack of control over the correct angle of inclination of the cutting part of the tool to the surface of the abrasive stone.
Later, the Hugh-Freedy company improved the above technique by adding the dial rule. In this case, the tool is held motionless in the non-dominant hand, and its cutting part is sharpened with an abrasive stone. The tool handle is placed at the 12 o'clock position, and the angle of inclination of the abrasive stone corresponds to 3.5 minutes after 12 o'clock for right-handers and 3.5 minutes before 12 o'clock for left-handers. At the same time, even when using the dial rule, it is quite difficult to maintain the inclination value constant throughout the entire sharpening process.
Most hygienists use a special whetstone to check the degree of sharpness of instruments. If the tool does not cut into the surface of the block, this indicates that its cutting edge is dull. At the same time, we recommend studying the condition of the cutting part of the tool using optical magnification and an additional lighting source. Although optical magnification is generally used to improve the visualization of objects in the patient's oral cavity, it also allows you to identify areas of curvature of the cutting edge (they reflect light rays) and sharpen only them (Fig. 8).
As a rule, the cutting edge becomes dull in the places where it is most intensively used, i.e. during the first 3 - 5 mm of the working part of the instrument. The lack of a visual inspection of the condition of the cutting edge of the tool leads to excessive processing of its cutting part. In addition, pay attention to how much the surface of the abrasive stone exceeds the surface of the rounded cutting edge (3 - 5 mm).
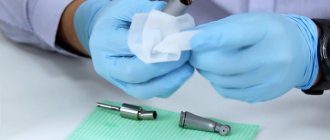
Sharpening tools using a tip and a cylindrical abrasive polisher
To sharpen periodontal instruments, you can also use a turbine handpiece and special cylindrical abrasive polishers (marked FG). The green polish is more abrasive than the white polish and is used only when the cutting edge of the tools is noticeably dull. In most cases, a white polisher is used (Fig. 9a).
This method of sharpening tools consists of the following steps:
- Examine the condition of the cutting edge of periodontal instruments using optical magnification and an additional light source.
- Hold the periodontal instrument in your left hand. In this case, the front surface of the tool (cutting surface) is parallel to the floor, and the tip of the tool is facing towards you.
- Hold the turbine tip in your right hand and rest the finger of your right hand on your left hand (Fig. 9. b, c).
- Place the abrasive polisher against the cutting surface of the tool (Fig. 9b).
- While pressing the pedal, gently move the abrasive polisher from the handle to the tip of the tool.
- It must be remembered that with this technique it is necessary to apply slight pressure on the tip. Sharpening the cutting edge requires just a few strokes of the polisher. Processing the front surface of the tool with an abrasive polisher allows you to simultaneously sharpen both cutting edges.
- Re-examine the working part of the instrument using optical magnification and an additional light source. Remember that the sharp cutting edge does not reflect light (Fig. 9d).
The above technique is ideal for sharpening scalers, since it allows you to simultaneously sharpen both cutting edges of the tool. To sharpen the curette, it is recommended to treat only the side surfaces with an abrasive polisher (to do this, the polisher is placed at a slight angle to the side surfaces of the working part of the instrument). All movements with the bur are carried out in the direction from the handle of the tool to its tip.
Periodontal instruments that maintain a sharp cutting edge for a long time
Recently, a new generation of periodontal instruments from American Eagle was introduced to the dental market. The XP Technology technology used in the manufacture of these tools allows them to maintain the sharpening angle of the cutting edge longer than traditional steel tools. The Rockwell hardness of most periodontal instruments is in the range from 58 to 60, the same indicator for American Eagle instruments is 89, for diamond - 100. When playing with the Betwinner mirror, remember responsible gambling and the best bonuses in 2021
In Fig. Figure 10 (left) shows the condition of the cutting edge of a steel scaler after 1500 machining cycles. The yellow line indicates the original shape of the cutting part of the tool. The right side of the figure shows the condition of the cutting edge of American Eagle tools after 15,000 machining cycles. Even with longer use, these tools maintain a sharper edge better than traditional steel tools.
One of American Eagle's most popular periodontal instruments is called the Scandette. It combines the advantages of the Gracie 11/12 and 13/14 curettes. Since there is a small protrusion in the middle third of its front surface, we do not recommend machining the front surface of this tool.
Benefits of using American Eagle tools include:
- Long term retention of cutting edge sharpness.
- Light weight and ergonomic design.
- The thin working tip allows you to treat narrow areas.
- The attachments are easily replaceable, allowing the doctor to create his own set of instruments and reuse instrument handles.
conclusions
Each dental instrument has its own service life. When a tool breaks or becomes very thin as a result of repeated sharpening, it must be replaced with a new one or the working attachment must be changed. If you are considering purchasing a set of periodontal instruments, we recommend that you take a closer look at American Eagle instruments as they maintain their original cutting edge sharpness throughout the life of the instruments.
Prevention
According to statistics, 60–70% of the adult population of the world have tartar. In order not to be one of them, daily prevention of the formation of dental plaque is necessary. If even the slightest dark plaque appears, you should visit the dentist to have it removed.
In general, tartar removal is recommended at least once every six months. Many people are afraid that removing tartar is painful. If this fact stops it, then the procedure can be performed under anesthesia. Basically, modern methods of getting rid of tartar are completely painless.
In addition, it is best to combine tartar treatment with enamel fluoridation, then fluoridation will be most effective.
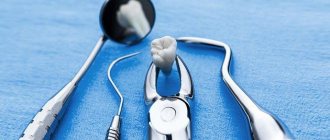
Removal with hand tools and chemical detergents
Using tools to remove deposits “manually” can be quite effective, with virtually no risk of tissue damage. But this method has many disadvantages: high labor-intensive and time-consuming manipulations, tools need to be sharpened, and after removing deposits, additional polishing is necessary, since the surface becomes uneven.
The use of the manual method in patients with orthopedic structures has its own characteristics. It is not recommended to use the traditional vertical technique for removing deposits, as it can accidentally damage the edges of the structure and disrupt the edge seal. This can lead to decementation of the structure, the occurrence of caries and inflammation in the marginal periodontium.
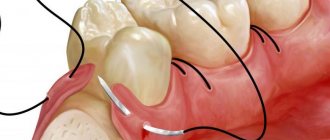
In patients with dentures, it is recommended to use a horizontal scaling technique, where the instrument moves parallel to the edge of the structure. It is better to use special curettes (for example, Gracie curettes).
The chemical method is rarely used to remove dense deposits from moving teeth. The gel is applied with a swab for preliminary softening, then washed off with water. Next, the softened deposits are carefully scraped off with hand tools.
Varieties
Your dentist will tell you in detail how to remove tartar. He will also offer various options for getting rid of deposits. Currently, three types of cleaning are used:
- instrumental - special equipment is used to remove deposits. tools;
- chemical - removal of plaque and stones using alkali or acid solutions;
- removal of tartar using ultrasound or laser.
The last option is more gentle and effective. It is also the safest, neither gums nor tooth enamel are damaged during the procedure. This option is also suitable for those individuals who experience hyperesthesia. After removing tartar, tooth sensitivity practically does not increase.
Laser removal is an innovative method, but also expensive. It can be used to combat the hardest deposits. The main advantage is the fact that laser exposure not only does not harm the enamel, but also increases its ability to absorb beneficial substances. The risk of developing a carious process is also significantly reduced due to the fact that the laser sterilizes the canals and cavities of the teeth (destroys pathogenic microorganisms). The procedure is completely painless and does not require any specific preparation.
Complications
At the first stages, plaque does not cause discomfort, and therefore many patients do not go to the dentist, ignoring brown spots on the enamel, which may not be visible. This is the main mistake, because, when accumulated, solid deposits provoke:
- gradual destruction of the bone tissue of the tooth (caries);
- gum diseases - gingivitis and periodontitis, accompanied by bleeding, redness, swelling of the mucous membranes, bad breath;
- damage to other tissues of the oral cavity , primarily the roots, which leads to inflammation and destruction of bone tissue;
- general inflammatory diseases . Toxins released by bacteria enter the bloodstream, affecting the gastrointestinal tract, respiratory tract and other systems.
Hardware mechanical and sandblasting methods for removing deposits
One of the old ways of removing tartar is cleaning with rotating instruments, as well as leveling surfaces with special conical burs. This category also includes polishing using special plastic and rubber cups, also used with or without abrasive pastes.
Air abrasive systems have been used in dentistry relatively recently. Under pressure, a stream of water with air and soda powder is applied to the teeth, cleans them, and the water washes away the soda and plaque.
Every year new technologies for removing deposits appear and old ones are modernized. Technological progress is progressing by leaps and bounds. And in dentistry, new technologies appear, are tested and introduced into practice. Effective and painless. For example, removing dental plaque using a laser.
Each dental clinic has well-equipped hygiene rooms. They employ experienced hygienists who provide professional hygiene, protect teeth from decay and ensure the safety and functionality of dentures for many years.
Where does tartar come from?
It is formed from the most common dental plaque, which at first is a thin film, almost invisible to the eye, which becomes denser over time. In most cases, plaque is formed due to the lack of comprehensive oral hygiene, the use of incorrect toothbrushes and toothpastes, sometimes from drinking very hard water, often due to the need to correct the bite, problems with the gastrointestinal tract, or due to the habit of constantly eating unhealthy and even junk food.
Tartar on the teeth is hardened food debris stuck in the interdental crevices and is a “safe haven” where pathogenic microorganisms can constantly and unhindered multiply. At first it has a fairly soft texture, but over time it turns into a real stronghold. The transformation process takes about 6 months, which is why dentists recommend undergoing a preventive examination at least once every six months.
Reasons for education
The main reason for the appearance of tartar is insufficient oral care. An incorrectly selected brush, poor-quality toothpaste, too fast and incorrect technique for cleaning teeth gradually lead to the fact that soft plaque, formed under the influence of bacteria and saliva on food debris, is not completely removed, but is retained and mineralized, especially in hard-to-reach and invisible places (on the back surface of the front incisors, in the interdental spaces). The composition of solid plaque includes organic (microorganisms, protein, keratinized epithelial cells, etc.) and inorganic (primarily calcium salt) components.
Mineralization of the soft bacterial film lasts about 15 hours. The plaque hardens within 7 days, and after six months you can see real tartar on the enamel. In other words, poor oral hygiene starts a process that can only be stopped by dental tartar removal methods.
According to localization it is:
- Supragingival . It accumulates at the bottom of the teeth and is clearly visible upon examination. This dark, yellow or brown plaque that borders the teeth is removed faster than the hidden plaque.
- Subgingival . Forms in the gum pockets between the teeth and gums, making it difficult to notice. Subgingival deposits can be indicated by blue discoloration, swelling, bleeding gums, and purulent formations.
In addition to poor hygiene, other factors that lead to the development of hard deposits include:
- Smoking . Nicotine sticks to the enamel and remains as a yellow coating, which mineralizes and hardens over time.
- An abundance of fatty, sweet, and mostly soft foods . Sticky food stays more firmly on the teeth. And if there is little solid food in the diet that promotes spontaneous cleansing of the enamel, then the permanent soft film easily turns into tartar.
- Abuse of tea and coffee . These drinks, as well as other coloring substances in food, leave a pigment deposit on the enamel.
- Diseases of internal organs . First of all, these are chronic inflammations of various etiologies and localizations.
- Diabetes mellitus and metabolic disorders . In this case, the process of mineralization of the soft film occurs faster than usual.
- Anomalies of bite and position of teeth . Plaque accumulates more in places where teeth are crowded.
Hardware physical methods for removing dental plaque
The sound method with an oscillation frequency from 1500 to 8000 Hz allows you to quickly remove massive dental plaque.
The ultrasonic method with an oscillation frequency of 20 to 60 kHz is actively used in dentistry, as it has such unusual properties as: hydrodynamic effect, cavitation, microstreaming, diffuse effect. After ultrasonic treatment, the tooth surface becomes smooth, plaque does not linger on it, and is cleaned well.
Ultrasound devices are divided into two groups: magnetostrictive and piezoelectric. In Russia and European countries, piezoelectric devices are more often used, in the USA - magnetostrictive ones.
When removing dental plaque from patients with dentures using ultrasonic and sonic scalers, it is very important to work carefully and professionally so as not to accidentally damage the structure or disrupt the adhesive connection between the tooth and the denture.