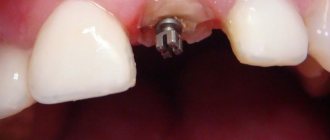
Pin in a tooth - what is it?
Phrases from the series “putting a tooth on a pin,” “building a tooth on a pin,” or “tooth under a pin” sound quite scary for many patients. However, in reality, restoring a tooth with a pin will help avoid its removal, and the design itself does not cause any discomfort. A dental pin is placed into the root canal. The device performs a supporting function and helps to optimally distribute the load on the tooth. Since a pin is placed in the root of the tooth, a number of therapeutic and endodontic procedures must be carried out before starting treatment.
Indications for installing a pin in a tooth
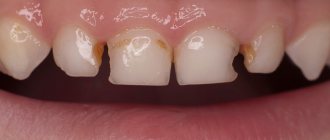
- Serious damage to the coronal part. A tooth without a post has a higher risk of destruction after treatment if more than 50% of its visible part is initially damaged.
- Repeated dental treatment due to secondary caries or destruction of tooth tissue due to other reasons.
- The need for additional supporting and fixing elements for installing a crown.
- When preparing the abutment tooth for fixing the prosthesis.
- For the treatment of advanced forms of periodontitis and periodontal disease. Pins are installed on loose teeth for subsequent splinting.
- During tooth replantation (in rare cases).
Contraindications to the procedure are related to the condition of the tooth (severe damage, too thin walls), anatomical features and pathologies of the root canal structure, as well as concomitant diseases (caries, acute periodontitis, cyst, granuloma, abscess, mental disorders) and body conditions (pregnancy) .
Everything you wanted to know about dental pins in dentistry
The use of dental pins in Kirov dentistry is a very common phenomenon, since it is this technology that allows you to save a tooth in a number of cases. If the treatment involves depulpation (removal of the dental nerve), a pin must be placed in place of the cleaned canals - we dedicated our new article to these devices. From this material you will learn what a pin is, what types there are, how they are installed, and what are the advantages/disadvantages of the decision to use a similar approach in dentistry.
What is a pin?
A dental pin is a specialized structure that is installed in the internal cavity of the tooth root after removal of the nerve. This approach allows you to preserve the root itself and, as a result, the original structure of the jaw, which is very important for every patient.
It is also worth understanding that using a pin to save a tooth is a much more affordable option from a financial point of view when compared with prosthetics.
As a rule, a pinned tooth after treatment requires the installation of a crown (or bridge), and the very possibility of using pins is limited by a number of requirements:
- The thickness of the root walls must be at least 2 millimeters;
- The depth of unsealing the canal is at least 2/3 of its length;
- Possibility of complete (and high-quality obturation of the canal);
- Availability of conditions for giving a conical or cylindrical shape to the channel.
To put it in very simple terms, pins in dentistry are a kind of reinforcing reinforcement when restoring the shape of a tooth after removing nerves and cleaning the canals.
How are pins used in dentistry?
Today, there are five key areas for the use of pins in dentistry in Kirov. Let's consider and comment on each option:
Extension of the crown part of teeth on a pin is a key direction in the implementation of the technology;- Prosthetics with pins in cases where it is not possible to attach the prosthesis to adjacent teeth;
- Reinforcement of a tooth with a removed nerve using a pin insert;
- Treatment of periodontal diseases using combined structures for splinting teeth;
- Carrying out operations to replant your own teeth, where dental pins have also found their use.
Modern dentistry today is simply impossible to imagine without the use of pins.
This is the same indispensable tool for a dentist as, for example, a burr or filling material. Of course, in 8 cases out of 10, these pin structures are used to build up the crown of a tooth, however, many other procedures are also impossible without the use of such products.
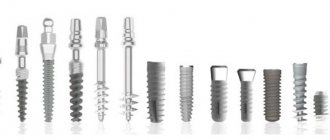
Types of pins for teeth
There are several options for making pins for solving dental problems today – let’s look at the most popular and common ones:
- Anchor pins, which can be active or passive, depending on the fixation method. Active ones are screwed into the root of the tooth, which can cause complications. Passive pins are installed in a simple way and are used for reinforcement after tooth depulpation;
- Fiberglass pins. This modern material has a number of important advantages, including elasticity, hypoallergenic properties, ease of installation (in just one visit to the dentist) and the ability to quickly remove in case of dental retreatment;
Carbon fiber pins. In its texture, this material is as close as possible to the natural dentin layer - this is a guarantee of increased strength and reliability;- Parapulpal pins. They are a metal base with a polymer coating;
- Stump tab. It is used in case of serious damage to the crown, since this design is a microprosthesis. Production is carried out individually according to casts.
Pins, like filling compounds, are made from a wide variety of materials: each has its own characteristics and cost, as well as indications. That is why the choice depends on the recommendations of the dentist, who will select the best option based on the characteristics of the disease.
Installation of a pin in Kirov
The pin installation process depends on the type of structure and material used. However, as a rule, the universal treatment algorithm looks like this:
- Inspection and identification of the possibility of using pins for tooth treatment. Typically, this may require an x-ray or even a CT scan;
- Unsealing the canal (if there is a filling) or removing the nerve (in case of a depulpation procedure);
- The pin is installed in the channel, and its excess is cut off (in the case of using carbon or glass fiber);
- Fixation of the pin in the canal using composite compounds;
- Restoration of the crown part of the tooth, which, as a rule, occurs during a second visit to the dentist. The reason is the need for complete hardening of the composite in the channels.
After completion of treatment, such a tooth is closely monitored, analyzing possible pain and other complications.
If there is a feeling of discomfort or pain, especially after removal of the nerve, there is no need to worry, as this is a completely natural phenomenon. After a few days, the pain should subside, otherwise it is better to consult a doctor.
Disadvantages and contraindications
And this article should be completed by familiarizing yourself with the list of disadvantages and contraindications of using pinning technology. Among the negative points are:
- There is a risk of complications if the dentist makes mistakes;
- There is a possibility of allergic reactions;
- Limited service life of a “dead” tooth with pins.
As for contraindications, the key reason for the impossibility of implementing the technology may be the condition of the root walls (insufficient thickness, severe destruction, obstruction of canals, etc.).
In any case, the decision on the possibility of using dental pins is made by the dentist at the initial appointment.
Sign up for a consultation at Dr. Efremov’s Dentistry and get answers to all your questions! Information by phone: 8 (8332) 255-717 . Be healthy and take care of the beauty of your smile!
Dental pins - what are they?
Today, doctors have a wide selection of dental pins, varying in shape, material and area of application.
Dental pin materials
- Metal.
The most popular options: titanium, brass, palladium and precious alloys. - Metal-free.
They are made from gutta-percha, ceramics, fiberglass and carbon fiber.
Forms
- screw
- cylindrical
- conical
- combined
Recovery methods
- pins for tooth crown
- tooth filling on a pin
Mounting methods
- Active.
Threaded pins are screwed into the root canal, thereby achieving a tighter fixation. However, there is a risk of perforation of the canal walls. - Passive.
A more gentle (but less reliable) method of fastening. The pin is placed inside the root canal and fixed using a special compound.
Method of placing a fiberglass pin:
The root canal is opened.
From root cement and gutta-percha at a distance of minus 5 mm from the apex or, if we are dealing with a curved shape of the root canal, then 6 mm from the mouth is sufficient for the adhesive fixation technique.
The prepared lumen is thoroughly cleaned with ultrasonic instruments or Sonic-Air. The canal lumen must be clean.
We introduce a water-soluble gel into the lumen of the root canal
(Fig. 4).
Glycerin may be suitable for these purposes, but the best consistency is a water-soluble lubricant (you can buy it in the personal care section of the pharmacy).
It is applied into the root canal quite generously using a root needle or microbrush.
Preparing the fiberglass pin.
The Transluma pin (it is advisable to take a smaller size in order to minimize the removal of root dentin with a drill when preparing the bed for the pin) is degreased in alcohol or anhydrine, dried, and then the One-Step adhesive system (Bisco) is applied to the pin in one or two layers.
We evaporate the solvent of the adhesive system for 5 seconds and carry out polymerization (Fig. 5).
We take a composite hybrid material of light shades,
You can use A2 or Clear shades and cover the prepared fiber pin with the material.
WE DO NOT POLYMERIZE!
We obtain a fiber pin with a composite coating made of durable material (Fig. 6).
We insert our fiberglass pin into the root canal,
we remove obvious excess material or form the supra-root part of the tab and carry out trans-pin polymerization for no more than 10 seconds.
This will allow you to easily remove the resulting polymer insert, even if there are retention elements in the lumen of the root canal (Fig. 7).
We remove the pin-composite structure.
After that, within 40 seconds. At a lamp power of 500 mW/cm2, we carry out additional polymerization of the resulting core inlay.
Then we try it on again in the lumen of the root canal and, if necessary, adjust it to an exact fit (Fig. 8).
Root canal thoroughly for 1 minute. rinse with distilled water.
It is very convenient to use Sonic-Air for this. The file is set to the usual amplitude as during endodontic work, with the only difference being that it does not touch the walls, a plentiful flow of water is supplied and the canal is washed for 1 minute.
Add acid and etch the root canal
and dentin - the enamel of the crown part of the tooth for 20 seconds. We wash off the acid from the surface of the tooth and wash the lumen of the root canal for one minute.
Use Sonic-Air for these purposes.
We remove excess moisture from the root canal until the paper pin is dry.
Mix A and B of the All-Bond 3 adhesive system (Bisco)
and using a root needle with cotton wool, apply it generously into the root canal and saturate the dentin of the tooth tissue.
Immediately evaporate the solvent and thin the adhesive layer. Using paper pins, we remove excess adhesive system in the lumen of the root canal and carry out polymerization for 10 seconds.
The use of the All-Bond 3 adhesive system at this stage is an extremely important aspect:
- This system has a self-curing polymerization phase without a light source, which occurs after 90 seconds. after mixing. And bringing light to the terminal point of the root canal is the most critical!
- the components of this adhesive system are the most hydrophobic, which ensures longer hydrolytic stability of the adhesive bond.
- All-Bond 3 is a universal adhesive system that provides excellent adhesion to all composite materials, both light and chemical curing, not to mention dual curing systems.
The individual fiberglass pin itself is degreased
and the choice of adhesive system OneStep or One-Step plus or All-Bond 3 is applied to it.
I prefer to use One-Step plus for this purpose. It's convenient, fast and this adhesive system is versatile.
1-2 layers of adhesive are applied, the solvent evaporates, the adhesive becomes thinner and polymerization is carried out for 10 seconds. onto the surface of the individual pin.
That's it - the channel and the pin are ready.
Dual-curing composite cement is injected into the canal on the canal filler,
such as Duo-Link (Bisco) or chemically cured Bisfill 2B (Bisco).
Installation of fiberglass pin. An individual fiber post is passively inserted into the root canal and polymerization of the composite cement is carried out. Next, we use the resulting stump core for prosthetics or direct restoration techniques.
Types of dental pins
Gutta-percha
Filling dental canals with gutta-percha pins allows you to achieve predictable results, since the entire root canal cavity is filled. However, the gutta-percha pin cannot perform a full support function.
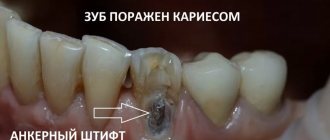
Metal pins in teeth (anchors)
Most types of anchor pins are made of metal, threaded, and installed using the active method. An anchor pin in a tooth is a classic option that is most often used for fixing crowns (a crown on a tooth on a pin). There are also modern analogues: these pins have a smooth surface and are made of ceramic, but some experts no longer call these products anchors.
Fiberglass
Fiberglass teeth pins are sufficiently strong, elastic and safe. They are almost transparent, so they are actively used to restore teeth in the smile area. The front tooth on a fiberglass post looks quite aesthetically pleasing, since the material does not stain over time and is generally quite durable.
Carbon fiber
Another type of modern and popular pins, which are as similar as possible to the structure of dental tissues. They are very durable, help to optimally distribute the load and prevent root fractures.
Attention!
To restore teeth, pin inlays are also used - these are solid structures made of metal alloys or ceramics, the base of which is installed in the root canals, and the stump imitates part of the crown.
Types of pins and their main features
The pins are either fiberglass or metal. Fiberglass is used when installing tile crowns. Such an instrument does not show through the crown. It is quite easy to remove it if necessary. However, metal knitting needles are stronger, which is why they are used more often. Sometimes they are also called anchor.
Anchor pins are made from materials such as titanium, palladium or stainless steel. There are also pins made of brass and precious metals. They are used in the most difficult cases. Anchor pins are very popular because they make it possible to restore an almost completely destroyed tooth. It is only important that its root is intact.
The pins are fixed in the canal with phosphate cement. The use of ultrasound can help destroy it. This has to be done when repeated caries begins around the pin. Excessive strength of the material often causes displacement of the pin when chewing food, which can lead to damage to the prosthesis. In this case, the entire structure will need replacement or correction. Most often, the violation is detected already at the stage when it is already quite difficult to cure the tooth. In this case, you have to remove the pin along with the tooth. In some cases, the tooth can be saved. In this case, a small part of the dental tissue is removed around the pin using a drill, and then the pin is carefully unscrewed. After removal, re-treatment is carried out, the canals are properly processed and fillings are placed again.
Parapulpal pin wires are non-metallic. They are made from gold or special stainless steel, and then they are necessarily coated with polymer. Such knitting needles are used for retention of fillings and their reinforcement. A special feature of parapulp pins is that they are installed in hard tissue without touching the pulp. The absence of actions inside the tooth cavity ensures the complete elimination of the likelihood of contracting any infection or the development of inflammatory processes in the oral cavity. The disadvantage of such tooth strengthening means is the limited possibilities of use. The fact is that these products are located very close to the surface. They often break teeth and need to be reinstalled.
Dentists divide pin instruments into two groups: standard and special. The first ones are used to eliminate minor damage, and are available in the form of cylinders or cones. Special devices are made in a variety of shapes. Pin devices are also distinguished by fastening methods. Among screw materials, the main drawback is the danger of the tooth part breaking off during screwing.
How is a pin inserted into a tooth?
Installing a pin into the root of a tooth is a rather labor-intensive process, including diagnosis and preliminary treatment of canals. Further actions depend on the treatment method. The first option is to place a pin and build up the tooth using composite materials. The second option, a tooth prosthesis on a pin, involves installing a crown. Dental prosthetics with a pin is not performed. The role of the prosthesis is performed by the crown, and the pin is only an additional supporting element. Finally, the extended tooth on the pin is polished and brought into proper condition. In the case of a crown, the doctor makes sure that the prosthetics was successful.
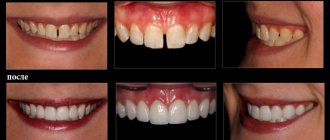
How is tooth restoration performed on a pin?
Despite its apparent simplicity, restoring a tooth on a pin is a rather painstaking and time-consuming process that requires a lot of experience and a certain skill from the dentist. This procedure is carried out in several stages:
- Anesthesia, providing access to root canals (if necessary, if this has not been done before - depulpation).
- Cleaning root canals from pulp residues and infected tissues.
- Inserting the pin into the canal so that it enters the bone. Next, it is securely fixed with filling material.
- Restoration of the coronal part with filling material or an artificial crown.
- Checking the success and reliability of the restoration. It is usually carried out 1-2 days after restoration; if necessary, correction and polishing are carried out.
Such restoration is several times cheaper than full-fledged prosthetics, so dentists advise people who have partially or completely destroyed dental units in their mouths not to rush to remove them and first try restoration using pin structures.
Veronika Aleksandrovna Ivantsova, dentist at the 32 Dent clinic, says: “The success of restoring teeth on a pin depends not only on the doctor, but also on the patient. If the patient follows the diet prescribed by the doctor, that is, refuses solid fibrous food for a while, if he carries out all hygiene procedures on time and takes the medications prescribed by the doctor, the restoration will be successful and durable. And, of course, one should not forget to visit the dentist every six months for examinations and timely identification of possible problems with the dentition and gums.”
Titanium pin in tooth
The pins located in the tooth canals can be made of titanium, but they should not be confused with implants. Dental pins belong to endodontics and partly to orthopedics, while implantation is a separate area. When a titanium pin is placed in an extracted tooth, the product is called an “implant.” This is an artificial root that is implanted in place of a lost tooth. Theoretically, a dental implant can be called a titanium post (which many people often do), but compared to classic posts, it performs a completely different function. The advantages of implantation today are undeniable: if a natural tooth is lost, it is the implant that can best restore its functionality and aesthetics.
Installing a seal on a pin
A damaged tooth is restored using a pin in the case where the tooth's nerve has been removed, but there is still at least a wall that can hold the filling substance.
Using a post when installing a filling will not only create a more dazzling smile. With this procedure, you can restore the chewing function of the tooth and thereby significantly simplify the patient’s life.
A pin is essentially a screw made of a special material. The dentist inserts it into the tooth canal. The pin is the basis for the filling substance. It is on the screw that the seal is applied. The strength of this design allows the patient to wear it even with serious injuries. Let's take a closer look at when this method of treatment is used.
Who needs a filling on a pin?
- Dentists install a filling on the pin for patients whose enamel is severely damaged
- This procedure is also necessary for those who have had a tooth completely removed or knocked out.
- In addition, the pin allows you to achieve the necessary rigidity when installing prostheses.
To install a filling on a pin, you only need a couple of hours of free time and one trip to the dentist.
However, it is worth noting that such a serious procedure has contraindications. Everyone should familiarize themselves with them before going to the doctor.
The fact is that the procedure for installing a seal on a pin is considered a surgical intervention. That is why it cannot be performed if you have gum inflammation and periodontal disease, carious enamel damage and insufficient root thickness, as well as the formation of a jaw cyst. But the main contraindications are disorders of the central nervous system and cardiovascular diseases. In all these cases, the pin cannot be installed.
This method of dental treatment has a major advantage. Installing a filling on a metal pin will cost the patient significantly less than dental crowns. In addition, with this treatment option, the tooth will look much better from an aesthetic point of view. It is also important for patients that the pin allows them to preserve the root of the tooth and restore its chewing functions. Another advantage is that the filling on the pin lasts for quite a long time - about ten years, but only with proper use and timely oral hygiene. The procedure for the patient occurs without any discomfort and takes a couple of hours. After installing the filling substance, neither the fiberglass nor the titanium pin will cause any pain or discomfort.
Unfortunately, this method of treatment also has disadvantages. After a few years, the patient’s tooth walls may become thinner and even the enamel may wear off. In addition, there is a threat of caries development and corrosion of the metal pin.
No one excludes the possibility of individual intolerance to such intervention. In this case, the structure may not take root and then the tooth will have to be removed. It is impossible to predict this, but you have the power to eliminate all allergic reactions.
What to do if a tooth with a pin hurts?
Painful sensations may well occur after installation of the pin, since surrounding tissues were affected during the treatment process. Often, unpleasant sensations occur after depulpation, especially with the use of arsenic. A tooth without a nerve and a pin should not hurt, since it is dead. If a tooth hurts after installing a pin and these sensations do not go away for several days, there is a risk that the treatment was carried out with errors and complications arose. In this case, you should consult a doctor as soon as possible.
Is it worth putting a pin in a tooth?
Like all dental treatment methods, pins have their drawbacks. This list is small, but these nuances must be kept in mind before agreeing to treatment.
- Allergic reactions to metal alloys are possible.
- Even with ideal treatment, a tooth with a pin will be more vulnerable than a healthy tooth. Its service life is shortened and the tooth becomes more fragile.
- The risk of root fracture increases (especially when using classic anchor pins).
On the other hand, this technique allows you to save a tooth in almost hopeless conditions.
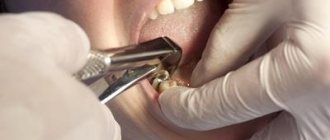
Removing the pins
Author: Ronald Forde
Root canals of endodontically treated teeth often contain broken instruments (instruments, silver posts, Lentulo, broken pins, etc.). The ability to remove broken instruments from the root system partially determines the success of root canal treatment. Abbott demonstrated that 9.4% of patients in an endodontic practice present for endodontic post extraction. Many factors influence the success of post removal, namely: the clinician's experience and choice of extraction technique and knowledge of tooth morphology, the type of cement used for luting, the shape (active or passive) and the type of post used (standard or customized).
When a hard object needs to be removed from a root canal, most general dentists refer such cases to an endodontist. Removing intact or broken pins is particularly difficult because previously prepared teeth have already been weakened by loss of hard tissue. Because dentists may have had little or no experience in removing posts, they are often concerned about the possibility of root fracture while attempting to remove the post, or they may not have the appropriate equipment for such a procedure. Many endodontists are also concerned about the possibility of root fracture when removing cemented posts, or they may believe that the extraction instrumentation is not up to the task.
According to Stamos and Gutmann, reasons for choosing a surgical approach include failure to remove or loosen the post after reasonable efforts have been made and cases where the post is large, long, or threaded and the crown and inlay appear intact. Quite often, the surgical approach carries its own problems (for example, intervention on the palatal root of a maxillary molar). In general, periapical surgery has a lower success rate than pin extraction.
If it is determined that an endodontically treated tooth is to be restored, the dentist must be aware of techniques for removing the foreign object from the canal and decide on the best solution for that particular situation. In reality, there is no true best method for all situations, and therefore the instrumentation and method of pin removal must be selected and tailored according to the situation. The goal will always be to preserve as much of the remaining tooth structure as possible. This factor is critical when working on a tooth where most of the root dentin has already been removed when the post was initially placed and the coronal portion has already been destroyed.
Pin removal tools have been on the market for a long time. They can be divided into 3 categories: mechanical, high-speed rotating and ultrasonic. It was and still is believed that pin extraction devices increase the risk of root fracture, although the Castrisos and Abbott study did not support this idea.
Attempting to remove pins or other foreign objects from a tooth canal may cause cracks, vertical root fracture, or perforation as a result of the direct mechanical effect of ultrasonic energy on the tooth structure. When any type of fracture occurs, it may be the formation of a new crack or from impact on a pre-existing weak point located on either the inner or outer surface of the root. It has been demonstrated that even the process of obturation of root canals creates intradentinal cracks. Altshul's study found that post removal using ultrasonic energy resulted in more root cracks (at the cemento-enamel junction) than in endodon.