Author: Sheplev Boris Valentinovich, Doctor of Medical Sciences Center for Postgraduate Education "DentMaster", Novosibirsk
Analysis of literature sources reveals a general trend regarding the success of endodontic treatment of teeth with a complex anatomical configuration of the root canal system. Weiger and co-workers (Weiger et al. // Endod Dent Traumatol. – 1997. – No. 13. – P.69-74).
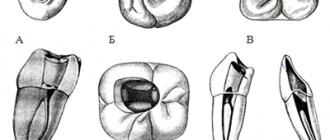
An assessment of the situation by well-known clinicians clearly indicates the reasons for its occurrence: “...100% of teeth removed after endodontic treatment for periodontitis had at least one unblocked port from the root canal system into the periodontium” (J. West, 1974) (Fig. 1 ); this conclusion is also supported by A. Castellucci: “90% of endodontic treatment failures occur due to inadequate cleaning and obturation of the root canal system.”
Rice. 1. Routes of infection: inadequate obturation, missed canals, broken instruments, unfilled accessory canals
Let's look at the main aspects of the problems of successful or, conversely, unsuccessful endodontic treatment.
Factors depending on the specialist
Knowledge
According to Aristotle, the category Knowledge is multifaceted; it combines theoretical knowledge (Episteme), professional skills (Techne) and practical wisdom (Phronesis), that is, the ability to perform the right actions at the right time (Fig. 3).
The latter, in turn, is a whole complex that includes High Moral Philosophy (deontology, the principle of “do no harm”), Experience, Imitation, Creative Fantasy, Decision-Making Algorithms, a certain amount of Luck - in a word, everything that we call intuition.
Rice. 3. Aristotle, the triune maxim Episteme, Techne, Phronesis
Equipment
Equipment, instruments and materials, along with clinical skill, guarantee the success of endodontic treatment. In this regard, magnification is of particular importance (Fig. 4 ad).
| Rice. 4a. Microscope-oriented practice; b. Treatment of pulpitis of 4.7 teeth using an operating microscope; c. “We treat what we see; and we see what we are treating!” | ||
| d. Initial radiograph 4.7: denticle in the distal canal; at the stage of extraction from the mouth; denticle on the mesial cusp of the tooth |
Let's move on to real cases of positive endodontic therapy for teeth with complex anatomical shapes.
As a rule, several groups of teeth have additional endo-systems, which is illustrated in detail in the literature (for example, Clifford J. Ruddle. Shaping for success. - February 2006: additional canals of maxillary premolars and molars, mandibular first incisor and premolars). Or a clinical example from our practice - “Overlay”, presented on the website dentmaster.ru (Fig. 5):
Rice. 5. Right mandibular molar, the five root canals of which were prepared with ProTaper instruments and 3-D obturated; condition after 1.5 years
Errors in identifying root canal orifices
Causes:
- insufficient knowledge of the topography of root canals;
- Features of endodontic anatomy.
To detect the mouths of root canals, a sharp angled probe, optical devices, and dyes are used. It is often difficult to find additional canals at the bottom of the tooth cavity, but sometimes the entrance to the canal is not identified due to ignorance of the anatomy. The fourth canal in teeth 16, 26, 17, 27 is usually located in the center of the main mesiobuccal canal and is sometimes connected to the main canal. The second canal in teeth 31, 41, 32, 42 is localized on the lingual side of the main canal. To detect it, it is necessary to expand the entrance to the cavity towards the neck of the tooth. In lower jaw teeth 34, 44 with two canals, one canal is located on the buccal side, the other on the lingual side. In teeth with three canals, one canal is located on the lingual side, the other two on the buccal side. If the additional channel remains undetected, the treatment prognosis worsens. The fourth canal in teeth 36 and 46 is located next to the main distal canal; it can be identified by the oval opening of the distal canal, elongated in the lingual-buccal direction.
"Comma"
initial situation
Having exhausted the possibilities to clean and obturate the root canals of the 3.7 tooth, the patient was sent for treatment using an operating microscope.
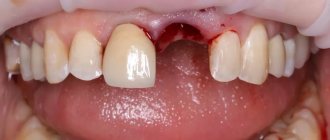
The first thing we did was to dissuade the patient from the bridge: tooth 3.4 is intact, it’s a pity! In addition, there are ideal conditions for implants. If endodontics 3.7 is successful, then he will feel great in the dental arch, and not in the block (Fig. 6, 7).
| Rice. 6. Orthopantomogram | Rice. 7. Initial radiograph 3.7 |
Complaints: constant aching pain in the area of the 3.7 tooth; pain when biting; inadequate chewing function. History: tooth 3.7 was previously treated for pulpitis using the resorcinol-formalin method. According to the patient, when preparing for prosthetics, “the doctor searched and searched for a canal, picked at it, it started to hurt, found the canal, but was only able to go one and a half (that means he measured!) mm.” Objectively: tooth 3.7 is dystopic, with a mesial slope; changed in color to pink, which is typical for teeth after resorcinol-formalin treatment; covered with a temporary filling; percussion is weakly positive; Palpation of the transitional fold is painless.
Examination with magnification
Rice. 8. Apparently, this is the same one and a half millimeter channel. Something's wrong here
| Rice. 9 a, b. Let's increase it even more... and more |
THIS cannot be a channel:
- The geometry of the pulp chamber bottom is continuous. Here the gray tone, characteristic of peripulpar dentin, is interrupted by a light stripe - a sign of the thickness of the dentin.
- At high magnification, you can see that the mouth is literally sawed out.
- The color of the tissues surrounding the pseudoostium is clearly different from the color of the peripulpal dentin (Fig. 9 a, b). The change in color in this case is a sign of approaching the root cement (periodontal gap).
- The principle of symmetry of the bottom of the pulp chamber and its congruence with the occlusal surface is violated (Fig. 10).
Rice. 10. This is how the canal mouths of the lower molars are not located
Let's take a closer look at the "comma"
Rice. 11. "Comma"
Even closer... And now from a different angle. The distal canal cannot be confused with anything (Fig. 12 a, b):
| Rice. 12 a, b The mouth of the distal canal is indicated by a circle |
The mesial canal is probed at the opposite end of the “comma”; the overhanging dentin must be removed (Fig. 13).
Rice. 13. Probing point of the mesial canal (green arrow); overhanging dentin (red indicators)
After removing the overhanging dentin, which was nothing more than the roof of the pulp chamber, not only the mouth of the mesial lingual canal opens, but also a suspicious groove (Fig. 14)... We process the groove with an ultrasonic nozzle and find the mouth of the mesial buccal canal (Fig. 15, 16 ).
| Rice. 14. Orifice of mesial lingual canal (green circle), groove | Rice. 15. Orifice of the mesial buccal canal (red circle) |
Rice. 16. Schematic representation of mesial root canals, lateral view; hatching marks overhanging dentin
Instrumental treatment of root canals
Working lengths were determined using a Root ZX apex locator. The root canal system was treated with rotating NiTi ProTaper instruments (protocol of work using the ProTaper technique, printed version by Clifford J. Ruddle. Form of success. // Clinical Endodontics. - 2007. - Volume 1. - No. 1-3. - P. 3-9). Throughout the entire treatment and cleaning procedure, the root canals were washed generously with a heated 5% sodium hypochlorite solution, maintaining the patency of the apical foramina.
| Rice. 17 a, b Preparation of the mesial buccal root canal |
Rice. 18. Such “commas” are often mistaken for the mouth of one channel with a C-shaped cross section
| Rice. 19 a, b. Shape of the root canal orifices of 3.7 teeth treated with ProTaper files: distal, mesial lingual and buccal, respectively |
Medicinal cleaning of the root canal system
Even such a renowned endodontist as Dr. Clifford J. Ruddle is not able to completely treat the canal with instrumental methods alone (Fig. 20 a). According to Markus Haapasalo, up to 40% of the surface of the root canal walls in molars remains completely unaffected by instruments (Fig. 20 b) (Haapasalo, Markus. Current Concepts In Root Canal Disinfection. - August, 2007. - Plenary report, 7th World Endodontic Congress, Vancouver , Canada).
| Rice. 20 a.m. Status of the endosystem before (red) and after (green) instrumentation (reprinted with permission from Dr. Clifford J. Ruddle) b. Areas unaffected by instruments are shown in red (M Haapasalo. IFEA-2007) |
The difficulties encountered when machining branched multiapex systems with deltas and lateral canals are easier to visualize using 3-D visualization (Fig. 21 a, b):
| Rice. 21 a, b. Examples of complex endo-systems (3-D Interactive Tooth ATLAS) | |
In connection with the above, including the problems of eliminating the smear layer and biofilm and the influence of these factors on the success of endodontic treatment, it seems extremely important to carry out disinfection of the root canals (Fig. 22, 23). (This article is not intended to describe a specific disinfection protocol; the main thing is to choose the right strategy. – author’s note)
| Rice. 22 a, b. Surface and cross section of the root canal wall: pulp tissue, organic and inorganic dentin, microbes | |
| Rice. 23 a, b. Surface and cross-section of the root canal wall after treatment with the NaOCl - EDTA irrigation system: dentinal tubules are completely open, calcospherites are cleaned | |
The amazing regenerative properties of the biofilm, its increased resistance to antimicrobial treatment, its ability to form an intercellular matrix and firmly attach to the dentinal base with subsequent rapid implementation into the canal - all this has attracted the close attention of researchers (Fig. 24 ac).
| Rice. 24 ac. Surface and cross section of the root canal wall: rapid growth of a colony of microorganisms on the cleaned surface; spread deep into the dentinal tubules | ||
(Images 22-24 taken with a scanning electron microscope; presented by M.Haapasalo, IFEA-2007, Current Concepts In Root Canal Disinfection)
In order to improve the long-term prognosis of treatment of root canal systems and minimize infectious manifestations, the latest scientific publications recommend, in addition to irrigants, the use of intracanal disinfecting agents - ozone and laser therapy, as well as a very effective method of photoactivated sterilization.
Let's return to our clinical case. After rotary treatment, the root canals were washed for 10 minutes with a heated 5% NaOCl solution, activating the process with ultrasound: ultrasonic file No. 10 was immersed 2 mm shorter than the working length at the lowest frequency, the solution was changed every 30 seconds (Fig. 25).
| Rice. 25. Irrigation of the root canal system under the influence of ultrasound |
Photodynamic sterilization of the lumen and walls of the canals
Required equipment and materials (Fig. 26 a, b): 100 mW diode laser, tolonium chloride solution at a concentration of 12.7 mg/l (pharmaceutical form of the vital dye toluidine blue O).
| Rice. 26 a, b. Diode laser, wavelength - 635 nm |
Tolonium chloride is a photosensitizer, that is, a chemical compound capable of entering into a light-initiated radical reaction with molecular oxygen, forming atomic (singlet) oxygen. The photosensitizer is absorbed by liposomes of the cell wall of microorganisms, then activated by light with a wavelength of 635 nm, which leads to the release of singlet oxygen, causing oxidative destruction of the bacterial cell membrane. At the end of exposure to light, the photosensitizer returns to the unexcited state (Fig. 27 a, b).
| Rice. 27 a. Addition of tolonium chloride solution | b. Photoactivation process |
Obturation of root canals
The root canals are filled using the vertical condensation technique of hot gutta-percha according to Schilder. But the three components of our “comma” are clearly visible (Fig. 28 ac):
| Rice. 28 ac. Three components of the “comma”, the mouth of: a – distal, b – mesial lingual and c – mesial buccal root canals |
Direct restoration of the dental cavity
The procedures for surface etching with phosphoric acid, adhesive cavity preparation and polymerization of the composite material were carried out according to the manufacturer's instructions (Fig. 29-31).
| Rice. 29. Surface etching with 37% H3PO4 solution | Rice. 30. Light polymerization of the composite |
| Rice. 31. The tooth is restored with core material for the purpose of further prosthetics with a metal-ceramic crown |
Control radiographs
The root canals of 3.7 teeth are 3-D obturated; the sealed lateral canal is clearly visible (Fig. 32 a, b):
| Rice. 32 a, b. Control radiographs 3.7 |
As a spatial illustration, we present an endo-system with a similar lateral channel from the 3-D Herbranson Atlas (Fig. 33 a, b):
| Rice. 33 a, b. Root canal with S-shaped cross-section and lateral branch (3-D Interactive Tooth ATLAS) | |
Control inspection
- The pain in the area of the 3.7 tooth stopped the next day.
- The patient was prescribed installation of implants in positions 3.5 and 3.6, followed by prosthetics with metal-ceramic crowns on the implants and 3.7 tooth.
Errors and complications associated with creating endodontic access
Insufficient removal of the arch of the dental cavity (Fig. 1).
Rice. 1. Insufficient removal of the arch of the tooth cavity
Causes:
- insufficient knowledge of the topographical features of the tooth cavity;
- non-compliance with the rules for opening the tooth cavity.
Prevention:
- knowledge of the topographical features of the tooth structure;
- following the algorithm for opening the tooth cavity.
Endodontic treatment begins with the complete removal of carious tissue and poor-quality restorations. The opening of the tooth cavity is carried out with a spherical diamond bur. To expand the cavity, it is better to use cylindrical burs or mechanical wellhead files. The most rational approaches to the dental cavity are considered coronal-apical and mesiodistal. They make it possible to minimize the number of errors at the initial stage of processing and not to lose the correct direction of the tool in the channel. To check the free access of the instrument into the canal, the “hanging” instrument rule is used: the instrument must enter in a straight line without bending at the mouth.
Perforation of the bottom or walls of the tooth cavity is one of the most common complications during mechanical treatment of the tooth cavity and root canals.
The problem of tooth perforation appeared with the introduction into practice of drills in 1871 and special instruments for mechanical expansion of root canals (Gates Glidden, Beutelrok, Drill reamer, etc.). Even then, there was an increase in the number of complications. The factors leading to the occurrence of perforations were pointed out by the dentist M. Morgenstern in 1901: if “... careless handling of root drills when using an electric drill, it is easy to drill the root.” Currently, dentists make the same mistakes as they did a hundred years ago.
Perforation of the bottom of the tooth cavity is caused by excessive preparation with a bur during the search for the mouths of the root canals. This happens especially often when re-treating a tooth previously treated with the resorcinol-formalin method, since the search for the mouths of the canals is complicated by the changed color and structure of the dentin of the bottom of the tooth cavity.
The prerequisites for the occurrence of perforations of the bottom and walls of the tooth cavity are:
- displacement of the tooth axis in the lingual or buccal direction;
- reduction in the height of the tooth crown due to significant abrasion of the chewing surface or deposition of a large amount of replacement dentin;
- endodontic treatment of a tooth through an artificial crown.
Clinically, perforations of the bottom or walls of the tooth manifest themselves in the form of a characteristic “sinking” of the instrument, bleeding and a sharp pain in the patient during treatment without anesthesia. Touching the site of a fresh perforation with a probe also causes acute pain.
Perforation of the tooth crown at the level of the neck, walls of the crown cavity, bottom of the crown cavity and in the bifurcation area (Fig. 2, 3):
Causes:
- poor knowledge of topographical features of teeth;
- rough preparation without taking into account the position of the tooth and its working length;
- excessive expansion of the root canal orifices, sometimes as a result of an attempt to detect the orifice of a sclerotic canal;
- incorrect choice of tool and violation of the methodology for its use;
- an attempt to prepare curved root canals.
Prevention:
- indication of root canal orifices using dyes;
- compliance with the principles of preparation taking into account the topography of the teeth;
- compliance with the rules for using endodontic instruments;
- knowledge of topographical features of teeth;
- avoiding forced passage of narrow and obliterated root canals and irrational use of machine instruments;
- periodic x-ray monitoring during the passage of root canals.
Rice.
2. Perforation of the tooth cavity Fig. 3. Perforation of the bottom of the tooth cavity. Fracture of the vestibular or lingual wall of the tooth.
Causes:
- wrong direction of bur;
- excessive pressure on the boron.
Prevention: careful use of a boron.
Three complex curvatures of one root canal
initial situation
Complaints of discomfort in the area of the upper right incisors and the presence of a fistula. Lateral incisor with a “creeping” composite restoration of reduced aesthetics, dark color of the cervical part; endodontic treatment was not performed. A Straumann implant with a narrow neck is installed in the area of the central incisor. At the implantation stage, the neurovascular bundle of tooth 1.2 was disrupted, which caused pulp necrosis.
Formation of access
Analysis of the radiograph of 1.2 teeth revealed 3 severe curvatures of the root canal (Fig. 34).
Rice. 34. X-ray 1.2 with a gutta-percha cone in the fistula tract
When opening the cavity, hemorrhagically altered replacement dentin was discovered:
| Rice. 35 ac. Formation of access to the mouth of the root canal of 1.2 teeth |
Extremely atypical anatomy - the mouth of the root canal is located not at the bottom of the pulp chamber, but on the wall!
Instrumental cleaning, irrigation and disinfection
It is very difficult to effectively irrigate a curved root canal without proper instrumentation; in this case, it is a silicone nozzle for a syringe manufactured by Vista Dental Products (Fig. 36):
| Rice. 36. Flexi-Glide Silicone Tip, Vista Dental Products |
The root canal is expanded with ProTaper instruments (Fig. 37) with copious irrigation with hot 5% sodium hypochlorite (NaOCl) solution; ProTaper Protocol: Printed Version - Clifford J. Ruddle. Form of success. // Clinical endodontics. – 2007.– Volume 1. – No. 1-3.– P.3-9
| Rice. 37 ac. Shape of the root canal mouth of 1.2 teeth: sequential increase |
At the end of the medicinal treatment, photodynamic sterilization of the lumen and walls of the root canal was carried out with tolonium chloride solution at a concentration of 12.7 mg/l (Fig. 38):
| Rice. 38. Photoactivation of the sterilization process |
Obturation and restoration
The root canal of 1.2 teeth was filled using the vertical condensation technique of hot gutta-percha according to Schilder; the coronal part and palatal surface were restored with a hybrid composite (Fig. 39, 40).
| Fig.39. Gutta-percha level – 2 mm below the periodontal junction | Fig.40. Completed direct restoration |
X-ray inspection
The 3D root canal is obturated, repeating the anatomical configuration, the apical curvature and delta are sealed (Fig. 41).
Rice. 41. Control radiograph 1.2
Control inspection
- A week later: no complaints, the fistula closed.
- The patient was recommended to remove the implant, orthodontic treatment, followed by bone grafting and correct installation of the implant in position 1.1 of the tooth.
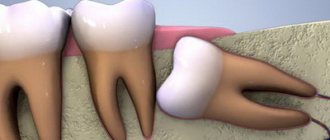
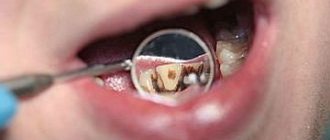
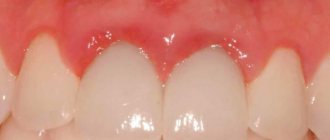
When is root canal treatment necessary?
Treatment and filling of canals are stages of endodontic treatment. The doctor opens the tooth to treat the following diseases:
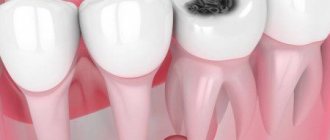
- deep caries - the last stage of the disease, characterized by extensive damage to dentin, accompanied by severe toothache that appears when chewing, pressing on the tooth, eating cold and hot foods and drinks;
- pulpitis - inflammation of the neurovascular bundles located in the tooth cavity, most often occurs against the background of advanced caries, characterized by paroxysmal pain, which intensifies when eating hot or cold food;
- periodontitis - inflammation of the apex or edge of the tooth root, develops due to damage to the connective tissue that holds the dental unit; symptoms of the disease are acute pain, swelling of the gums, swelling of the lip or cheek, as well as pathological mobility of the tooth.
The main reason for the development of these diseases is non-compliance with the rules of oral hygiene. If you brush your teeth twice a day and visit the dentist regularly, these problems can be avoided. Experts recommend undergoing a preventive examination every six months. In this case, the doctor will be able to detect caries at an early stage and promptly eliminate it, thereby preventing the development of pulpitis and other complications.
Introduction
A broken instrument in the tooth and one untreated canal is the background to this clinical case, which was encountered in the practice of the German Implantology Center.
A direct participant in the events, the doctor who saved the patient’s tooth, endodontist of the German Implantology Center Melikov Azer Fuadovich, tells about this interesting case, when it was necessary to remove an instrument previously forgotten by one of the doctors from the root of a tooth:
The patient was referred to me by a colleague from another clinic after obturation of 2 root canals of a tooth, to remove a broken instrument during the work. A broken and forgotten instrument in a canal is not good. During the initial CBCT diagnosis, we identified the fact that the broken instrument was located in the root canal.
The fact that an instrument was left
and in this form it was sealed - this is an extremely negative point. But the situation was complicated by the undertreatment of the tooth as a whole, since during the examination a missed 4th root canal was discovered:
The patient was sent to me with a temporary filling, which I immediately removed. Here is a view of the tooth cavity after removing the temporary filling and monitoring the location of the fragment of the broken instrument in the root canal:
It is necessary to evaluate the situation with an open, unfilled canal missed during treatment for the first time. All work of this level is carried out exclusively using a microscope
, about which there will be a short video at the end of the article. In the following image you can see the appearance of the tooth cavity after removing the temporary filling and checking the missed canal before starting work: