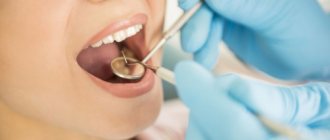
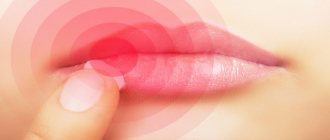
When we hear the phrase “ adhesive systems ,” we imagine something complex and not fully understood. And they are increasingly trying to simplify this, reducing the entire system to one jar of homogeneous liquid. Is this necessary? In this article we will find out what place adhesive systems occupy in dentistry.
Dental composite materials do not have independent adhesion to tooth tissue; this requires an intermediary that will provide strong adhesion. It is for this reason that we resort to these “adhesive systems”. Adhesive systems are a very important link between restoration and tooth tissue, so it is very important to understand what they consist of, how they work and what they are “not eaten with”.
Because enamel and dentin have a completely different structure, and the adhesive systems for them are different.
Enamel bonding agents (enamel adhesives) consist of low-viscosity monomers of composite materials, which, due to micromechanical adhesion, ensure adhesion to tooth enamel. Enamel adhesives are hydrophobic, so before applying them, the enamel must be thoroughly dried (should be matte, chalky white). It should be noted that these adhesives do not provide adhesion to dentin, so it is necessary to either isolate the dentin from toxic effects with an insulating lining, or use an adhesive system for dentin (primer).
Adhesive systems for dentin
Ensuring good adhesion of a hydrophobic material to a hydrophilic one is quite a difficult task, which they have been trying to solve for many years. In a fairly short period of time, several generations of adhesive systems for dentin have changed, with development going in two directions - simplifying the procedure for use and improving the adhesion itself. But we all know that simple and high quality are far from synonymous. The term “generation” does not, by and large, have any scientific basis; nevertheless, it allows us to structure in a certain way the whole variety of adhesive systems present on the market today. Belonging to a particular generation is determined by the chemical composition, mechanical adhesion indicators and ease of use.
1st generation adhesive systems
The first generation of adhesive systems has fairly strong adhesion to enamel, but minimal adhesion to dentin. The adhesion mechanism is carried out due to the interaction of calcium, which is part of the teeth, and the bond. After some time, postoperative sensitivity appeared, because the restoration in the dentin was “dangling”, holding on to the enamel with all its might. These generation adhesive systems have been recommended for use with Class III and V cavities only.
2nd generation adhesive systems
The main difference between the second generation adhesive system and the first is that this adhesive will interact with the smear layer, which was not previously involved. But this improvement only helped to slightly increase the period of stay of the restoration in the oral cavity. Postoperative sensitivity was still observed and about one third of the restorations required replacement after a year.
3rd generation adhesive systems
After some time, scientists were able to develop a two-component adhesive system that ensured adhesion of the composite to both enamel and dentin (adhesion values of 8-15 MPa), but apparently it was still not good enough. Postoperative sensitivity decreased significantly, the service life of the restoration increased, but most restorations required replacement after 3 years.
4th generation adhesive systems
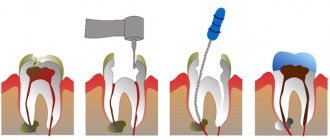
4th generation adhesive systems were quite a big leap in the entire history of adhesive systems and are still the “gold standard”. As I said, simple and high quality are far from synonymous. Postoperative sensitivity decreased even more, and the adhesion rate doubled. The technique of total etching and wet dentin bonding appeared for the first time. These adhesive systems owe much to the hybrid layer that forms between the dentin and the composite. After etching, the adhesive interacts with the collagen fibers of dentin, penetrating the dentinal tubules and forming an intermediate layer that is neither dentin nor adhesive, which is called hybrid.
The main disadvantage of these systems is the difficulty of use, because All the necessary components (there are three of them) must be mixed in precise proportions. It was due to these inaccuracies that problems arose when using these systems.
As we have already said, these adhesive systems contain 3 components:
1) Conditioner (phosphoric acid in the form of a gel for etching enamel and dentin);
2) Primer (a mixture of hydrophilic low molecular weight compounds that penetrate wet dentin, saturate it and form a hybrid layer);
3) Enamel adhesive system (unfilled resin that ensures the bond of the composite with the hybrid layer and tooth enamel).
Stages of working with 4th generation adhesive systems Type 1:
Provides for cleaning only enamel.
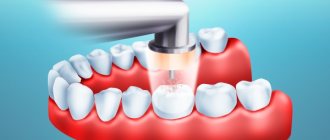
- Etching the enamel surface for 20-30 seconds using 37% phosphoric acid, which is part of the etching gels;
- Removing the etching gel with a stream of running water for 20-30 seconds (you need to wash it off for the same number of seconds as you etched it).
- Drying the enamel and controlling the quality of the etching (etched enamel has a matte tint);
- Applying primer to the dentin of the carious cavity using an applicator (exposure 10 seconds);
- Distribution of the primer using a weak stream of air (in this way, excess is removed and the primer penetrates more deeply into the dentinal tubules).
- Introducing the enamel adhesive system into the carious cavity using an applicator (applied to prepared enamel and dentin);
- Distribution of the enamel adhesive system using a weak air stream;
- Photopolymerization of adhesive and primer;
- Addition of composite material.
Type 2:
Provides for complete dissolution of the smear layer by etching dentin with phosphoric acid.
Stages of working with 4th generation adhesive systems Type 2:
- Etching the enamel surface for 15 seconds using 37% phosphoric acid, which is part of the etching gels, adding the gel to the dentin for 15 seconds;
- Removing the etching gel with a stream of running water for 30 seconds;
- Drying enamel and dentin (quality control of etching - etched enamel has a matte tint, dentin should not be overdried - moist, shiny);
- Applying primer to the dentin of the carious cavity using an applicator (exposure 10 seconds);
- Distributing the primer using a gentle stream of air;
- Introducing the enamel adhesive system into the carious cavity using an applicator (applied to prepared enamel and dentin);
- Distribution of the enamel adhesive system using a weak air stream;
- Photopolymerization of adhesive and primer;
- Addition of composite material.
Vacuum therapy in the treatment of wounds and wound infections
About the article
42902
0
Regular issues of "RMZh" No. 17 dated 08/03/2010 p. 1064
Category: Surgery
Authors: Obolensky V.N. 1, Semenisty A.Yu. , Nikitin V.G. , Sychev D.V. 1 State Budgetary Educational Institution of Higher Professional Education “RNIMU named after. N.I. Pirogov" Ministry of Health of the Russian Federation, Moscow; GBUZ "City Clinical Hospital No. 13" DZM, Moscow
For quotation:
Obolensky V.N., Semenisty A.Yu., Nikitin V.G., Sychev D.V. Vacuum therapy in the treatment of wounds and wound infections. RMJ. 2010;17:1064.
One of the newest methods used in the treatment of both acute and chronic wounds is the local use of vacuum dressings - the Vacuum-assisted closure (VAC® therapy) method, the Topical negative pressure (TNP) principle (Fig. 1).
Topically used vacuum dressings generally consist of a hydrophilic polyurethane (PU) sponge with a pore size of 400 to 2000 micrometers, a clear adhesive coating, a non-collapsible drainage tube, and a vacuum source with a fluid collection container. In certain cases, a polyvinyl (PVA) sponge with a pore size of 700–1500 micrometers can be used, and there are references to a PVA sponge with a pore size of 60–270 micrometers. Special vacuum equipment has an external control device that supports a wide range of negative pressure values and is capable of providing a mode of continuous and intermittent vacuum exposure to the wound [1,2]. For flat surface defects, to increase the reliability of the system's tightness, Stomagesiv paste (or its analogue) can be applied around the perimeter of the wound. A negative pressure of –50 to –200 mmHg is used. Art., the optimal level of negative pressure in the wound is –125 mm Hg. A combination of drainage-flushing and vacuum systems is also used - vacuum-flushing therapy (Vacuum Instillation Therapy), when in addition to the described VAC system, inflow drainage is supplied (Fig. 2). In cases of severely infected wounds, in purulent cavities, and with osteomyelitis, washing is carried out with antiseptic solutions and solutions containing antibiotics; in case of severe contact pain of the wound, anesthetics are used; in order to create a moist environment in aseptic wounds - Ringer's solution. Please note that hydrogen peroxide solution is not recommended for use in vacuum flushing therapy, because H2O2 can damage tissues, cause gas embolism, and in addition, destroys the structure of the PU sponge [2]. Vacuum therapy improves the course of all stages of the wound process: it reduces local swelling, as a result, it increases local blood circulation, reduces the level of microbial contamination of the wound, causes deformation of the wound bed and a reduction in the wound cavity, leading to accelerated wound healing. Vacuum therapy also reduces the severity of wound exudation, helping to maintain a moist wound environment necessary for normal wound healing. All these effects contribute to an increase in the intensity of cell proliferation and enhance the synthesis of the main substance of connective tissue and proteins in the wound [3]. Effects of vacuum therapy: 1. Active removal of excess wound discharge, including substances that slow down wound healing (for example, matrix metalloproteinases and their breakdown products). 2. Preservation of a moist wound environment that stimulates angiogenesis, enhances fibrinolysis and promotes the functioning of growth factors. 3. Acceleration of the reduction of bacterial contamination of wound tissue. In studies by DeFranzo AJ et al. and Morykwas M. et al. it has been proven that wound decontamination below the critical level with vacuum therapy is achieved by 4–5 days versus 11 days with other methods of local wound treatment [4,5]. 4. Reducing local interstitial tissue edema, reducing intercellular pressure, increasing local lymph circulation and transcapillary transport, which as a result improves the wound environment and tissue nutrition and increases the rate of formation of granulation tissue, and improved perfusion of the wound bed additionally contributes to wound decontamination. 5. Strengthening local blood circulation. In studies by Morykwas M. et al. it was found that the increase in the intensity of local blood circulation at a level of negative pressure is 125 mm Hg. reached approximately 400% relative to the initial level, and the use of local intermittent vacuum for 5 minutes at a level of 125 mm Hg. followed by the absence of vacuum exposure for 2 minutes is the most optimal treatment regimen for the wound to stimulate local blood circulation [5,6]. 6. Deformation of the tissue bed. The walls of the open pores of the sponge are attached to the wound bed, while the inside of the pores does not come into contact with the wound. Thus, due to local negative pressure, stretching and deformation of the tissue of the wound bed occurs. This causes deformation of the cells of the evacuated tissues and stimulates cell migration and proliferation. This is similar to the process of cell proliferation that occurs when using the method of dosed tissue stretching in plastic surgery, as well as when using distraction bone devices in traumatology, orthopedics and maxillofacial surgery. In vitro studies have shown that stretching cells promotes their proliferation, while unstretched cells lose the ability to divide as vigorously. Experimental study of this effect made it possible to explain it by the structural features of the cytoskeleton and the presence of indirect connections between the cell wall and the cell nucleus. These connections in the experiment transmit mechanical tensile forces from the cell wall to the cell nuclei, leading to a series of events that result in an increase in the production of growth factors, tissue proteins, and gene expression, which induces adaptive changes in cells and enhances the process of cell proliferation [1,7] . 7. Reducing the area of the wound. Direct application of negative pressure to the wound base and edges under conditions of external isolation has a permanent effect on the wound edges, promoting wound contraction. This effect directly reduces wound size, regardless of the intensity of cell proliferation [8]. Vacuum therapy, by improving the quality of granulation tissue, increases the chances of success in closing the wound with local tissue. Due to the fact that a vacuum dressing reduces the size of the wound, preliminary stretching of local tissues before plastic surgery may not be necessary [1]. Applying a vacuum bandage to a transplanted split skin flap improves the adaptation of the flap to the wound surface, allows you to remove excess wound exudate, stimulates angiogenesis and protects the transplanted flap from displacement. To use the vacuum therapy method after performing free skin grafting and covering skin flaps with a vacuum bandage, it is recommended to use a negative pressure level from –50 to –75 mm Hg. instead of the often used -125 mm Hg. The additional use of a non-adhesive barrier (or dressing) between the sponge and the skin grafts is often recommended to avoid ingrowth of healthy mature tissue into the sponge structure and accidental damage to the skin grafts when changing the dressing. The dressing remains on the wound continuously for at least 4 days [9]. 8. Wound hypoxia. The direct effect of vacuum on the wound bed leads to a local decrease in the partial pressure of oxygen in the wound, but this stimulates the formation of new vessels and further improvement in the quality of granulation tissue [10]. This ultimately ensures increased tissue oxygenation. 9. Cost reduction. Vacuum dressings are applied continuously for a long period of time (on average from 3 to 7 days), which allows you to do without dressings even in the first phase of the wound process, saving dressings, topical medications, as well as the effort and time of medical personnel. 10. Prevention of nosocomial infections. The long-term absence of dressings for an inpatient, and therefore the contact of the wound with instruments and the air of the hospital, with the hands of medical personnel, reduces the risk of contamination of the wound surface with hospital strains of microorganisms. 11. Strengthening the effect of drug treatment. In conditions of increased local blood and lymph circulation and transcapillary transport, improved perfusion of the wound bed, the concentration of parenterally and orally administered drugs in the wound tissue also increases, which also increases the overall effectiveness of treatment. The literature mentions the use of vacuum therapy for a wide variety of pathologies: acute trauma, various wounds, burns and frostbite, osteomyelitis, necrotizing fasciitis, bedsores, purulent wounds and trophic ulcers, diabetic foot, lymphostasis, maxillofacial, spinal, thoracic, plastic and reconstructive surgery, in pediatrics, as well as for peritonitis, intestinal fistulas and abdominal trauma, leakage of intestinal anastomoses and accompanying pelvic abscesses [2,11–14]. Our experience in using vacuum therapy is based on the results of treating more than 100 patients with surgical and trauma pathology. There are VAC systems in the USA, which, however, are not represented on the Russian market. We use original, similar modifications: the dressing consists of a drainage tube connected to the wound through a counter-aperture with additional sections for better outflow from the wound, a foam rubber sponge, which is placed in the wound in two layers to cover the entire surface of the wound, and the drainage is located between the layers of foam rubber (another option – one layer of sponge on the wound with drainage supplied to its surface using an elastic flat adapter); Next, the wound is covered with a film for the surgical field; the drainage tube is connected to a medical suction B-40A (Belarus) for active aspiration in non stop mode. This suction operates almost silently; allows you to set the level of negative pressure from 25 to 200 mm Hg. (8 gradations). In some cases, with a large volume of the wound cavity, the sponge is placed in several layers until it is filled. If there is a narrow and long wound channel or a deep cavity with a narrow entrance, the sponge is wrapped and fixed around the drainage. If there is a bone in a traumatic wound with damaged or necrotic periosteum, the latter up to the sponge is covered with a hydrogel dressing material (for example, Hydrosorb, Gelepran or Cica-Care). When applying a vacuum-assisted laparostomy, when the bottom of the wound is intestinal loops, for example, an Atrauman Ag dressing is placed under the sponge. We did not find any references in the literature to the use of VAC therapy for certain types of pathology, which were successfully treated with vacuum-assisted dressings and vacuum instillation therapy in our clinic. For example: infected necrotizing pancreatitis in the stage of development of phlegmon of the retroperitoneal and paracolar space, retroperitoneal phlegmon of the small pelvis (3 patients); multiple intestinal fistulas opened into a purulent-necrotic wound of the anterior abdominal wall (3 cases); widespread actinomycosis of the lumbar region, retroperitoneal and paranephric space (1 patient); extensive suppuration after repair of a ventral hernia with prolene mesh (2 patients); purulent complications of endocorrection of scoliosis (5 cases); Moreover, in the last two examples, all foreign bodies (mesh, endocorrectors) were preserved, and the inflammatory process was stopped. As for vacuum flushing therapy, in our opinion, it is more expedient when inflow drainage, in addition to the described VAC system, is brought directly to the wound bed (to the bottom of the wound). The antiseptic solutions we use or hyperbaric oxygenated antiseptic solutions in this modification of the vacuum dressing wash the tissues of the wound bed, all layers of the sponge, and only then are aspirated (Fig. 3). Summarizing the vacuum therapy guidelines indicated in the FDA-approved (VAC® therapy Guidelines), literature data and our own experience, we can determine the following general indications and contraindications for use method: • Indications – foot wounds with diabetes mellitus; bedsores; chronic trophic ulcers of various etiologies; acute and traumatic wounds, primary and secondary open fractures, including those with metal structures in the wound; complicated surgical wounds, including laparostomies, exposed extensive and deep phlegmons of the retroperitoneum and pelvis, intestinal fistulas opened into the wound; scalp and burn wounds, skin grafting with local tissue and free skin flaps. • Contraindications – malignancy of wounds, unsanitised foci of osteomyelitis, bleeding in the wound, necrotic wounds and wounds represented by scar tissue, intestinal purulent fistulas requiring examination, wounds, part of which are the walls of internal organs or vessels (however, in some cases, for example, when applying vacuum-assisted laparostomy, when the bottom of the wound is intestinal loops, the latter can be protected by applying a non-adhesive barrier under the sponge - an Atrauman Ag dressing or another). In addition, the patient’s inadequacy or mental illness may also be a contraindication. • Adverse events – pain, excessive ingrowth of granulations into the hydrophilic sponge, tissue bleeding when changing the vacuum dressing, drying out and necrotization of the wound when the dressing is depressurized, and in some cases, reinfection of the wound and/or development of perifocal erysipelas.
Content is licensed under a Creative Commons Attribution 4.0 International License.
Share the article on social networks
Recommend the article to your colleagues
5th generation adhesive systems
In the 5th generation adhesive systems, the mixing problem was eliminated - the “one bottle” concept was implemented, i.e. the adhesive and primer were placed in one container (they became one-component).
The use of one-component systems also involves total etching of enamel and dentin. The mechanism of their connection is similar to the mechanism of adhesion of 4th generation systems. These materials have good adhesion rates to enamel, dentin, ceramics and metal (at the level of 20-25 MPa), but their most important advantage is the absence of the component mixing stage, the poor performance of which led to a decrease in adhesion rates in fourth-generation systems.
Fifth generation adhesive systems are still the most popular because they are easy to use and give predictable results. Postoperative sensitivity when using them is also low. But the strength of adhesion, whatever one may say, is worse than that of our “gold standard” - the fourth generation.
Principles of working with adhesive systems
There are no special principles for working with adhesive systems, unlike the previous ones, but still consider
I understand that this should be stated.
- Etching the enamel surface for 15 seconds using 37% phosphoric acid, which is part of the etching gels, adding the gel to the dentin for 15 seconds;
- Removing the etching gel with a stream of running water for 30 seconds;
- Drying enamel and dentin (quality control of etching - etched enamel has a matte tint, dentin should not be overdried - moist, shiny);
- Application of the adhesive system to the enamel and dentin of the carious cavity using an applicator (exposure 15 seconds);
- Distribution of the adhesive system using a weak air stream;
- Photopolymerization of the adhesive system;
- Addition of composite material.
6th generation adhesive systems
The next task of developers when improving adhesive systems was the need to remove the etching stage from the list of procedures performed. In sixth generation systems this problem has been solved.
Generation 6 adhesive systems are one-step, self-etching systems that come in 2 bottles and require mixing immediately before use. The system is then applied to the enamel and dentin. At the same time, etching, diffusion into the tooth tissue and the formation of a hybrid zone are ensured.
Compared to adhesive systems of the 4th and 5th generations, they are easier to use, working with them requires less time due to the reduction in the number of steps, and the risk of technical errors is reduced.
However, adhesion to dentin (18-23 MPa) remains virtually unchanged over time, while adhesion to enamel deteriorates.
Stages of working with 6th generation adhesive systems:
- outside the oral cavity, the components of the adhesive system are mixed (inside a disposable package or in a special cell);
- applying the adhesive system to the enamel and dentin of the carious cavity using an applicator (exposure 15 seconds);
- distribution of the adhesive system using a weak air stream;
- photopolymerization of the adhesive system;
- introduction of composite material.